close

Apps

AppsTechnology News

Android.Process.Acore Error Fixing

Android.Process.Acore Error Fixing

Multiple bugs and glitches are there, which begin displaying as your mobile gets old. For example, while going to the contact list or calling someone, a message will appear in front of the showing ‘unfortunately, the process android.process.acore has stopped’. It is one of the bugs caused for a few reasons.

When you tap on OK, the pop-up temporarily will disappear, but it can come back. It becomes irritating when you don’t know the reason for the issue. This guide will let you know how to fix the problem.

What is an android.process.acore?

android.process.acore is a type of bug caused in Android devices.

What Causes the android.process.acore Keeps Stopping problems on your Android device?

Many reasons let you know why the issue occurs on the android phone. We have given some common reasons why the issue causes on your device.

  • Corrupted cached data of the Contacts app
  • Outdated Android OS
  • Not having sufficient storage space
  • Apps are not updated
  • Your mobile is having a virus or some glitches or bugs.

How To Fix Android Process Acore Keeps Stopping Issue:

Check For Updates And Restart Your Device:

If you encounter such an issue, you have to begin checking the updates, and then you need to reboot the mobile. Your first task is to navigate to the Android Play Store to check if any update is there. After that, your task is to update your apps where updates are available.

The android.process.acore has stopped working if you don’t update apps for a long time. As soon as you update all the apps to the recent version, you have to reboot the device. However, it will help you to solve the problem.

Remove And Add Your Google Accounts:

You can try removing the Google accounts from the mobile. In this case, you have to navigate to the settings, then to the Accounts and Google. You can now open your Google accounts. After opening the Accounts, you have to remove them from the mobile. It helps to resolve problems with your contacts or Google accounts, which is why the issue occurs. Finally, reboot the Android mobile and add all the accounts.

Reset App Preferences To Default:

If you’re willing to solve the android.process.acore has ‘stopped’ error, try to reset the app preferences to default. Next, you should check whether you have mistakenly disabled any vital system or not. The reason is that disabling any system app can cause the ‘android.process.acore keeps stopping’ issue.

If you are willing to fix it, your first job is to move to the phone settings and open it. Then, proceed to apps and notifications, and then to manage apps. Next, hit the three dots on the display’s top-right side. Next, you should choose reset app preferences and hit the ‘reset apps’ option.

Clear All Data From Contacts:

You can clear the data from contacts to fix the problem. Try to clear all data, including the cached data, to solve the error caused due to some bug or glitch.

If you want to remove data from contacts, you have to open the mobile settings, go to apps and notifications, and manage apps. After that, you have to find ‘contacts’ from the list of applications and open them. Next, you must hit the ‘clear data’ option at the display’s bottom. Lastly, you have to hit the ‘clear all data’ option.

Check For Software Updates:

If you don’t update the software, it can lead to bugs and glitches in the software, due to which the issue occurs. Whether you find android.process.acore keeps stopping in the mobile; check if any software update is available. If you are willing to check software updates, your first job is to move to Settings. Then, navigate to the About the phone, and check for updates. Now, your task is to download updates available for the software, if any, and then reboot the computer to solve the problem.

Update Messaging Apps:

Do you use the Facebook app on the device? Then, you need to ensure that you have installed the recent app version. If you use old messaging apps, it can run into contact syncing problems which causes the “android.process.acore has stopped” error.

  • Your task is to move to the Play Store app and open it.
  • After that, your job is to hit the Google profile icon available in the upper-right.
  • Now, click on Manage apps & device.
  • You can see all available updates on the Overview tab.
  • Click on the individual installed apps to update. Then, if you are willing, hit the Update All option to download all available updates.
  • If it cannot solve the issue, you can continue with other fixes.

Disable Sync for Facebook:

Syncing problems with Facebook can cause the ‘android.process.acore has stopped’ error. Therefore, you have to stop syncing for Facebook and apps, including Facebook Messenger.

  • First, your task is to tap on Settings on the Android device and open it.
  • After that, you have to navigate to the Accounts section.
  • Hit Facebook, Account Sync, and disable it after that.
  • You have to click on Messenger, Account Sync, and turn it off.
  • Reboot the mobile to check if you see the pop-up message appearing again. Then, if you are willing, uninstall and reinstall them on the device again.

Reinstall Messenger Apps:

Whether you cannot fix the account syncing issue, try to uninstall and reinstall the app. If you are willing to reinstall, move to the Google Play Store and find the Messenger app. After that, you need to head toward the app description page and open it. Then, hit the Uninstall button.

In an alternative way, you have to hit the app icon. Next, your task is to choose the Uninstall option from the pop-up menu. As soon as you uninstall the app, you should navigate to the Google Play Store. After that, you should try to install your application again. Finally, try to use your mobile and check if the issue can pop-up still.

Clear System Cache Partition:

Wiping the cache partition of the mobile help you to fix the problems on your mobile, including random glitches and errors. It can remove any temporary or corrupted data on your mobile. But ensure that you should proceed with the steps with caution. You have to back up the data to recover it later when you format your mobile accidentally.

  • You have to switch off the mobile.
  • Your job is to tap on the Power+ & Volume Down buttons simultaneously. However, you can find the combination differently on the device. Hence, you have to check it by searching “How to open recovery menu on <your phone model>” in Google.
  • The device starts booting into recovery mode when you tap on the right key combo.
  • In this case, you can take the help of volume keys to head towards the Wipe Cache Partition.
  • Hit the power button to choose and reset the cache partition.

Ensure that you are wiping only the cache partition, not your entire mobile. Otherwise, you will lose your data. Whether you tap on the wrong key combination mistakenly, you need to boot your device into download mode rather than the recovery menu, tapping and holding the power button.

Use Android Repair Tool:

If you are not willing to follow any manual ways and get rid of the problem, you should use the professional Android Repair Tool. It helps to solve the issue on the Android mobile. This one is a robust tool designed to fix Android-related problems, including Phones stuck in a boot loop, apps that keep crashing, black screen of death error, etc. First, you should download the software and install it on the PC. Then, follow the guide to solve the issue.

Factory Reset Your Device:

The final method you can try to solve this android.process.acore error is to perform a factory reset to your device. If you cannot solve the issue following the above methods, you must complete a factory reset on the android mobile. The process helps to erase all data, and you can get a backup of your data on an external SD card before performing a factory reset. In addition, it helps to reset the mobile to default factory settings and solve problems.

The Bottom Line:

These are all the methods you can apply to solve the error. Go through every step carefully to eliminate the annoying pop-up messages appearing on display repeatedly.

read more
AppsTechnology News

Google Pedometer | GMap Pedometer

Google Pedometer | GMap Pedometer

Have you heard of Google Pedometer before? However, you must know about the company at least. It is a multinational technology company offering information through the internet. Besides, it has been presenting new ideas and innovations continuously. As a user, you will never get disappointed.

What is a Pedometer?

It is a small device that you can adjust to your waist on your pants or belt. The device recognizes your movement and lets you know the number of steps you take. These are available in different options, and a few can display merely the steps. On the flip side, the fancy models help track the distance traveled, calories burned, etc. However, the primary task is to count steps.

But technology has developed for which people no more need to carry but every time while walking. Nowadays, hundreds of apps are available to help you count the number of steps. But it may seem to you that these are not accurate also. You should know that a pedometer is not correct either, and both cannot provide the exact number of steps taken, and you can get only the approximate number.

Accuracy:

Sometimes, a smartwatch is more accurate than a mobile, and it can work as an application. The reason for that is the accuracy can vary depending on the condition and the quality of the mobile. Each mobile comes with an accelerometer that can provide accurate readings. But these are not reliable as a smartwatch or a fitness band, and it is because these are mainly for Fitness and other activities. As a result, their productivity may be higher than smartphones. However, if you have a flagship or a top-end phone, this tiny device can work as an actual pedometer. These use an algorithm helping you to calculate the steps based on generated movements and forces.

What is “Google Pedometer”?

Google Pedometer uses the default sensor to count the number of steps. But it is not a website; it is an app or a feature offered by Google.

What is The Most Impressive Thing About Google Pedometer?

What makes Google maps pedometer unique is that it is beneficial both with and without a smartwatch. It means that the “Google Fit” app can help you only to keep track of steps, although you don’t have a smartwatch, and you don’t need to buy the device to keep track of your steps. Rather than that, you can download this app to keep the steps in the count. It is compatible with both Android and i0S. The company can offer multiple apps and features for people’s needs. It helps to make the lives of people easier and more efficient.

Additional Information:

Google map pedometer can offer you information on your walking, running, cycling, and other activities throughout the day. The company’s (Wear OS) smartwatch and your mobile can detect your activities. It comes with a “Google Fit Journal,” ensuring that you stay on track by keeping tabs on workouts. In addition, it can offer different other activities. You merely have to choose the activity to pursue, including pilates, rowing, or spinning. The company helps to keep track of all the activities.

Along with helping to track these activities, they help to monitor your goals and other activities. You can set the goals after installing the application. After that, you can begin to use the app. You can get a report on your daily progress to stay on track and meet goals. Thus, it can help you to keep a healthy heart and mind.

Features:

  • Google pedometer takes the help of a built-in sensor to count your steps. But it doesn’t feature GPS tracking helping you to save battery. Besides, it helps to track your burned calories, walking distance and time, etc. Moreover, it can display all information in graphs.
  • It allows you to set daily step goals. In addition, it will begin a streak when you achieve your goal for two days or more. Further, it enables you to check your streak statistics chart to stay motivated.
  • You will get all features unlocked. In addition, most features are 100% free. Therefore, you do not need to invest money to use the features.
  • With the help of the step counter, you can easily save battery power.
  • It would be best to hit the Start button only to begin counting your steps. Then, when you keep your mobile in your hand, bag, pocket, or armband, you can record your steps automatically even if the screen is locked.
  • You do not have to sign in to the step counter, and they don’t collect private data or share information with third parties.
  • It allows you to pause and start step counting whenever you are willing to save power. Besides, the app can stop background-refreshing statistics after pausing it. You can even reset today’s step count. If you want, you can start counting steps from 0.
  • The app enables you to begin a separate walking training whenever you want, like a 30-minute walking exercise after dinner. When you are in the training mode, it can offer you a function to record your active time, your distance and burned calories, etc.

More Features:

The company’s Play Best of 2017 winning team designs the step tracker so cleanly that people can use it easily.

  • One of the most innovative features of the app is its report graphs. These are designed mainly for phones to assist you in tracking your walking data. It lets you see the weekly and monthly statistics in graphs. Moreover, they can offer you many colorful themes which are currently under development. In addition, the step tracker allows you to enjoy your step counting experience with it.

The Function of the Google Pedometer:

The step tracker comes with a lever arm inside, and it moves whenever any motion comes into your body. For example, if you are in a car, bus, train, or other public transport, your body will catch the vibration. As a result, it will count the vibration as a step. Therefore, you will not get the correct result.

Important Things to Know about the Google Pedometer:

  • If you’re willing to ensure step counting accuracy, you must enter the correct details in the settings. The reason for that is you need to use this to calculate your walking distance and calories.
  • The tracker allows you to adjust the sensitivity so that it can count your steps more precisely.
  • These come with a power-saving feature. Therefore, these can stop counting steps when the display is locked.
  • If your device is of an old version, you do not get features like step counting if the display is locked. This one is not a bug.
  • It uses the company’s Maps API to overlay user data onto Maps. You can plot the course of your walk with the help of the “record” function and tap on the points two times you have walked so far. It is lucrative while planning walks, bike rides, or even car trips.

How to Use Gmaps Pedometer for a Walk/Jog/Cycle:

The Google pedometer comes with s combination of cool mapping features with a digital pedometer. This specific feature is useful for walkers, runners, and cyclists as they can track the distance. You can get a Google pedometer available at www.gmap-pedometer.com. You can set a feature to the left and a U.S. map to the right on the home page.

The section can calculate distances and draw paths automatically for runners and cyclists. Besides, it provides information on elevations. Also, the Google pedometer offers the information as a print map or as an external GPX link to load onto a GPS on mobile devices.

Steps:

Before starting, ensure that you have read the Gmap Usage Instructions. You can use Google pedometer in many ways, and we have given you the easiest way to use it.

  • First, your task is to zoom in on your preferred location.
  • After that, you should choose the recording options. Then, hit the Start recording button.
  • Next, your job is to tap on every routing point two times. Hence, you can see a colored line appearing. When you tap on the bar two times, it will increment.
  • Finally, you should save the route. Then, you can get a URL that you can bookmark and link to your route.

Google Map Pedometer to Track Your Activities:

Suppose you are willing to job around a whole campus. Then, you should know the circumference. In this case, your task is to get the map with the entire locale of the walk visually within the map range. After that, begin your recording and place your markers along the walking path. Whether you are willing to draw the path manually, you should tap the button available near manually (straight lines).

You can find map formats as the default street maps, satellite maps, a hybrid view, topographical maps, and terrain maps.

Using the Google pedometer, you can calculate your calorie consumption and elevation, and it lets you know the amount of effort you have exerted. In addition, the tracker uses Maps to chart a running route and determine the distance.

Suppose you are a marathon runner if, for the first time, you may want to know the exact distance without dragging a GPS or pedometer around on your run. G Maps can help you hence by allowing you to set it to English or metric units, and it helps to mark mileage or kilometers. In addition, it will enable you to generate a permalink to the page. Finally, you can make a shortcut to create a TinyUrl used to cut and paste into an email or bookmark.

If you are willing, you can set your map into satellite or hybrid mode, helping you to go off the right road or trail. After the completion, you can zoom out the map. After that, generate your permalinks and TinyUrls from there.

However, the mile marker can appear in the wrong place, and it doesn’t indicate the wrong mileage point along your course, and the mile marker can appear fully off of your course.

The Bottom Line:

Google pedometer offers some features to keep you fit and staying fit. The excellent features, including Fitness, regular exercise, and physical activity, are lucrative for attaining powerful muscles, bones, and better immunity.

It helps develop your respiratory, cardiovascular, and overall health. But, of course, staying fit is a more significant task than becoming fit. So, with the help of the app, users can stay active. Besides, it doesn’t display any symptoms of lethargy.

The tracker can maintain a healthy weight and decreases your risk of certain diseases & infections. When you open the app, you need to enter a little information, i.e., date of birth, gender, height, and weight.

Frequently Asked Questions:

  • Does Google have a Pedometer?

Yes, we know it as Google fit, and it has been considered a threat to Apple Health. However, whereas Apple Health is suitable for only Apple devices, it allows users to access any android device and even iOS.

Sometimes, the tracker can count steps of vibration or motion caused by bus rides or bike rides. However, it asks you also to confirm whether or not it was, and you should say no so that it doesn’t make a mistake. Ensure that optimum usage is required by completing the Google pedometer day-by-day.

  • What is Google Map Pedometer?

It is used for Running, Walking, Cycling, and Hiking.

  • Is Google Fit steps accurately?

You should enable GPS to get  99 to 100% accuracy when using it.

read more
AppsDo It YourselfInternetTechnology News

Windows 11 Tips and Tricks

Windows 11 Tips and Tricks

In the last few years, you may have tried many things and discovered innovative ways to get things done from home, like your job, homework, connecting with dear ones, etc. Nowadays, technology has progressed a lot, but still, there are many things to improve when it comes to communicating and collaborating. However, windows 11 tips and tricks can quickly fix the issue.

We have given here many windows 11 tips and tricks, letting you know that you can make most of the updated version. These new updates can offer a simple user experience that can quickly become familiar with it.

Top Windows 11 Tips and Tricks:

Get Started:

When you enable your Windows to back up your apps, Get Started will take you to a list of the apps on your old device. It allows you to select what you prefer to load on your new device. In this case, it is better to restore all of your old version photos, docs, and files to the upgraded one rather than beginning it ultimately. These prompts enable you to select what to migrate to the computer. Hence, the Get Started app can apply the preferences and settings. In addition, it allows you to transfer apps and programs.

Start and Taskbar:

These are available in the front and center. You can make these things possible with fewer clicks and swipes. First, your task is to head towards Start and find anything. After that, a centralized search allows you to find the web and computer from one place. Next, you need to look for browsers, tabs, and folders. Finally, it lets you find new visual elements and sounds, smooth animations, new buttons, toggles, and fonts. With the help of the new layout and navigation, you can make complex things easier.

Snap Assist and Desktop Groups:

These are useful in arranging the apps on the desktop. For example, if you have already opened multiple windows, you can drag these to the edge of the screen to turn on Snap Assist. It helps snap them into an arranged grid, making most of the display space. As soon as you have completed upgrading to the new version, it will remember the way you have placed the apps, whether you use external or many displays.

While plugging the computer back in, you will get everything back into its position. Desktop Groups allow you to switch between many desktops quickly. For example, suppose one may have apps including Word, Microsoft Edge, and Teams opened, whereas another may have PowerPoint, OneNote, and a music player. The new version has four standard pre-configured layouts and two extra ones for displays. In addition, it offers effective screen resolutions of 1920×1080 or higher.

Widgets:

Do you want to find things quickly that matter to you most, like to-do lists, upcoming meetings, and news? In this case, you will need one place to get things done quickly. Now, you can enjoy the Widgets in the new version’s Taskbar. Your job is to tap or swipe from the display’s left side first. Then, instead of looking for it in separate apps, tabs, and pages, it lets you see the content you curate. In addition, you can get personalized content, including reminders, stocks, sports scores, social media, and local weather. If necessary, you have to take the help of the Interests page under Manage Interests to find topics and publishers.

Microsoft Store:

The Microsoft Store is now available with a new design. It also offers different apps, shows, and movies, from casual gaming to professional editing. In addition, windows and developers combined work to provide you with more content. This new Microsoft Store features tools including Preview and Search that assist in searching for what you want.

With the help of these tools, including Dark Web monitoring, automatic price comparisons, and vertical tabs, it becomes easier to stay safe online and save money while shopping. Besides, these help to keep you organized and focused. In addition, Microsoft Edge lets you know if your password-protected on the browser matches with those available in the list of leaked credentials. After that, it will prompt you to update your password. In this case, Password Monitor helps to scan for matches. For example, you have joined a bank recently and set up your online account, and it allows you to create a secure password to keep the account secured.

While checking out, Microsoft Edge helps save more money by applying coupons to the order. In addition, using the Sleeping tabs, you can keep the focus on current projects.

Chat Support from Microsoft Teams:

It is possible to attach the computer with any of your contacts. You can chat and do audio & video calling from iOS, Android, PC, or Mac. It enables you to stay on the call for up to a day. Therefore, you do not even need to drop and dial back in. It is one of the great windows 11 tips and tricks.

Touch, Voice, and Pen Inputs:

The digital pen, touchscreen, and voice typing feature help work more quickly than previously. For example, you can record your voice with your mobile and playback it to transcribe your words into text. In addition, your computer may have a microphone that can process your speech immediately using voice typing – text transcription.

In addition, it lets you detect inflection and rhythm for adding essential punctuation. The new version makes writing or drawing possible. Besides, it allows you to annotate PDFs. Moreover, it enables you to take the help of a digital pen to make the most of both worlds. It is possible to personalize the new Pen menu with favorite apps for quick access.

Conclusion:

Smartphones have become very handy nowadays for their touchscreens. But taking notes is not so simple. If the new version PC has a touchscreen, you can take notes instantly with a digital pen. In addition, the windows 11 tips and tricks allow you to use natural gestures like multi-finger gestures to navigate quickly.

Frequently Asked Questions:

  • What cool things can it do?

These are a few hidden features of the updated version:

  • Multitasking features.
  • Background apps permission.
  • Clipboard history features.
  • Better security.
  • Manage volume for individual apps opened on a desktop.


  • Does it improve performance?

Compared to the earlier version, it can hold some potential to improve the PC speed.

  • What does it do differently?

It comes with a new design containing a centered Start menu and Taskbar. Besides, it brings a Mac-like interface to the OS. In addition, it comes in a clean design with rounded corners and pastel shades.

read more
AppsInternetInternet Security

What is Gstatic & What is Gstatic.com Used for?

What is Gstatic & What is Gstatic.com Used for?

If you are surfing the web daily, you can face gstatic.com appearing on display. Multiple people don’t know what it is and think of it as a virus or malware. In this article, we have covered all details about it.

What is Gstatic?

Gstatic is a service that Google uses to hold static content and decrease bandwidth usage. Google LLC uses this http://Gstatic.com reliable domain to boost network speed for users.

What is gstatic.com?, How does Google use it?

gstatic.com is a web domain that Google uses to access its driver where Google hosts images, javascript, CSS, and other contents. It helps the content load more quickly from the content delivery network or CDN.

The domain helps to boost network performance, decrease bandwidth usage. Besides, it allows you to load Gmail, Google Maps, and other Google services. You can store different static data such as JS libraries, stylesheets, etc. The domain can verify the connectivity to the web, especially for Chrome browser and Android devices.

It comes with a few Subdomains:

fonts.gstatic.com – It sends requests to the Google Fonts API, and these consist of resource-specific domains like fonts.googleapis.com or fonts.gstatic.com

maps.gstatic.com – The domain allows you to embed Google Maps images on the web page, and you don’t need JavaScript or any dynamic page loading.

csi.gstatic.com – The domain helps to improve the performance of other sites.

These are a few other examples of subdomains

accounts.gstatic.com

connectivity.gstatic.com

csi.gstatic.com

fonts.gstatic.com

metric.gstatic.com

mail.gstatic.com

maps.gstatic.com

ssl.gstatic.com

Browser hijackers and other cybercriminals use a counterfeit version of the domain to install unnecessary applications and adware. The programs do not disclose details about apps bundled with them. We advise you to install third-party software only from trustworthy sources. Running a scan can also help you check if there is any virus.

Adware-type software or browser hijackers offer unwanted pop-ups installed on the devices without the user’s consent. For example, the adware can offer coupons, banners, pop-ups, and other intrusive advertisements.

You may find the ads disturbing as these can redirect you to untrustworthy sites. Besides, these can run scripts that can download PUAs or potentially unwanted applications and install them. It can cause harm and create issues like high-risk infections.

The browser hijacker software can change browser settings and options like search engine, new tab URL, and homepage. As a result, people can encounter redirects to untrustworthy websites. Besides, it can store IP addresses, keystrokes, search queries, geo-locations, URLs of visited websites, etc., including personal or sensitive details. The software can leak information to third parties, and they misuse the details to make revenue. Thus, you can experience different privacy safety issues.

Is it a Virus?

It is a legitimate Google service used to decrease bandwidth usage and enhance network performance. The service doesn’t have any relation to harmful activities. Therefore, if you find any unnecessary pop-ups appearing, you can scan them for viruses and malware.

What are Gstatic Images?

These indicate the images that you can find on https://encrypted-tbn0.gstatic.com/ representing the cached version of all the images stored on Google’s servers. They boost the delivery of image results.

Can you remove it?

Many people think that it is malware, but it isn’t. You can remove the service by following the procedure given below in the article.

www.gstatic.com/generate_204 Error?

You can see the URL: http://www.gstatic.com/generate_204 opening up automatically in a new tab. The page is blank with “Untitled” as its title.

If you face a misconfigured network and unstable connection, it can trigger the problem. It is because the browser thinks that it can sign in to the Captive portal. Here, the new WiFi users should enter the sign-in details for security purposes.

What is Connectivity.gstatic.com?

It is a subdomain of gstatic.com used by Chrome and Android devices. The function of the domain is to check if you have internet access to your connected network. If not, the browser can load the captive portal login web page or enable you to access the internet.

Should you Block Connectivity.gstatic.com?

You should not block the subdomain. It may not create significant problems, but the subdomain helps check internet access. Therefore, we advise you not to mess with it.

csi.gstatic.com Keeps Loading:

While opening a website on the Chrome browser, you can see a message Waiting for csi.gstatic.com available in the bottom left corner. The Page displayed doesn’t load, and you see the csi.gtsatic.com URL continuously. If there exists any problem, you can solve it by following the processes.

  1. Allow and Delete Cookies for the Page:

If something gets blocked, you can allow the cookies by tapping on the little lock next to the URL. If you are willing, try to delete cookies for that specific domain. After that, your task is to refresh the page and check if it loads.

  1. Change DNS Settings on the device:

Try to change Domain Name System (DNS) settings to fix the problem.

Uninstall from Windows:

If you’re willing to eliminate the potentially unwanted programs from Windows OSs, you should follow the steps.

For Windows 11:

First, tap on the Start icon and choose the Apps and Features option.

A window will open where you need to look for the app you are willing to uninstall. As soon as you find the app, tap on the three vertical dots. Now, choose the Uninstall option.

For Windows 10/8 :

  • When the windows search box appears, you need to enter the Control Panel. After that, tap on “Enter” or the search result.
  • Choose to Uninstall a program available below Programs.
  • Look for the entry of the suspicious program available in the list.
  • Tap on the app and then choose Uninstall.
  • When the option User Account Control appears, tap on Yes.
  • Finally, you should wait until the uninstallation method is not finished and tap on OK.

Windows 7/XP user:

  • Your job is to tap on the Windows Start and then go to the Control Panel available on the right pane. People who use Windows XP need to tap on Add/Remove Programs.
  • When you open the Control Panel, you should choose Programs and Uninstall a program afterward.
  • Choose the unwanted app by tapping on it once.
  • Tap on the Uninstall/Change option available at the top.
  • Choose the Yes option available in the confirmation prompt.
  • Hit the OK button as soon as the removal process is completed.

Delete from macOS:

If you are willing to delete it from Mac, you should go through the steps.

Remove Items from the Applications Folder:

  • Go to the menu bar, and then you should choose Go > Applications.
  • Open the Applications folder and find all related entries.
  • Tap on the app and then drag to the option Trash. If you want, right-click and select the option Move to Trash.

If you want to delete an unwanted app, ensure that you should access the Application Support, LaunchAgents, and LaunchDaemons folders.

  • After that, your task is to delete relevant files.
  • Choose the option Go and then Go to Folder.
  • Tap on /Library/Application Support and hit the option Go. Next, you may tap Enter option.
  • While opening the Application Support folder, you should find dubious entries and remove them afterward.
  • You should enter /Library/LaunchAgents and /Library/LaunchDaemons folders similarly and terminate all .plist files.

Remove from Microsoft Edge:

Delete Unwanted Extensions from MS Edge:

  • Choose Menu, i.e., three horizontal dots available at the top-right of the browser window. After that, you should choose the Extensions option.
  • Select the extension from the list and then hit the Gear icon.
  • At last, you should tap on Uninstall at the bottom.

Clear Cookies and Other Browser Data:

  • Tap the Menu, i.e., three horizontal dots at the top-right of the browser window. Next, you should choose Privacy & security.
  • Select the option Choose what to clear below the Clear browsing data.
  • Apart from the passwords, you can choose everything. After that, tap on the option Clear.

Restore New Tab and Homepage Settings:

  • Your job is to hit the menu icon and select Settings after that.
  • Next, your task is to look for the On startup section.
  • Finally, tap on Disable if there is any suspicious domain.

Reset MS Edge:

  • If something doesn’t work, you should tap on Ctrl + Shift + Esc to open the Task Manager.
  • Hit the More details arrow available at the bottom of the window.
  • After that, choose the Details tab.
  • Scroll the Page down and find each entry with the Microsoft Edge name. Tap on every item and choose the option End Task to stop MS Edge from running.

Take the help of an advanced Edge reset method if you cannot fix the issue following the procedure. Ensure that you have backed up your information before proceeding.

  • Your first task is to look for the folder available on the PC: C:\\Users\\%username%\\AppData\\Local\\Packages\\Microsoft.MicrosoftEdge_8wekyb3d8bbwe.
  • Tap on Ctrl + A available on the keyboard to choose all folders.
  • Hit the option, and after that, you should choose Delete.
  • Next, tap on the Start button and choose Windows PowerShell (Admin).
  • As soon as the new window opens, your job is to copy the command and paste it. After pasting the command, you need to tap Enter. The command is as follows—

Get-AppXPackage -AllUsers -Name Microsoft.MicrosoftEdge | Foreach {Add-AppxPackage -DisableDevelopmentMode -Register “$($_.InstallLocation)\\AppXManifest.xml” -Verbose

Instructions for Chromium-Based Edge:

Delete extensions from MS Edge (Chromium):

  • Navigate to the Edge and open it. After that, your job is to tap on select Settings and Extensions, respectively.
  • Tap on Remove to delete unwanted extensions.

Clear Cache and Site Data:

  • Tap on the Menu option and head towards the Settings.
  • Choose the Privacy and services option.
  • After that, your task is to select Choose what to clear option available below Clear browsing data.
  • Choose All times available below the Time range.
  • Finally, your task is to choose the option Clear now.

Reset Chromium-based MS Edge:

  • Your first job is to hit Menu, and after that, choose Settings.
  • Next, select Reset settings available on the left side of the display.
  • Now, you have to choose the Restore settings to their default values.
  • Finally, tap on Reset for confirmation.

Remove from Mozilla Firefox (FF):

Try to reset the browser by following the steps manually.

Remove Dangerous Extensions:

  • First, your task is to head towards the Mozilla Firefox browser and open it. Then, your job is to tap on the Menu, three horizontal lines available at the window’s top-right.
  • Next, choose Add-ons.
  • Finally, you should choose the unwanted plugin and then tap on Remove.

Reset the Homepage:

  • Tap on the three horizontal lines you can see at the top right corner for opening the Menu.
  • Next, your task is to select Options.
  • If you are willing, you can put the preferred site under Home options. Then, you can open it whenever you open Mozilla Firefox.

Clear Cookies and Site Data:

  • Tap on the Menu and select Options.
  • Head towards the Privacy & Security section.
  • After that, your job is to scroll the page down to find Cookies and Site Data.
  • Tap on the Clear Data.
  • Finally, your job is to choose the Cookies, Site Data, and Cached Web Content. After that, you need to hit Clear.

Reset Mozilla Firefox:

If you can’t solve the issue by resetting the browser, you must follow the steps.

  • Head towards the Mozilla browser and tap on Menu.
  • Move to the Help and select Troubleshooting Information.
  • Tap Refresh Firefox available below the Give Firefox a tune-up section.
  • As soon as you can see the pop-up on the screen, tap on the Refresh Firefox to confirm the action.

Remove from Google Chrome:

Delete Malicious Extensions from Google Chrome:

  • Your first task is to move to Google Chrome and open it. Tap on the Menu option, three vertical dots at the top-right corner. After that, choose More Tools and Extensions, respectively.
  • You can see all the installed extensions in the newly opened window.
  • Finally, tap on Remove to uninstall the suspicious plugins related to the unwanted program.

Clear Cache and Web Data from Chrome:

  • You have to tap on the “Menu” option and choose Settings.
  • Choose the option Clear browsing data available below the Privacy and security.
  • Next, you should choose Browsing history, cookies, and Cached images and files.
  • Finally, tap on the Clear data.

Change Your Homepage:

  • Your job is to tap on the menu option and then select Settings.
  • Next, find a suspicious site if there is any in the On startup section.
  • Next, tap on the option “Open” a specific set of pages. Now, hit three dots to find the Remove option.

Reset Google Chrome:

Try to reset Google Chrome to eliminate the unnecessary components when the above steps are not helpful.

  • You should first tap on Menu and choose Settings.
  • Scroll the Page of Settings down and tap Advanced.
  • You should scroll down to find the Reset and clean up section.
  • Tap on the Restore settings to the actual defaults.
  • Finally, click on the Reset settings for confirmation.

How to Perform a System Scan?

If you are willing to check if the PC is safe from viruses, you need to run a full system scan. Running a scan will help your device isolate and eradicate malware from the PC.

  • Your first job is to tap on “Windows” + “I” to open Settings.
  • After that, your task is to tap on the “Update & Security” and choose “Windows Security” from the left pane.
  • Now, you should choose the “Virus and Threat Protection” option. Then, hit the “Scan Options” button.
  • Tap on the “Full Scan” option and hit the “Scan Now” button.
  • After tapping on the button, the defender can scan the PC to ensure that your device is safe from viruses.

The Bottom Line:

Gstatic is something you can find in your browsing history or anywhere else. I hope after reading this article; now you know what it is.

Frequently Asked Questions:

  • What exactly is this gstatic Page?

It resembles a Google static code page to create an HTTP 204 No Content response.

  • How do you turn it off?

Look for the app you are willing to uninstall in the opened window. After finding the app, you should tap on the three vertical dots and choose Uninstall. Then, if necessary, you can perform a scan on the pc to check for malware infections or remaining unnecessary components.

  • Is it a tracker?

As per Whotracks.me, the service tracks around 39.6% of internet traffic, its tracking share is increasing each month. But there is nothing to take tension as it delivers content only, and the service will not track personal activity.

read more
AppsGadgetsTechnology News

How to View the Clipboard History on Android & Windows

How to View the Clipboard History on Android & Windows

The Clipboard is an area in mobile where you can find the copied data before pasting it into the target location. However, it can store one element only. Therefore, your Windows replaces contents while copying something every time for which you are unable to retrieve the data you have copied before. For instance, if you forgot to paste any text after copying and then if you copy another text, you will lose the earlier one forever. Let us know How to View the Clipboard History on Android & Windows.

What is a Clipboard?

Clipboard lets you copy and paste various data types. Hence, the information may be text, images, binary stream data, etc.

What is Clipboard History?

Clipboard History is an app enabling you to copy & paste anywhere, edit, manage, remove clips easily. Besides, it is possible to access items very fast. A few Android mobiles enable you to access it, while others only showcase the earlier copied content.

It is a set of all data you have copied to the application, such as different format texts— plain text, RTF, HTML, images, file lists, etc. If you are willing to access it, you need to use specific software. We advise you to use Clipdiary. The software can remember copied items like plain text and text with formatting (RTF), HTML, pictures, and files. However, if you use a Samsung phone, you cannot access the file without rooting the mobile. Take the help of a clipboard manager app to access it on the android device.

What Gets Stored in Clipboard?

It was available first in Windows 10’s October 2018 Update. Recently, it has been compatible with text, HTML, and images coming in less than 4 MB size. But, unfortunately, you can’t store oversized content there.

It can save up to a maximum of 25 entries. In addition, the app will reset each time you reboot the device till you pin an item to it.

How to View the Clipboard History on Android Mobile:

You can view the app in a few ways, even on android devices that don’t come with the default function. The way you view it on your android phone relies on the type of model you use. Despite sharing similar OS, android mobiles differ in multiple features, where a keyboard is one of them.

In most cases, smartphones come with built-in clipboards. But a few devices allow you to view the history.

You should follow the way to view the app on the devices.

  • First, your task is to navigate to Messages, Notes, Email, or any place you are willing to paste a message from it.
  • You should now press the display and hold it to access several options.
  • After that, you should choose the option “Clipboard.”
  • Finally, you have to turn it off to see the complete history.

Unfortunately, most android mobiles don’t come with the feature. Rather than that, these enable you to paste the most recent item that you have copied. You can view the app and manage it, but it needs installing third-party apps.

Best Ways to Check and Recover Clipboard History on Android Using Keyboard Apps:

Most android mobiles have default keyboards, but many people are there who want to install a third-party keyboard app. The reason is that keyboard apps provide exciting features like clipboard managers.

Gboard:

It is one of the most famous keyboard apps. Gboard is the official keyboard of Google and is simple to use. Over one billion people have downloaded the Gboard app from the play store, and multiple new devices have Gboard pre-installed.

We have given here the process to use it to set up and view on the android device.

  • You should ensure that you have completely installed the software and set it as the default keyboard. You should download it from the Play Store if you have not installed the software.
  • Tap on the clipboard icon above the letters while writing in Gboard.
  • Hit the option “Turn on Clipboard.”
  • You should copy the items you are willing to save in the app.
  • After that, tap on the clipboard icon again, and view the copied items below the option “Recent.”
  • The software allows you to save all the items you have copied forever by pinning. Hence, you should tap on the clip and hold it for a while. Now, you can find the software available under “Pinned.”
  • You need to remember that the feature will not work if you make the feature disabled. As soon as you disable it, Gboard will not save items that you have copied, and you will not find any way to retrieve them.

SwiftKey:

It is a fantastic keyboard app with clipboard options. The process of accessing the app and viewing the history is as follows:

  • Use the app first. Whether the app is not available, you should download it from the Play Store.
  • Next, your task is to copy the items you are willing to save to the app.
  • Hit the clipboard icon, 3rd one from the left.
  • The items you have copied are available, with the most recent one at the top. It allows you to pin specific items and stop them from expiring. Tap the pin on the right part of the items you are willing to save.

Other Apps:

Multiple keyboard apps have specific features. These may have different features, but in most cases, they offer good options that provide more control over the items in most cases. We advise you to go with Chrooma and Ai.type. However, multiple apps are available, giving excellent features.

How to View the Clipboard History on Android & WindowsUsing Dedicated Clipboard Apps

Use this type of app to view the app. It is a perfect choice for those who copy & paste different content and want to use a solution to organize it. A few apps provide more features than famous keyboard apps like Gboard. These let you arrange copied items into categories, turn into QR codes, and translate them into different languages.

Clipper:

It is a famous app available on the Play Store. The app provides multiple features making the model easier to control.

The process of viewing the app in Clipper is:-

  • You should make sure that the software is available on your mobile. If you have not installed it previously, you should download the software from the Play Store.
  • After that, your job is to hit the option “Clipboard.”
  • Now, the copied items are available in front of the display. You will find the most recent article available at the top of the list.
  • The app lets you save automatically everything you have copied and add your clippings manually. Tap the plus sign available at the bottom-right and then write the clipping.
  • It is possible to access the app through the status bar and save time if you want to view it.
  • The software allows you to pin items that you use often and helps to sort these into different categories.

Clipboard Manager:

It can make the app managing a breeze. More than one million people have downloaded it from the Play Store.

Use the software to view the app by following these steps—

  • You need to make sure that the software is available on the android device. If the software is not available on your mobile, you should download it from the Play Store.
  • Next, your job is to open the application.
  • Then, you can find the copied items available below the “Clipboard” section, where the most recent articles are available at the top.
  • When you install the software, it will sync with the android device. If you are going to copy a text on the mobile, you will automatically find this in the app. The app lets you adjust the app manually, indicating that it helps to add text within the app.

It is possible to add favorite clipboards, create many categories, use the Search option to navigate quickly, merge notes, etc. You can access the app from the status bar directly. Besides, you may use the “Smart actions” feature by going there, making it separate from the rest. It allows you to include new notes, run a Google or Wikipedia search, or translate various content.

Other Apps:

Clip Stack and Clipboard Actions & Notes are examples of other apps enabling you to manage. These let you use them freely and don’t contain any ads. The Standalone apps are ideal for people willing not to change the default keyboard but often use copy & paste features.

Tips:

We have given here a few tips to help to use its functions safely.

  • Ensure that you should not keep sensitive details in the app. Try not to save passwords, SSNs, PINs, or credit card details, as these may go to the wrong hands. If you use any third-party app, the probability is higher. You should download reputable apps only with positive reviews.
  • While providing app permissions, you should know that some apps can access it without you knowing.
  • Whether you are using an app that you may access from the status bar directly, ensure its showing details.

How to Check and Recover Clipboard History on Android:

If you copy something in your email before copying another text, you can check and recover content from the app. The two ways let you know how to retrieve any text copied previously without losing them.

  1. Using Google keyboard (Gboard):

With the help of Google keyboard, you can view and recover the history on your mobile. In addition, you can find a clipboard manager in multiple keyboard apps enabling you to access previously-copied texts.

Most devices have installed the app already, and it has been working with the feature for two years. So these are the steps to check and recover it on the mobile device.

Step 1: Press the clipboard icon beside the Google logo while typing with Gboard.

It will launch the feature of Gboard.

Step 2: If you are willing to recover any specific text from the app, you only need to click on it to paste it into the text box. Texts will not remain in the Gboard after an hour by default.

Pin the copied text manually if you are willing to stay here. Hence, your task is to click on the clip and hold it. After that, choose the pin icon. You can now see the clip moved to the Pinned section of the clipboard manager.

Ensure that you have enabled the feature to get the best from the app. For example, while launching the feature, the app will say ‘Gboard clipboard is off,’ and you should toggle on it with the help of the switch.

If you find the feature disabled, Gboard can’t back up the copied texts, and you cannot recover them. Whether you cannot find or use the feature on the app, assure that you have updated the app. To update the app, go to the google play store on the device.

  1. Use dedicated Clipboard Apps:

Using third-party apps is another way to retrieve the content on the device. Compared to Gboard, the apps can offer advanced and quick copying and pasting features. If you need to copy and paste plenty of texts, you will find a few of the apps helpful.

These apps can encode the app content into QR codes and share the clips with others. Multiple apps are available on the Google Play Store.

How to Clear the Android Clipboard:

Are you using the Clipper Clipboard Manager? If yes, you may see a Delete option while choosing the three dots to the right of a selection. Use the option to clear out the items.

  • Turn on the Gboard keyboard and use it. If you don’t find the app available on your mobile, you may install it from Google Play.
  • Navigate to the messaging app and open it on the android phone. After that, hit the + symbol to the left of the text field.
  • You should now choose the keyboard icon. As soon as the keyboard appears, your task is to select the > symbol at the top. Finally, hit the clipboard icon for opening the app on your android.
  • Whether you have not used it before on the android device, a notification appears on your mobile to enable the Gboard.

If you are willing to enable the Gboard, you should click on the option Turn on the Clipboard.

  • You can copy anything and check it on the Google Android keyboard again. You can find a list of current items you have added.
  • Hit the edit icon to delete any of the items from the Clipboard.
  • Choose every item that you are willing to delete. After that, your task is to hit the trash icon to delete.

The clipboard manager with the default keyboard app relies on the android mobile and brand. For instance, you will find a tool that depends mainly on your Android phone Samsung Keyboard. The keyboard is the initial way to access the software without an app.

Best Ways to Check and Recover Clipboard History in Windows 11:

clipboard WindowsHow to Enable the Clipboard App:

Two ways are possible to enable the app— the Settings app or emoji panel.

Enable from Settings:

If you are willing to enable it through the Settings app, you should follow these steps.

  • Your first job is to navigate to the Settings and open it.
  • Tap on the System.
  • Tap the app’s page available on the right side.
  • Now, your task is to open the settings of the software.
  • After that, enable the app toggle switch.
  • As soon as you finish the steps, you may start copying and pasting, with an extra interface letting you adjust the contents you copied.

Enable from Emoji Panel:

If you want to enable it through the emoji panel, you must follow the steps.

  • Your first job is to invoke the Windows key + V keyboard shortcut.
  • Hit the Turn on button.
  • As it is a part of the emoji panel, you may access the feature with the help of the Windows key +; or Windows key + . keyboard shortcuts. Thus, you can open the “Clipboard” tab.

How to Sync:

While enabling the app, it is possible to configure the feature to upload and sync the contents you have copied across devices connected to the Microsoft account.

The process of syncing to the cloud and across devices is as follows:

  • First, go to the Settings and open it.
  • Then, tap on the System.
  • Next, tap the app page available on the right side.
  • After that, you should enable the Sync across the devices toggle switch.
  • Then, choose the sync option to use with it.

Automatically sync text that I copy — It will sync to the cloud and across the devices connected to the same Microsoft account.

Never automatically sync text that I copy — Hence, your job is to choose the contents you are willing to upload to the cloud to make these available across devices.

As soon as you finish the steps, the items stored will sync across the devices. In addition, it enables you to paste text and images you previously copied on other devices.

How to Use:

  • It can work similarly to the classic experience. The interface allows you to review and adjust the stored content, the only difference from the classic experience. While selecting the sync option, you can paste text and images uploaded across devices to the app.
  • As soon as you enable the feature, continue to use both the Ctrl + C & Ctrl + V
  • keyboard shortcut to copy and paste, respectively. With the help of the context menu or the command bar in File Explorer, it is possible to do the same.
  • The Windows key + V keyboard shortcut can open the emoji panel to see the list of items copied from other apps like Microsoft Edge, Word, OneNote, Notepad, etc.

Copy and Paste:

If you are willing to copy & paste content with the feature, follow the steps.

  • You should go to an app and open it.
  • Choose the text or image. You should know that the app allows you to copy images from specific apps like the Snipping Tool. Unfortunately, it isn’t possible to copy image files to the app. However, you can copy & paste files usually, though these don’t appear in the interface.
  • Tap on the selection and select the Copy (or Cut) option.
  • Switch to the application for pasting the content.
  • After that, your job is to invoke the Windows key + V keyboard shortcut.
  • If you are willing to paste the content, choose the item to paste it.
  • Whether you are willing to paste as text without formatting from the source, you should tap the See more (three-dotted) menu. After that, your job is to tap on the Paste as Text option.
  • As soon as you finish the steps, you can see the text or image appearing in the app, relying on the output selection.

Manage Items:

If you are willing to manage items in history, use the steps.

  • Your first task is to invoke the Windows key + V keyboard shortcut.
  • Then, hit the Pin button to quickly access the content you frequently use.
  • Next, tap the See more (three-dotted) menu button. Then, your job is to tap the Delete option for removing the items from the history.
  • As soon as you finish the steps, you will not get the text or image available in the history.

How to Clear Clipboard:

If you are willing to delete all items in the history, use the steps.

  • Navigate to the Settings and open it.
  • After that, your job is to tap on the System.
  • Next, you need to tap the app’s page on the right side.
  • You should now open the app’s settings by going there.
  • Hit the Clear button for the “Clear clipboard data” setting.
  • As soon as you finish the steps, you will find the history cleared on the mobile, except pinned items.

How to disable the app:

First, perform the four steps of the previous section.

Now, you have to disable the Clipboard history toggle switch.

As soon as you finish the steps, you can copy and paste them as before. But you will not get any access to the history. Besides, the contents are not going to sync across devices.

How to Check and Recover Clipboard History on Windows 10:

How to Enable:

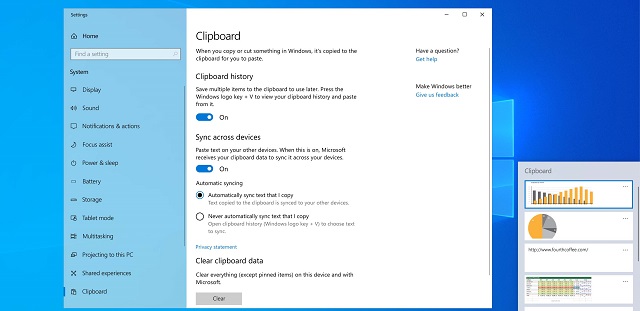
  • Your first job is to hit the “Start” button. After that, you have to tap on the “Gear” icon available on the left side of the Start menu. Thus, you can open the “Windows Settings” menu. If necessary, then tap on the Windows+i to get there.
  • While in the Windows Settings, you should tap on “System.”
  • As soon as you are on the Settings sidebar, tap on the “Clipboard.” You should find the “Clipboard history” section in the app settings. Then, your task is to toggle the switch to “On.”
  • Now, you have enabled it. Turn off Settings and use the feature in any app.

How to View the app:

  • As soon as you have enabled it, a list of items will appear in front of the display you have copied recently while using any app.
  • If you are willing to view it on Windows 10, your first job is to tap Windows+V.
  • As soon as you tap there, you can see a small window popping up. You will find the most recent copied items available at the top of the list.
  • Tap on any item in the list to paste it into an open app.
  • If you are willing to remove items from there, you should tap on the ellipses (three dots) beside the item that you want to delete. Then, choose the option “Delete” from the small menu popping up.
  • Whether you are willing to remove all items from there, you should tap on the “Clear All” In the ellipses menu.
  • However, you can pin an item on the list. Thus, you can see the option available on the list although you restart the PC or tap on the option “Clear All.” Then, you have to tap on the three-dot menu and choose “Pin.” It is possible to unpin the item later by choosing “Unpin” from the ellipses menu.

You will find a different look at the interface on older versions of Windows. Follow the steps for the devices running a build before 1909.

As soon as you use the Windows+V keyboard shortcut, you can see a small floating window. It is available near the app you use, or all windows remain closed or reduced in the lower-right corner of the display. Items you have last copied will appear at the top of the list.

If you keep the window opened, tap on any item in the list to paste it into an open document. Whether you are willing to remove items from there, you should tap on the small “X” beside an item on the list. It is possible to clear the whole list. But to do so, you need to tap on the option “Clear All” in the window’s upper-right corner.

Tap on the small pushpin icon beside the item to pin an item to the list. The item is available on the list even if you restart the PC or tap on the option “Clear All.”

How to Disable the App:

If you are willing to disable it in Windows 10, you should move to Settings. After that, go to the System and the app. Next, you need to look for the option “Clipboard history,” After that, toggle the switch to “Off.”

After disabling the option, a small window will appear when you tap Windows+V. It lets you know that Windows 10 cannot display your app as the feature is not enabled.

Use the Clipboard App on a Mac:

Mac does not enable you to use it like windows. The Operating System allows you to paste only the most recently cut or copied item.

You may install a third-party tool. Multiple tools are available to select, such as CopyClip, or PasteBot.

Conclusion:

The article lets you know how to view the app on Android devices. Besides, we expect you to like our recommended keyboard and clipboard apps.

Frequently Asked Questions:

  • How do you view the app in Chrome?

As soon as you are ready to paste or take a peek at the application, you should tap on the Search/Launcher key+v. After tapping there, you can see the floating clipboard manager.

  • Where is the app stored?

Navigate to Settings, System, and the app, respectively, and then your task is to enable the switch for the app. Tap on the Win key+V to see it. Now, you can see all the copied items available in recent history.

  • Where is the app on Gmail?

You can find this on the keyboard while the cursor is available on the subject line for Gmail. But it isn’t available on the keyboard if the cursor is available in the body of the email.


read more
AppsDo It YourselfInternet SecurityTechnology News

How to Ping a Phone?

How to Ping a Phone?

As a mobile user, you may want to find the location of someone’s mobile like your kid, any employee, etc. Besides, you may need to check if your mobile is active or getting network connectivity. You can ping a phone in this case. Have you faced such a situation? You will be glad to hear that many ways help you hence. The process is known as ‘pinging a phone.’ In this article, you will learn how to ping a phone.

What does it mean to Ping a Mobile Phone?

Pinging a device indicates knowing the device’s location that you want to check. Almost all major operating systems are compatible with this network utility, and Android, iOS, and other operating systems support this feature.

Technically, ping means a signal to the mobile querying about its network location. Then, the mobile will respond to the request with the required details. This technology takes the help of the device’s GPS location.

Use-cases for Pinging a Phone:

Its primary purpose is to find the location of the mobile. However, there are a few reasons why you may want to find the location of a mobile.

  • It enables you to find the location of a phone you have lost or stolen.
  • Using the technology, you can watch your kid’s or employee’s location.
  • You can keep people with a criminal record.
  • Spy apps are used to perform the operations. You should know that spying on someone is illegal without their will.

How does pinging a phone technology work?

Two methods are there to locate a cell phone location by the cellular network provider— Pinging and Triangulation. The first is a digital method, whereas the second is an analog method to find a device location.

To “ping” indicates sending a signal to a specific mobile phone and getting a response with the requested data. While pinging a new digital mobile, it will determine the latitude and longitude through GPS, and then, it will send the coordinates back through the SMS system.

Why ping a mobile?

People use modern technology to find the location of a stolen or lost Android or iPhone device. Likewise, using the technology, you can track the live locations of criminal people.

Besides, the android spy app companies use the technology to keep track of users’ devices. So guardians who are willing to keep track of their kids’ location can use different spy apps.

However, without the person’s permission, spying on them or tracking a device’s location is illegal. So it would be best if you let the person know, like your kid, about using the technology before installing any spy apps.

How to Ping a Phone?

How to Ping a Phone?Multiple mobiles are there supporting the ping functionality. But mobiles released currently don’t come with the feature enabled. Therefore, if you are willing to ping the devices, you will require specialized apps on the mobile. PingD, Google Find My Phone, etc., are a few examples helping to return the ping request. Therefore, you should ensure that you have the apps installed and configured on the system before you proceed. Besides, remember that you cannot ping a mobile that is turned off. However, having a firewall installed on the system does not allow other devices to ping the mobile. Besides, if the AP Isolation feature is turned on the router, other devices may not work.
Ping from a Phone:

  • It would be best to launch the App Store or Play Store first. Then, look for Ping.
  • After that, you need to ping any app that you want. Of course, as soon as you install the app, it would be best to launch it.
  • After that, your job is to put the IP of the mobile. For example, you can enter 192.168.8.101 if it is the IP address. Next, tap on the Ping or Start option.

Use command prompt:

The process is applicable with Android mobiles only. Your first task is to tap on the ‘Windows’ key plus the ‘R’ option for opening the ‘Run’ box. Next, write ‘cmd’ in lowercase letters for bringing up the command prompt. Next, you should write ‘ipconfig,’ and tap on the ‘Enter’ option after that. It offers you the machine’s IP address if it is not available.

When you go to the following line of the command prompt, you must write ‘ping’ there. After that, you should complete the IP address of the mobile to get a ping to the mobile automatically. If it is successful, both the ping and a minimum of 2-3 lines of ‘Reply from’ the address appears. Every line represents a data packet that was sent.

It is a speedy process giving the actual data packets sent to the phone, not the technical ping only. Whether you face a problem, you should try to close the PC or mobile and reboot your wireless router. The issue may be an IP address error. Hence, the process helps send a ping only, and it won’t get any details about the user’s physical location.

GPS tracking software:

It is the quickest way to find a stolen android or iPhone mobile. With the help of GPS tracking software, you can track the location of your family and loved ones. Multiple GPS tracking software is available in free and paid versions. In addition, we have given a few GPS tracking software that helps you ping the device’s location.

  1. GOOGLE MAPS:

It is one of the effective GPS tracking apps for android and iPhone devices that help to find the device location. You can use the application for free for both android and iPhone devices. It allows you to adjust the sharing options. With the help of the latest technology, you can track the lost device’s location.

  1. LIFE 360:

This GPS tracking software lets you ping a phone to find its location. It has plenty of excellent features that help to find the lost device. Besides, it helps to track the location of your family members. Apart from this, many location tracking software is available on iPhone and Android OSs.

With the help of GPS tracking apps, you can find the live location of any device. But it is not possible if GPS is disabled on the device or you have installed fake GPS on the mobile.

Default phone mechanisms:

Take the help of the default mechanism of your mobile phone if the GPS location is disabled. It will help you to ping your mobile to find out the device’s location. Generally, android devices have a default feature called “Find My Device,” whereas iPhone devices have an inbuilt feature called Find My iPhone to track the device location.

The steps you should follow to use Find My Device are as follows:-

  • Your first task is to visit the site android.com/find.
  • Then, you should log in to your Google Account via Gmail details.
  • After that, while using the map, the live location of the device you want to find out will appear.
  • If you are willing, play a ringtone, delete the data, or lock the lost device remotely.

Spy Apps:

You can use a spy app to ping a mobile to know where it is. These apps are equipped with excellent and advanced features to monitor the lost mobile or that you want to track.

These enable you to use android and iPhone devices. The apps help track any person’s live location, read conversations, monitor social media chats, check browser history, record screens, listen to live phone calls & surrounding sounds, etc.

You can find multiple spy apps available in the market, allowing you to track both Android and iPhone devices.

Follow the guide to know how to ping a mobile using spy Apps.

  • Your first job is to make a new account from an Android or iPhone device.
  • After that, your task is to choose the mobile you are willing to monitor and check your call history.
  • Now, you should choose the plan as per the requirements.
  • Next, you must install the application on the device you want.
  • As soon as you complete installing, you can experience Wi-Fi or GPS data in real-time.

Ping from computer:

Taking help from the PC, you can also find out the device you have lost. Then, you should undergo the steps given here to ping mobile using a PC.

  • First, your task is to move to the “Settings” on your android phone and open it after

that.

  • After that, your task is to click on the “About Phone” option.
  • Now, hit the option “Status,” and you should get the IP address.
  • After that, your job is to power on the computer and look for the Windows Command Prompt.
  • Next, you should open the CMD or command prompt as “Run as Administrator.”
  • Write “ping” followed by the IP address of the android device, and next, you should tap on the “Enter” option.

How to Ping a Phone in macOS System:

You can use the macOS system to ping the mobile. However, if you are willing to ping a mobile from macOS, you must follow the steps.

  • Your first job is to go to the Finder and open it on the Mac, followed by Applications. If not, you should tap on the Command and A key to get the list of apps available.
  • Tap two times on Utilities and after that on the Terminal app.
  • While opening the terminal app, you need to write ping followed by the IP address of the mobile. For example, suppose you can ping 192.168.2.1.
  • You can see the results similarly to the Windows system.

How to Ping a Phone from ChromeOS systems:

Use the ChromeOS system if you are willing for this purpose. This one is a Google-developed OS available on the PlayStore in Chrome OS. However, it is beneficial if you use the default command prompt app.

  • If you are willing to open the command prompt application on ChromeOS, you should tap on the link ctrl, alt, and T keys to open it up.
  • Write ping followed by the IP address of the device. Use 192.168.2.1 for pinging.
  • Tap on “Enter” to start connection tests and the results after the test.
  • Thus, you can ping a mobile from a system running Android or iOS.

Tracing the phone number details:

By tracing the details of a mobile number, you can find out the location of a sim number or a device. In addition, multiple apps can bring universal caller ID services to your mobile, enabling you to track the mobile number.

You can take the help of the famous mobile number tracking apps like True caller, Showcaller, CallApp. These allow you to check the sim card name, registered place, etc. It is beneficial in finding fraud caller, unknown caller location details, etc.

Take help from the phone’s carrier:

The last method is to take help from your mobile carrier by contacting them. As soon as you contact your mobile phone carrier company, they will help you to find out the mobile you have lost. They trace the live location using the triangulation process and find out the device.

How Can you prevent your location from being tracked?

A few people are unwilling to have their phone’s location traced. These are the ways to prevent the location from being tracked.

Power Off the GPS Location: You should disable the live location of your phone. Thus, you can vanish from live tracing software’s reach.

Power On The Airplane Mode: You can prevent your location from being tracked by enabling the Airplane mood. It does not allow the device to send signals to the closest GPS towers.

Power Off Your Phone Completely: You can power off the mobile and take out the battery. Thus, you can prevent all the software or tracking device from tracking the location.

Power Off Location Services In mobile Settings: Your first job is to move to the phone’s location settings and then disable them.

How to ping mobile location for free with a phone company?

You should know that all iPhone and Android devices come with a default trigger, and it enables you to return all data regarding location and GPS to the actual cell service provider.

An option is available under the “Location Services” tab in the settings section. The data will remain protected with the service provider until you use the service data given by your mobile provider.

While switching to another phone provider, they will have the authorization to track location and maintain its history.

Mobile companies have different phone towers around the area covered. Therefore, when you move, your mobile connects to every tower.

The companies can triangulate your position depending on the tower you join. It is vital to know that 911 operators and service station operators can access location software, enabling them to expedite operations and respond in an emergency. Therefore, these are legal processes using which companies can ping the mobile, and thus, they will know your location.

How can you ping your mobile, which has been switched off?

It is not possible to ping a switched-off phone. As soon as you power off the mobile, you cannot track your device. The reason is that the signals don’t interact more with nearby GPS towers. Thus, it stops letting other devices know where it is. In this case, you can know the last active location of the mobile.

However, a few rates cases always exist. For example, you can detect signals from any switched-off mobile in war zones using NASA technologies. However, the details of these operations remain unknown. As per a report, NASA helped previously to find out the location of people. Usually, there is no way to track a closed mobile.

How to ping a cell phone tower in ping a mobile?

If you are willing to trace the original location of the last cell tower giving the signal to the kid’s phone, you need to ping the mobile. Using a wireless carrier, you can do the job. However, it is not legal to ping a mobile phone not registered to you if you don’t approve it.

Phase 1:

You should first contact the wireless carrier’s customer service department. After that, you should go through the prompts to speak to a representative.

Phase 2:

Let the representative know about your intention to ping the phone or the mobile registered in your account.

Phase 3:

You need to verify the wireless account while asked. In this case, you need to give the representative the mobile you are willing to ping.

Phase 4:

Wait till the representative is not pinging your mobile. Then, it may give you instructions to enroll in a mobile pinging service of your wireless carrier, enabling you to ping the mobile without assistance.

Phase 5:

You should note down the pinged location as soon as it appears.

How to find a lost iPhone:

Use Find My:

Using the Find My app, you can track the location of the Apple products, and it helps to find out the mobile on the map. While using Find My, you can easily know where the mobile is, and you don’t need to ping it. However, if you know that your iPhone is in your home but do not know where it is, the pinging will help you.

Launch the Find My there if an Apple device is attached to a similar Apple ID like iPhone. Otherwise, if you are willing, sign in to icloud.com and then select “Find iPhone.” If you want, select the iPhone from the list and then hit the “Play Sound” option to ping. Firstly, your device will start vibrating. After a while, it starts playing a high-pitched sound. The sound is playing continuously till you will not find your iPhone. Remember that you can stop the sound using the Find My device.

Use An Apple Watch:

Pinging becomes easier while iPhone and Apple Watch have a connection between them. It is very simple, like swiping up on the Apple Watch to the Glances mode. Choose the “ping” button available under other options such as airplane mode, do not disturb, and silent mode. It lets your mobile emit a high-pitched sound.

In addition, you can give instructions to your mobile to blink the LED by tapping the “ping” button and holding it. You may use the feature to find the mobile in a dark room.

Use Siri:

Take the help of Siri if you have any other iOS 12+ device attached to the account. It may be another mobile, iPad, PC, or Apple watch. If you are willing to use Siri, ensure that you have turned on Find My and Siri. Call Siri, and you will get a reply from her. As soon as she replies, you should say, “Siri, find my iPhone.”

Whether many devices are connected to the account, you must specify your mobile. Then, Siri will ask if you are willing to play a sound on the mobile to find out.

You should say “Yes.” Next, you will get an option to see a visual map of the location of the mobile.

From the Cloud:

If you don’t have many Apple devices, there might not exist a simple way to access Siri or the Find My app. If necessary, use a device of another person or your non-Apple device to sign in to iCloud, and it will help you to ping your missing iPhone.

If you are willing to do this, go to this www.icloud.com/find site and log in using your Apple ID and password. After that, your task is to choose the mobile you are willing to find from the list of devices. Then, you should tap on the “play sound” to ping the iPhone.

Whether you have enabled the two-factor authentication and want to log in to the Apple account from an unrecognized device, you should use a 6-digit verification code to bypass the two-factor authentication.

Conclusion:

If you have mistakenly lost your Android or iPhone, these hacks will help you find your mobile phone successfully. We hope that you will know now how to ping a phone.

Frequently Asked Questions:

  • Can you Ping mobile for location?

You cannot ping a mobile number directly without access to the carrier’s system, indicating that it has limitations to carriers and is within range.

  • Is it illegal to ping a cell phone?

A few federal laws are there applicable to cell phone pings. According to the regulations, you can make one thing clear tracing the mobile of someone without their permission is against the law. You can do this only in a criminal investigation or emergency 911 call.

  • Can a private investigator ping the cell phone?

As per federal law, private investigators are not allowed to monitor mobile conversations without the permission of at least one person based on the state.

read more
AppsDo It YourselfInternetSoftware

Chrome OS Flex: Upgrade Your Computer

Chrome OS Flex: Upgrade Your Computer

Chrome OS Flex is called the second generation of CloudReady. If you don’t know about OS Flex, check Neverware, acquired by Google two years ago. Neverware is a New York-based company that developed CloudReady, and it enabled the old PC versions for running the Chrome OS and extending the lifetime.

CloudReady was made upon an open-source Chromium OS base, and this one is compatible with Linux. The project is taken over by Google. But Google released the operating system or CloudReady 2.0 based on Chrome OS.

The operating system is compatible with Google Assistant and other Google services. In recent times, the OS allows you to access for free to Education and Enterprise users. If you are a general user, you can install the operating system on old Windows PCs and MacBooks. The OS Flex build offers a great experience to the users, but it is based on the Chrome OS 100.

What is Chrome OS Flex?

OS Flex is a web-based OS announced by Google very recently. It offers quick access to web apps and virtualization. This new upgrade comes with the same code base and releases cadence. However, it offers a few basic benefits over its predecessor.

Requisites to install os flex web-based operating system:

  • You should first have a USB pen drive with 8GB or more storage.
  • The PC must come with an Intel or AMDx86-64 processor.
  • 4GB is the minimum RAM that is necessary on the device.
  • The device’s internal storage needs to be 16GB or more.
  • Make sure that you have checked the system compatibility before installing Google web-based operating system.

Flash the web-based OS on a USB drive:

  • You should first install your Chromebook Recovery Utility Chrome extension.
  • It allows you to flash the web-based OS build on your USB drive.
  • Next, you are required to open your Chromebook recovery utility. Then, you should connect the USB drive and tap on the option “Get Started”.
  • Choose a model you want from a list.
  • You can see a drop-down menu appearing as soon as you choose a manufacturer.
  • After that, you should select the “Google Chrome OS Flex” option. As soon as a drop-down menu appears, you should choose ‘OS Flex’ from it. Next, you have to tap on the Continue option.
  • Choose the USB thumb drive and thereafter hit the Continue option.
  • After tapping on ‘Create now’, you can see a Chromebook recovery Utility available.

Chrome OS Flex: Ways to install on Windows, Laptop, or MacBook: 

  • When you have completed the flashing process, you should reboot the computer. Then, you should tap on the boot key. Hit the boot key continuously until you see the boot selection page.
  • Use the arrow keys to choose the USB drive on the boot selection page. Next, you are required to hit the Enter option.
  • You can see now ‘Welcome to Cloudready 2.0 screen’ appearing. After that, hit the ‘Get Started’ option. Go through the instructions on display and then login into the Google account.
  • Your job is to explore the operating system and install this on the hard drive.
  • After that, your task is to open the Quick Settings panel and tap on the Sign Out option.
  • You should tap on the ‘Install CloudReady’ option available on the bottom-left corner.
  • After that, you are required to tap on Install CloudReady 2.0 option and tap on it again. Then, tap on the ‘Install’ option.
  • Finally, you can see the operating system available on the device.

Benefits of Chrome OS Flex installation:

You can install the software on the computer and Macs to protect these. After installing this, your system will work fast and automatically update itself in the background. You can manage these from the cloud.

Quick modern work experience:

Installing the OS helps to boot quickly, update the background, and reduce your device downtime. You can quickly access the VDI and web apps using an intuitive, clutter-free, and reliable experience.

Quick deployment and simple management:

Use the USB or network deployment to deploy it across the fleet with policies and a user’s settings. If necessary, you can use the Google Admin console to adjust updates and configure device policies remotely.

Proactive security:

It blocks the sandboxing technology and executables for which you are not required to use antivirus software. The IT controls do not allow data loss on lost or stolen devices.

Make the most of existing hardware:

You need to refresh the old devices using a modern OS. Then, you should boost the lifespan to decrease e-waste.

How does it operating system work?

If you are willing to experience the OS, you should use a USB drive on the PC or Mac. Setting up the web-based OS merely takes some minutes to be finished.

Steps:

  •  You need to generate a bootable Chrome OS Flex USB drive for installation.
  •  As soon as the method of creation is completed, then you should install the operating system on Windows or Mac to exchange the operating system.
  • Finally, you need to deploy the operating system to more devices through a USB drive or network deployment.

When to consider in Chrome OS Flex web-based operating system:

If you want to know about Chrome OS or accelerate cloud-first OS deployment, then the OS can make this simpler than ever.

You can use recent computing with cloud-based management. Just install the operating system and experience its benefits for Macs or PCs.

Use the modern operating system to decrease e-waste and increase the lifespan by transforming the existing devices.

You may deploy a cloud-first OS on the purpose-built hardware for kiosks or digital signage.

Adjust & protect the Chrome OS Flex fleet with Chrome Enterprise Upgrade:

With the help of Chrome Enterprise Upgrade, you can unlock the default business capabilities of the OS. You should use the Chrome Enterprise Upgrade for managing these alongside Chromebooks.

Advanced security:

It allows you to disable devices remotely and turn on the sign-in restrictions. Thus, you can keep the information protected in the right hands.

Control updates:

Use this to roll the updates out slowly or automatically with an additional option for the long-term support channel.

Granular device controls:

It helps to turn on the single sign-on and identity-free login. Besides, it is useful in configuring printers and WiFi networks.

Reporting and insights:

It can pull 7-day active metrics, OS versions, and crash reports.

Conclusion:

Google has created Chrome OS Flex that is simple to use and download. Users can have this for free on their computers or laptops, and they merely should have a USB drive and a compatible system to run this platform.


read more
AppsGadgetsInternetTechnology News

How to Fix a Corrupted SD Card?

How to Fix a Corrupted SD Card

It may happen that you are using your SD card, and it fails suddenly without warning. In most cases, SD cards display tell-tale signs of corruption/damage before they stop working. Whether you can recognize the signs, you can backup your data in time. Then, you can fix the problem. This article lets you know how to fix a corrupted SD card.

How to Fix a Corrupted SD Card:

These are some Ways to fix a corrupted or damaged SD card.

  1. Try another USB Port or change Adapter or Card Reader:

It is one of the most straightforward processes that you can try. That’s why you need to try this method first, and then you are required to move on to other fixes to solve the issue.

Whether you are using a laptop with a default SD card reader, buying a USB card reader is advised. You should try different types of USB ports, and it will be better if you use these more than one computers.

  1. Try CHKDSK Command for Checking Memory Card Issues:

A command-line utility exists in all types of windows, allowing you to check a volume’s file system and file system metadata. We know the utility as CHKDSK, and the command is simpler to use than you think.

If you are willing to solve issues related to a corrupted SD card with the help of a CHKDSK command, you should perform the steps.

  • Your first job is to write “cmd” in the search box that you can see available on the taskbar. After that, you are required to choose Run as administrator.
  • Next, you need to put the command given below, and after entering the command, you should tap Enter. Ensure that you have replaced X with the letter assigned to your SD card.

chkdsk X: /f

Here, this /f parameter says the utility to fix your memory card.

  • Now, you should wait for a while till the CHKDSK process is not finished. This method can take some hours, but it relies on the size of your SD card.

You can use all the methods given in this article to fix a corrupted SD card. These help to fix all types of SD cards.

  1. Use SD Card Data Recovery Software:

When your SD card becomes corrupted and damaged, it may happen that you have lost your essential files. If you want to get these back, you must use SD card data recovery software. There are plenty of data recovery software available online.

Most of the online data recovery software is compatible with all SD card types, such as SD, SD High Capacity (SDHC), and SD Extended Capacity (SDXC). It helps to recover documents, images, videos, etc., quickly. In addition, the recovery solution allows you to preview recoverable files before recovery.

That enables you to recover up to 500 MB. In addition, the tool features a few helpful data protection and backup features, which help to learn to keep your SD card secured against future data loss.

If you are willing to recover files with the help of the data recovery software, then perform the steps—

  • In this case, you should first download the software and install this after that.
  • Next, you need to attach your SD card to the PC, and then you should launch the tool.
  • Now, you have to choose your SD card, and after that, tap on the Search for lost data.
  • You are required to check files that you have recovered.
  • Then, you should tap on the Recover button at the bottom.
  • You should now specify your destination for recovery. Then, tap on OK to start the recovery process of the files.
  1. Use Card on Another Computer:

It may happen that the SD card that you use is working correctly. Therefore, problems that you experience are caused by the PC. In this case, you need to use the card on other PCs or devices to rule out the chance.

Hence, if necessary, you can take help from any of your friends, so they will allow you to use their PC. In addition, you may go to a public library and use any PC. Thus, you can verify your problems to check if it is occurring on other devices.

Want to diagnose a microSD card? If you have a mobile where a microSD card slot is available, you can use the device as an easy-to-use test device. You can verify the card’s functionality without a PC if you want. However, you need to be careful because your device may need to format your SD card. Therefore, you should ensure that you are not erasing this accidentally.

  1. Assign a New Drive Letter:

Multiple SD card issues are there, which you can solve by assigning a new drive letter to the SD card. These errors usually have something to do with conflicting drive letters.

If you are willing to assign an updated drive letter to an SD card, you must perform the steps.

  • You should first navigate the search box and write “disk management” there. You can see the box on the taskbar. Then, you should choose the Create and format hard disk partitions.
  • Next, you need to tap on the SD card. Then, you should choose the ‘Change Drive Letter and Paths…’ option.
  • Now, you have to tap on the ‘Change…’ button.
  • After that, you should choose a new drive letter and then hit OK.
  • Lastly, you should tap on OK again to turn off the Change Drive Letter and Paths window.

Conclusion:

This article lets you know how to fix a corrupted SD card. First, make sure that the memory card you have should support your mobile device. Try always not to lose data. That’s why you should follow the right processes to fix the corrupted SD Card problems. If you cannot solve the problem through these methods, then use some online SD card recovery services. Finally, ensure that you have chosen the correct memory card to strike a balance between a memory card and your device.

Frequently Asked Questions: 

  • Can a corrupted SD card be reused?

Yes, you can use this unless physical damage is the reason behind corruption. Then, after fixing the corruption problem, you can reuse the SD card.

  • Why does an SD card get corrupted?

A few common reasons for SD card error are—  improper use, malware, accumulated bad sectors, manufacturing defects, and physical damage.

  • Is it possible to recover photos from a damaged SD card?

Yes, it is possible to recover images from a corrupted SD card. But it relies on the condition of your card.

read more
AppsDo It YourselfInternet

How to Use Laptop as a Monitor for PS4?

How to Use Laptop as a Monitor for PS4?

Willing to play video games? But unable to do so because someone is watching programs on the TV? Then, you may want to use your PC as a replacement screen. In this article, we will let you know how you can use a laptop as a monitor for PS4.

Hence, the things required are PS4, Laptop, HDMI, remote controller, and Micro-USB cable (network connection). Whether you like to plug your PS4 into a laptop display rather than a big LED TV, it is essential to have these things. You should know that you are unable to attach High Definition Multimedia Interface port on the Laptop directly. The reason is that this one is unidirectional. Using the HDMI port, you can see the content of your PC to the external monitor only. But you require the video input and HDMI input to create a link with PlayStation to the laptop display.

How to Use Laptop as a Monitor for PS4:

It is not so easy to use a PC as a monitor like you connect it to the HDMI cable. The reason is that PlayStation 4 and laptops both use HDMI outputs. Each of these is not designed for HDMI input.

As a choice, you can purchase a video capture card or take the help of a game-streaming service. But the issue is that each of them introduces significant input delay. If necessary, you can use the physical HDMI ports because these are backward compatible. But the wires are compatible with video signals in one direction.

However, removing the panel of the Laptop can be done technically. Then, you are required to find a controller for the ribbon plug for transferring to the HDMI. After that, you can use this as a display.

Both can be damaged if you have attached two HDMI output devices through HDMI. A few methods are there to make a connection between PS4 and your Laptop. The two simple ways are using a capture card and a streaming service or Remote Play.

Connect Laptop and PS4 via a Video Capture Card:

A video capture card is a small tool to watch content from your console on another device. Besides, a video capture card allows you to record video footage. Use the capture cards to attach the Laptop as a monitor.

You need to acquire and prepare the necessary accessories for the setup.

If you want to make the system, first, you will require the Laptop, Ethernet or WIFI connection, a video Acquisition device, network connection, HDMI wire, and compatibility for file sharing. In most cases, you can see people using a video capture card while streaming or recording console games.

But these can’t deliver the best performance for direct gaming because they lag from the input delay. However, it works well while you screen records your games.

Requirements:

  • A video capture card
  • A dual-functioning HDMI cable
  • A PS4 model with a File Sharing option
  • An Ethernet or a wireless network connection
  • A laptop

Check Connection Settings:

Your first task is to navigate to the Settings first in the PS4 menu to turn on file sharing. After that, you should navigate to the network settings. Then, you are required to open the Internet Connection Settings and look for the network connection. Now, ensure that you have connected your device.

If there is no wireless connection, it is necessary to configure the PS4 and the Laptop to the same router. This job can be done taking assistance from Ethernet cables. It allows you to stream between the two.

Install the Software:

Take the help of the USB port for connecting the Video Capture Card to your Laptop. It will constitute a combined S-video connection. You should install the software available with the Video Card so that it works properly. Here, you need to ensure one thing is that your video capture card is of top quality.

Plug HDMI and PS4 to Capture Card:

If you are willing to plug the video card into the PS4, it is necessary to have an S-video connection wire. After that, your job is to connect the HDMI-IN on the capture card and connect HDMI-OUT on the PS4.

Open and Run the Software:

Your task now is to see whether the software can be opened or not. After opening the software, your job is to power up the PS4. The software will find the device and then display it on the screen. Here, you must make sure that the app should be in full-screen mode for displaying the full resolution. Ensure that you run the software after finishing the procedure.

Following the steps, you can configure the Laptop to stream gameplay from the device with HDMI.

How to Download Remote Play on Windows:

It is effortless to download the Sony Remote Play. Just go to the official website of Sony and download it from there. In this case, you should be careful about one thing that is you can choose the right operating system for your Laptop.

This gives two options— Mac and Windows PC. In case you download the incorrect version, you cannot install and operate it.

How to Set Up a PS4 for Remote Play:

When you have finished downloading the correct version for Windows, and with the help of the software, you can play PS4 on your Laptop. You will get improved stability in this latest update. So, those who have downloaded the Remote play already can get the updated version.

The steps you are required to perform to install the PlayStation Remote Play for Windows are as follows:

As soon as you complete downloading the software, you should run the installation file. It helps to open a new dialog box. In the dialog box, you can see the instructions letting you know the installation process and setting up correctly. You have to ensure that you must download the extra features also. If you are willing to download the additional features, you should check the right options available in the dialog box.

When the installation process is completed, setting up the PS4 gaming console is necessary.

If you are willing to set up, follow the instructions.

Steps:
  • First, your job is to enable the PlayStation 4 console and subsequent move to the Settings.
  • After that, your task is to tap the Remote
  • Play Connection Settings.
  • As soon as you open the settings tab, you need to choose the Enable Remote Play checkbox. Thus, you can turn on PlayStation 4 to interact with the installed Remote Play software.
  • After that, your job is to return to Account Management from PS4’s Settings.
  • Set up the console of the device as the primary system. Next, you should tap on the Activate as your Primary PS4. Then, you have to tap the activate option.
  • When the console is in rest mode, you can use the Remote Play feature.
Steps that need to be performed are:-
  • First, your task is to head towards the PlayStation 4’s settings menu.
  • Now, you should move to the Power Save Settings.
  • Next, your job is to tap on the Set Features Available option in rest mode.
  • After that, you should go to the Enable Turning on PS4 option and check it from the Network. You should keep a connection with the Internet checkboxes.

Thus, you can set up the Remote Play on PlayStation.

How to Use Remote Play and Connect PS4 to Laptop:

Heat distribution plays a major role if you are using a graphics card. A preset fan speed curveball can be used, decreasing the speed or boosting it depending on the GPU temperature. The feature helps to determine the cooling performance while the heat is produced.

Thus, it is possible to overclock the GPU avoiding damages.

It enables you to save the presets to use these. Thus, the utility will configure to the desired settings.

How to Connect the Laptop to PS4 with the Help of Remote Play:

When you complete downloading, installing, and setting up the Remote Play, you should use that after that to run the PS4 on your Laptop.

Things that you need to do here are:

  • Your first task is to power on the PlayStation 4. If you are willing, you can put this into the rest mode. But make sure that the PS4 has been configured for that mode.
  • After that, you are required to attach the controller to the Laptop. You can follow two methods— use the DUALSHOCK USB wireless adapter or USB cable.
  • You should go to the installed Remote Play Software and open it on the Laptop.
  • After that, your task is to hit the start button.
  • As soon as the window asks you for the information, you have to put the credentials for signing into your PlayStation Network account.
  • While you are using Remote play, ensure that a good network connection is available. Otherwise, you can experience lagging on poor internet connection.

How to Connect PlayStation 4 to a Laptop via PlayStation Now:

PlayStation Now is a PlayStation console gaming experience that doesn’t have any PlayStation console. It is the latest gaming subscription-based service of Sony through which you can play the PS2, PS3, and PS4 games. You don’t need to purchase the console or the game.

The service is not free, but it offers multiple amazing PlayStation games. You can access them quickly and play them without a PS4.

If you are willing, you may test the trial version of the service. You will need

Windows 7,8.1 or 10, Intel Core i3 with 3.5 GHz or AMD A10 with 3.8 GHz, minimum 2GB Memory, and 300 MB Storage.

How to download PlayStation Now for Windows:

You should download the PlayStation Now and install it after that. To do this, you are required to follow the steps.

  • If you are willing to download this, your first task is to move to Sony’s official website. You are capable of Googling it also using the related keywords. For example, you can use Sony PlayStation Now. After that, your job is to tap the official website of Sony. Thus, you are capable of opening the PlayStation Now downloader webpage.
  • As soon as you download this, you need to open the setup wizard. Then, you have to tap on the next option.
  • Now, you have to agree to the license agreement, and then you have to tap on next.
  • Move to the folder of your Laptop in which you are willing to install the PlayStation Now. After that, you should tap on the next option.
  • You have to check the box then to generate a shortcut for the desktop. Then, you should tap on next again to move forward.
  • Hit the install button now.
  • You can see a prompt appearing two times, allowing the app to change the system. Then, tap on the allow.
  • After that, you should tap install that is available on the install popup wizard. The PlayStation Now can take some minutes for installation.
  • As soon as you finish installation, your job is to tap on the finish option. After that, the PlayStation Now will launch automatically. In case it doesn’t happen, begin this manually.

How to Use PlayStation Now and Play PS4 on a Laptop: 

  • Your first job is to choose the date of birth, region, and language. Now, you are required to tap on the submit option.
  • You have to tap on a sign-in option that is available at the top right corner of your display. In this case, you may need to update some settings.
  • After that, your job is to tap the “start free trial” available at the top of the homepage. As soon as you tap on this, it will go to the browser.
  • You have to choose a 1-month subscription or the 12-month annual subscription when you see the options. It depends on what you prefer. After the trial period ends, you will be charged automatically.
  • You need to choose the “choose a version” option available on the left side of the page.
  • Your job is to type the credentials to log in to the Sony Account. You should use the same account to sign in to PlayStation Now.
  • After that, hit the “7-day trial” option.
  • It may happen that you have not saved any payment billing details already. Hence, you need to put the payment details as per your preferred method.
  • As soon as you register the payment details, return to the app and play games as you prefer. It is possible to cancel the subscription before the ending time of the free trial. In this case, you are required to head towards Sony Settings on your Laptop. Then, navigate to the Account Management, Account Information, and PlayStation Subscription, respectively. Next, you need to choose the PlayStation Now Subscription option and disable the Auto Renew option.

Plug the controller into the Laptop if you’re willing to play games. Perform the steps to do this.

Your first job is to use the USB cable to connect the controller to the Laptop.

After connecting, you can see a controller icon appearing on display in the top right corner. Tap on the option for connecting the controller.

Thus, you can attach the controller.

Built-In Recording Function:

PlayStation 4 comes with a built-in recording function using which you are capable of recording the gameplay with voice narration. Then, you should store this on the Laptop.

This feature enables you to broadcast the PS4 directly to your Laptop display.

  • The setup process is straight forward
  • You have to ensure that both PS4 and Laptop should be connected to a similar network.
  • Then, you can open any game that you are willing to play or record.
  • Next, you should hit the “share” button available on your controller. Now, a menu appears in front of the screen with multiple sharing sub-options.
  • Tap on the “advance settings” and click the “broadcasting settings” sub-menu.
  • Finally, select your Laptop from the window and then begin streaming.

If you are willing to add voice, you can do this too. However, the primary job of this function is to record the video only. As soon as you feel fine with the settings, play any game as you prefer. The settings will record this automatically.

Playing PS4 on a laptop is very useful. If you use HDMI, it becomes cheaper and more reliable. Besides, there is no necessity to invest plenty of money to get the gaming experience. The best advantage is that it allows you to stream games without lagging.

OBS Recording Software:

It is a third-party display recording software using which you can use a laptop as a monitor with the PlayStation 4. In this case, the benefit is that there is no need to take the help of a video capture card for playing PS4 on a laptop.

The software comes with a few advantages that are:

  • It is open-source software for free use.
  • The software is equipped with features like High-performance real-time AV capturing.
  • Audio mixing, noise suppression, and gain Streamlined settings.
  • Studio mode enables you to review the PS4 screen recordings and delete the parts that are not essential.
  • It supports Windows, macOS, and Linux devices.

Steps that you are required to perform are:

  • First, your job is to download the OBS recorder by navigating to the official website and installing it afterward.
  • Then, you have to open the software and select the window capture option.
  • It allows you to customize your recordings based on the available settings.
  • Next, head towards the display of PS4 and then choose “OK.”

Compared to video capture cards, this software is easier to use.

Using PSNow to Play PS4 Games:

PSNow can run off the PlayStation Network. You might not experience speed too much. However, your network speed is also a dependent factor. It has a drawback that is the app is a little bit expensive.

If you cannot use your Laptop as a monitor, you can purchase a portable monitor. A lot of portable monitors are available in the market. Most of them are known as tablets and can be used with laptops and other devices.

There is another benefit of using a portable monitor. It enables you to use this as a second screen for your device. When making any road trip, a portable monitor can become very useful.

The Bottom Line:

Did I wonder how to use your Laptop as a monitor for PS4? We have covered the topic in our article. These ways come with simple steps that don’t need too much time. Therefore, you can run without waiting for a while and play the games without waiting for a while.

It is possible to connect PS4 and Laptop through a Remote Play or via a Video Capture Card. You can try any of these methods. However, it is recommended to use Remote Play because this one is Sony’s official alternate gaming-streaming solution.

Frequently Asked Questions: 

  • Do you have to use remote play to play the PS4 on your Laptop?

No, it is not mandatory to use Remote Play. It is one of the simplest and most in-expensive processes you can try.

  • Will your PS4 run smoothly on your Laptop?

If you want to use a laptop as a monitor, it is necessary to use an HDMI cable, video capture card, or Remote Play. To follow the methods and perform, you should have a strong internet connection running smoothly. If you don’t have a strong connection, you may experience a lag between the controller and the Laptop. Besides, laptops of low-end models can face troubles while running the PS4 properly. If the Laptop is on the lower end, you have to manage the fps and resolution settings.

  • How do you know if my Laptop is HDMI input or output?

It isn’t easy to get a laptop with HDMI input. In most cases, laptops contain HDMI output, due to which it is unable to receive a video signal except its motherboard. It indicates that you cannot connect other output devices easily to your Laptop. You should check once the specifications of your Laptop and see if it comes with HDMI output or input. Whether your Laptop is HDMI-input, it is possible to make a direct connection between your PS4 and Laptop via the HDMI cable.

read more
AppsDo It YourselfGadgetsInternetInternet SecuritySoftwareTechnology News

How to Fix err_address_unreachable Error in Your Browser

How to Fix err_address_unreachable Error in Your Browser

Most of the people across the world prefer to use Google Chrome as a browser. However, many users have already encountered the message ERR_ADDRESS_UNREACHABLE on Chrome. If you have already faced the problem, the reasons can be router issues, proxy settings, wrong website access environment, server problems, etc. Due to these issues, you may be unable to access a few sites on your PC.

What Does The err_address_unreachable Error Mean?

This err_address_unreachable error message is common on the Chrome browser while using a Windows PC. It usually happens for the Domain Name System (DNS) when it carries an error. This is the reason due to which you are unable to load web pages using the host.

What causes the error “ERR_ADDRESS_UNREACHABLE” in the Chrome browser?

We have given here the reasons for which you can face the issue while trying to access any site on the browser.

Router Issues:

The router that you are using can create problems in submitting requests to the designated ports.

Proxy Settings:

Whether you use a proxy network to access websites, it might not handle your requests properly. In this case, you have to disable the proxy server or try to enable it as per the situation.

Wrong Website:

This message can appear while you are trying to access a private address in a public network.

Server issues: Whether you are a website owner, you should know whether your users can access your site or not. The error can appear due to some other reason related to your site.

DNS Cache Problem:

The chrome browser stores caches of different sites. Hence, the DNS cache can be a reason for the err_address_unreachable issue.

Antivirus Issue:

If you use antivirus to check websites, you can find the site spam or harmful. The installed antivirus may block the chrome browser and not allow it to reach the website.

Slow Internet Connectivity:

While you are using any network, the internet connection can be low, due to which you may not load a website. Hence, the browser displays the err_connection_timed_out message. Sometimes, it can display the message Err_network_changed where the address is unreachable.

When you are trying the fixes, ensure that you have a proper internet connection. However, whether you are willing to access a private address, you should be in the network.

err_address_unreachable’ Error on Chrome:

When you see the error, you cannot access the websites you prefer for some reason on the Google Chrome browser. The ‘This site can’t be reached’ message comes with the ‘err_address_unreachable’ error code. The message says that you are unable to get access to the webpage. So, it is essential to run Network Diagnostic to identify the real reason for the error. Ensure that you are refreshing the webpage on the chrome browser, then check if it works.

Sometimes, you can face the problem due to temporary glitches in the networking equipment and Windows. Hence, you are required to try to reboot both your router and PC. Then, you should check whether restarting the device helps to get rid of the issue or not. Generally, router and router settings-related issues are the reasons for the error. If you’re willing to solve the error, restarting or resetting the router can help you. If the proxy server settings are turned on on the Windows computer, you can also see the error. However, problems with the website server itself are also one of the causes of the issue.

Similar Types of NET::ERR_ADDRESS_UNREACHABLE Error problem:

  • Err_address_unreachable ubuntu
  • Err_address_unreachable opera
  • Net::err_address_unreachable
  • Err_address_unreachable mac 2018
  • This site can’t be reached
  • Err_address_unreachable mac 2020
  • Err_address_unreachable wordpress
  • How to fix err_address_unreachable chromebook
  • Err_address_unreachable reddit
  • Jio fiber err_address_unreachable

How to Fix err_address_unreachable the Error on Your Browser:

First, ensure that no problem will be there at the server-side. If there is no problem with the server, then the issue is at your side. Before proceeding with the fixing methods, you have to ensure that you have proper network connectivity. When you see the network connection is fine, then check these solutions given below.

Restart Your Router:

In most cases, when you restart the router, you can solve the issue immediately. Multiple cases are there where the router goes into an error state. If you face the situation, restart the router to get rid of the error message.

First, your job is to close the power supply of the router. After that, your task is to wait for around 2-5 minutes.

When the time has gone, turn it back on. Wait for a while, and then try to attach the PC again.

After that, try to access the website and then check if you are still facing the error.

Are you unable to fix the problem? Are you facing it till now? Then, reset the router. In this case, one thing you have to ensure is that you must know the details of the ISP of the router. If you don’t know, then you should know it first before resetting the router.

Hence, your job is to first find the small hole behind the router device with the reset tag.

Use a little pin after that, and then try to tap the hole continuously for 4-5 seconds.

Now, you can connect the router after a reset. Use an Ethernet wire if necessary and then head towards the router address. You can find the router’s address on the backside of it in most cases.

Next, you are required to put the details that you get from your ISP to access the network. Finally, check if the issue remains.

Disable Proxy Server:

A proxy server is the same as a VPN, and therefore you can use it with ease while connecting to a public network. When you use a proxy server outside of the organization or office, it can cause connection problems. In this case, you have to turn off the Proxy settings.

If you want to disable the proxy server, your job is to tap the Windows key + R button available on the keyboard to open the RUN dialog box.

When you are in the RUN dialog box, you must write inetcpl.cpl. Then, you should tap the Enter key or OK for opening the Internet Properties window.

Tap the Connections tab when the Properties window is opened.

Then, navigate to the LAN settings tab below the Local Area Network (LAN) settings.

Ensure that you have unchecked the “Use a proxy server for your LAN” option.

Then, you are required to mark the “Automatically detect settings” option.

After that, your task is to tap the OK to make changes. Then, get out of the LAN settings.

Finally, your task is to tap the OK button to get out of the Internet Properties window.

Clear Google Chrome DNS Cache:

Domain Name Server is the full form of DNS. The function of the server is to store the IP addresses of those domains you have visited. This browser helps to increase the speed of your internet browsing. To do this, you have to keep all the DNS data of the sites. You can face the issue due to this error. The reason is that Chrome may use the cache data for accessing the page that has moved to a different IP address.

It is better to delete the DNS cache memory to fix the issue. If you are willing to remove the DNS cache of the browser, then you need to copy the address and paste it into the address/URL bar. Next, your task is to tap the Enter button after pasting this address chrome://net-internals/#dns.

A page appears in front of the display after that. You need to tap the Clear host cache button.

Now, you have to remove the Host data DNS from the PC.

At last, your job is to relaunch the browser. Then, move to the troubled website again. Deleting the cache helps you to reset the device.

Disable your Antivirus App:

If you use any Antivirus software or third-party antivirus programs, it can create issues like ERR_ADDRESS_UNREACHABLE. Whether you want to solve the problem, you have to disable the antivirus program temporarily. Then, you can check if the issue remains.

If you find the antivirus software not causing the issue, you must enable the antivirus software again to keep the PC protected.

For Windows Defender:

Tap the Start button or Windows logo key first to get available at the lower left.

Then, you can see the settings icon. Tap on that for opening the section of Windows Settings.

When you are in the Windows settings section, you need to tap the Update and Security option.

Next, your task is to tap the Windows security available at the left pane.

Navigate to the protection areas section and tap on the Virus and Threat protection. After that, you will see a window appearing on display.

When the new window appears, you must tap the Manage settings option from Virus and Threat Protection settings.

Then, your job is to toggle the Real-time protection off.

Finally, reboot the PC.

For AVG:

First, tap two times on the AVG icon on the system tray.

Hit the option Temporarily disable AVG protection.

Then, choose the timing for how long you want it to be disabled. Select if you are willing to turn off its Firewall too. Tap the OK option if you are ready to disable the antivirus program.

For McAfee:

First, your task is to tap on the McAfee icon two times. The icon is available on the system tray.

Tap the Exit option after that.

Next, you can see a dialog box appearing saying that McAfee protection will be turned off. Hence, you have to tap the Yes option for turning off the antivirus program.

For Avast:

Hence, you need to tap on the Avast icon twice, which is available on the computer system tray.

After that, your job is to tap the Avast shields control option.

Now, you have to find the options for turning off the program. The options are as follows— for 10 minutes, an hour until the computer is restarted, or permanently. The option permanently indicates that it remains disabled until you turn this on again. After that, you have to select an option suitable for you. Use the option for turning off the program.

Launch the browser again and then check whether the issue remains or not

Reset TCP/IP:

We know TCP/IP as an internet protocol component useful for connecting with a network. When this gets corrupted, you can face a problem due to which you may not be capable of loading a webpage. Hence, resetting the TCP/IP of the PC can help you to solve the problem. If you cannot fix the error, you may want to reset TCP/IP with Command Prompt.

You should always be careful as your device may be affected if any wrong operation occurs while using Command Prompt. An improper operation can lead to data loss.

Step 1: First, your task is to navigate the Run window and open it. After that, you need to write cmd and then tap the Shift + Ctrl + Enter buttons for running Command Prompt as administrator.

Step 2: Hence, your job is to enter the following commands. Tap on the Enter after each.

  • ipconfig /release
  • ipconfig /all
  • netsh Winsock reset
  • netsh int ip set dns
  • ipconfig /flushdns
  • ipconfig /renew

Now, get out of the Command Prompt and then helps to reboot your PC. After restarting the computer, you have to launch the browser.

Clear Browsing Data:

Sometimes, the data you are using can be corrupted. In this case, what you should do is clear the browsing data.

We have given here the method for clearing the browsing data from the Chrome browser.

Hence, first, your task is to launch the browser.

After that, you are required to tap the vertical three dots. This menu is available at the top right corner of the browser display.

Next, move to the options list and then select the Settings option.

After that, head towards the Privacy and security section while you are in the settings.

When you enter the section, your job is to move to the Clear browsing data.

Now, go to the Advanced tab.

You should make changes to the Time range to All time. After that, you should check these items.

Browsing history,

cookies, and other site data,

site settings, and

hosted app data.

Tap on the Clear data button at the bottom of the display. Now, you should wait for a while till the data is cleared.

If you don’t clear data from the chrome browser, you should know that the more you clear data, the quicker the process will complete.

Check Address:

You can encounter the error if you try to access a private address while connecting to a public network. There are network addresses like ‘192.168.1.8’ etc. that you can access only in private networks.

You need to ensure that the address you are willing to access is not bound because of networks. If it happens, then you can confirm that you have connected to the correct network. Next, you should try to reaccess the network.

Try these solutions we have given below:

You can access the site in another network using a different ISP.

Besides, if necessary, then use another browser to access the site. If you find the other browser working correctly,

then the issue is with your browser. Hence, you are required to reset the browser or try to reinstall that.

You can check the address in the incognito tab. In this way, you can make sure that if the browser add-ons are the ones who are responsible for the issue.

If you are willing, you can try to access the site on another device but on the same network. Repeat the same process while you are connected to a different network. Thus, you can diagnose the issue to check if the culprit is your device or the network.

Whether each solution fails, you need to contact your ISP.

Change to Google DNS server on DNS Settings:

In most cases, whenever you find DNS (Domain Name System) related problems, you can fix them by changing DNS servers with the help of a Google Public DNS server. Hence, your task is to change the settings on Internet Protocol Version 4 (TCP/IPv4) for your preferable DNS server and Alternate DNS server. Now, check whether you are capable of solving the problem or not.

To get rid of the issue, first tap the Windows key + I buttons together that are available on the keyboard. By pressing the buttons, you can open the Windows settings section easily.

After going inside Windows Settings, your job is to tap the option Network & Internet.

Tap the option Change Adapter that is available below Advanced network settings of network status. Hence, you can see a new window appearing.

Then, your task is to tap on the network that is available in the Network Connections window. After that, you should tap the Properties option from the drop-down menu.

You can see the Networking tab option available below the Wi-Fi Properties. Hence, you have to tap on the option.

Now, you are required to scroll the page down and then tap two times on the Internet Protocol Version 4 (TCP/IPv4) for opening the section.

Tap the “Use the following DNS server addresses” option now.

Input 8.8.8.8 as a Preferred DNS server.

Input 8.8.4.4 as Alternate DNS server

Hit the OK option for making changes.

Next, your job is to relaunch the browser and check whether the message alert is still available in the Chrome Browser or not.

Reset Network Settings:

If you encounter problems with the network settings, you may experience this error message where the address can’t be reached. Besides,  if you are willing to get rid of the issue, try resetting the network settings by going to the command prompt.

If you want to do this, your first job should be to write ‘Command Prompt at the search bar on the lower left.

Next, you are required to tap the option command prompt result. After tapping, a drop-down menu will appear. From there, you have to choose the Run as Administrator option and tap on that.

When you are at the Command prompt window, you should try to write these commands. Then, you should tap the Enter option after each command.

You have to write the command ipconfig/release and then hit the Enter option.

Now, write ipconfig/all and tap Enter.

Write ipconfig/flushdns and hit the Enter key again.

Next, you need to type the command ipconfig/renew and then tap the Enter key.

Write this command now netsh int ip set dns, and after writing the command, you should hit the Enter key.

You have to write the command netsh Winsock reset and now hit the Enter key.

Write the ipconfig/renew command and then tap the Enter key again.

Finally, your job is to restart the PC.

As soon as the PC finishes the rebooting process, you should check whether the ERR_ADDRESS_UNREACHABLE error message is available or not.

Forget Wi-Fi Network and Reconnect:

Hence, you can try to delete the current Wi-Fi network and then connect it again. If you are willing to get rid of the error, you should follow the steps.

First, a drop-down menu appears to see the Network Preferences option at the bottom part of the menu.

Tap on the Wi-Fi option, which is available on the left side, and then tap on the Advanced option available at the bottom right of the pop-up window.

Now, you are required to choose the Wi-Fi network that you prefer to “forget” and then tap the minus sign. After that, your job is to hit the OK option.

Finally, you should type the username and password to reconnect the Wi-Fi network.

Turn on and Turn Off the Airplane Mode:

If you are willing to restart the device’s Wi-Fi and mobile-data components, you need to enable and disable the airplane mode. Try to restart the components as it can solve the error.

Remove Chrome Extensions:

Your PC can display the err_address_unreachable error for the chrome extensions you use. It is another strong reason for experiencing the error message. Using the Incognito mode of Chrome can help you in this case. When you use this mode, your browsing history or extensions are not stored because of the private browsing settings.

You should try to open the page in incognito to check the extensions if these cause the issue. If you can open the webpage with ease in the incognito tab, then ensure that this one is an extension error.

In this case, you must head towards the chrome://extensions to uncheck every extension manually. Then, you have to run the webpage to check which one is the culprit.

Update Google Chrome:

We primarily use Google Chrome as our regular browser to update automatically. However, if necessary, you can update it manually.

First, your task is to tap the three vertically aligned dots that you can see on the browser’s upper-right corner.

After that, your job is to tap the Settings and then Tap the About Chrome option. Make sure that you are updated. Otherwise, it asks you to update.

You should know that other browsers come with similar layouts and update procedures.

Use a Different Web Browser:

While you are using Google Chrome, you can experience plenty of err_address_unreachable error messages.

The reason is that the chrome browser may use its IPv6 DNS settings, due to which you can face the DNS resolving issue. Therefore, you are unable to get access to the websites. A few people experienced in the dns probe identified no internet problem due to this.

It would be best to try to access a similar webpage using a different web browser. For example, you can use Mozilla Firefox or Microsoft Edge. You may be capable of using the page on another browser but face the issue on Google Chrome merely. If it is the reason, then try this method.

Website is Down, Moved or not Exist:

Have you found your ISP not the culprit? Has it not blocked the webpage that you are using? Then, one thing that you can ensure is that your webpage server may be down. You can wait for a day until it comes alive again. Whether the web page won’t come, it either moves to another new address or doesn’t exist.

Use ‘PC Repair Tool’:

If the windows PC is causing the error, then the best way you can follow is to take the help of a ‘PC Repair Tool’ for solving the error. The additional benefits you can get from the software are that it can solve BSOD errors, EXE errors, DLL errors, programs/applicators issues, malware or viruses problems, and other system issues.

What will you do if no method will work for err_address_unreachable Chrome Windows 10?

If you have been experiencing the issue till now, then ensure that you are not the one who is causing the problem. Your device also works well.

How to Fix err_address_unreachable Error on Mobile?

Not only on a computer, but you can also face the issue on your mobile while surfing the web on a chrome browser. Hence, you are required to check the internet connectivity first. If it is fine, then you are required to restart the device.

You should check whether the mobile data or the Wi-Fi is working accurately or not. If the network is working fine, then the issue is on the server side. However, if your server is not responding to your device and responding to another one, follow the steps.

First, your task should be to enable the flight mode. Then, you have to wait for sixty seconds and then disable it.

Next, you should disconnect the Wi-Fi and then connect this again if you see the error.

Now, try to reboot the android mobile.

You can try to remove the browsing data and cache of the chrome browser

If you want, you can uninstall the browser and then try to install this.

Conclusion:

ERR_ADDRESS_UNREACHABLE is a type of error that is available in chrome browsers mostly. When it appears, it indicates that the browser you are using cannot get an answer from the site. It is actually on the IP address linked to your preferred domain name.

However, you should know that you can face the error on the other end of the connection. It indicates that your website may be down or moved. You can also see the error message while your network service provider or network administrator blocks the website.

Frequently Asked Questions:

  • Why are you unable to find the address of all websites?

There are a few websites that are unreachable due to server-related problems. For example, the server may be down or under maintenance. If you want to access an unreachable webpage, wait until the server becomes active. However, when you find the server responding to another device, then the issue is at your end.

  • How can you solve err_address_unreachable on mac?

Hence, you are required to diagnose your Chrome browser and mac book. You can reboot the system and modem, check the network connection, clear the Chrome cache, browsing history, etc.

  • What is Err_timed_out?

While trying to open any website on Google Chrome, it may take too much time to load. But if it fails to load the page, you can see the Err_timed_out error appearing.


read more
1 2 3 4 5 10
Page 3 of 10