close

Internet Security

AppsDo It YourselfInternet SecurityTechnology News

How to Set Up Stolen Device Protection in iOS?

How to Set Up Stolen Device Protection in iOS?

A new feature is introduced by Apple for iPhones and the feature is called Stolen Device Protection. If someone is attempting to access your iPhone, it will provide additional security to your iPhone. Besides, the feature offers security when anyone tries to change the sensitive settings of your iPhone. This crucial security feature is introduced with iOS 17.3 and helps to keep your device protected when it is stolen. If you are away from any location like your workplace or home, it helps you by offering a security layer. Therefore, if someone has stolen your iPhone, the feature ensures that your accounts and personal information remain protected. Now, let’s learn how to set up Stolen Device Protection in iOS.

What Is The iPhone’s Stolen Device Protection?

It is an optional security setting which has introduced extra steps when you or someone will try to access your personal data in an unfamiliar location. Suppose you are using your device in your home or workplace. You will not see any change in your iPhone. But once you use it in a less frequent location, you get to see iOS adding more steps to accessing sensitive information, including different Apple ID details or payment information.

About Stolen Device Protection:

If you are not in any of your familiar places and have turned on the feature already, a few actions and features will have extra security requirements. With these requirements, you can ensure that no one can make any critical changes to your device or account despite knowing your passcode or stealing your iPhone.

  • Face ID Or Touch ID Biometric Authentication:

    A few actions need a single biometric authentication with Touch ID or Face ID. For instance, accessing credit cards or stored passwords need this. And there will not be any passcode alternative or fallback option.

  • Security Delay:

    If you want to change your Apple ID password, you need to wait for an hour. After that, you need to perform a Touch ID authentication or a second Face ID.

When your device is stolen, you can stop a thief from doing some unwanted things using the security delay feature. It allows you to mark the iPhone as lost. Thus, you will be able to ensure that your Apple account is secured. So you need to know what are the essential things to do when your device is stolen or lost.

If you are using your device in one of the common places, you do not need these extra steps. So, using your device passcode is possible like normal. Some of the familiar locations are your workplace, home and some locations where you often use your iOS device. If you want, then set up the feature to always require these extra security measures also when you are using your iPhone in a familiar location.

The feature was introduced with the release of iOS 17.3 or later. Ensure that you enable this feature before your device is stolen or lost. Now, let’s learn what stolen device protection can do and how to set up this protection in iOS.

What Does Stolen Device Protection in iOS Do?

As soon as a person accesses your device, they are able to change your Apple ID password. Therefore, you will be unable to unlock your account. It is not even possible to turn on the Lost Mode on your device using Find My. In order to prevent this, the feature limits the locations where it is possible to take specific actions on your iPhone. Suppose your device is not currently in a familiar location.

Biometric authentication:

In that case. Biometric authentication is necessary for the following actions, which are not possible to be performed with only a passcode:

  • Seeing Apple Card virtual card number.
  • Using passwords or passkeys that are saved in Keychain
  • Disabling Lost Mode
  • Trying to apply for a new Apple Card
  • Auto-fill payment methods in Safari
  • Erasing all content and settings
  • Using the iPhone in order to set up another new device
  • Taking Apple Cash and Savings actions in the Wallet

The security is capable of adding a security delay for other actions when you are not using an iPhone in a familiar location. You should use Touch ID or Face ID, and then you need to authenticate it.

Security Delay:

Thereafter, you need to wait for an hour before doing the actions mentioned below:

  • Turning off Stolen Device Protection
  • Signing out of your Apple ID
  • Changing the Apple ID password you have.
  • Updating the security settings of your Apple ID ( for instance, adding or removing a reliable device, Recovery Contact or Recovery Key)
  • Changing the iPhone passcode you have
  • Adding or removing Touch ID or Face ID
  • Resetting All Settings
  • Turning off Find My

In order to mark your iPhone as lost, the one-hour security delay is more than sufficient when your iPhone is physically stolen. As a user, you are capable of using the Find My app on your device or on another device of yours or you can use the device of someone else.

How To Set Up Stolen Device Protection In iOS:

If you want to use this, you must require iOS 17.3 or later. In addition, it is necessary to have a device where you have enabled Touch ID or Face ID and turned on the Significant Locations settings. When you have done these tasks already, you can turn on this extra security within a few steps.

The below steps are especially for iOS 17.4 and later. The company added an option which lets you use the additional protection while you are even at familiar locations. People who are on 17.3 can toggle on the security without any extra steps. Let’s learn now how to turn on the security feature on your iOS device.

  • Your first job is to open the Settings application.
  • Then, you need to tap on Face ID & Passcode.
  • Next, typing in the passcode is your task.
  • After scrolling down, your job is to tap on the security.
  • Finally, you need to toggle on the Stolen Device Protection.

You need to choose Always, which is available under Require Security delay if you need extra delay time everytime. Or you can choose Away From Familiar Locations if you need the delay only when you are away from any common place.

How To Turn On Or View Significant Locations On An iPhone:

This security needs to use Significant Locations. This setting uses the most frequented location of your phone to add features in Car Play, Maps, etc. But now, it is impossible to customise the data. Based on the location of your device, Significant Locations data has been generated over time. It is possible to see the data’s summary or you are capable of clearing the data when you move to a new house.

If you are willing to access your Significant Location settings, these are the steps you need to follow:

  • Your first task is to open the Settings app.
  • Then, your job is to tap on Privacy & Security.
  • After that, you need to tap on Location Services.
  • Now, selecting System Services is your job at the page’s bottom.
  • Your task thereafter is to find Significant Locations and tap on it.
  • Then, you are capable of turning on or off Significant Locations. You can also view the location of your home or clear out the existing data.

Stolen Device Protection in iOS has Its Caveats:

But this security has a drawback which is that it does not remain active in familiar locations. Suppose a person has got your passcode and then he or she is attempting to change something to the device at your work, home or other familiar locations. If it’s the case, the security feature will not prevent them from doing this. So, ensure that you are not entering your passcode when someone is near you or seeing you to do this.

When another person gets access to your device with the passcode, they can access even your other accounts except your Apple account, where they may be unable to make any changes. However, they might try to access your social media accounts and say that they forgot the password. Then, the site is going to share a new password to the given email ID. Thieves can access the email addresses on the iPhone and get the new passwords. Thereafter, they are able to buy different things and access accounts and social media history. 

Issues That Can Be Created By Security Delay:

The security delay might pose an issue. Suppose you have traded in the old models of iPhones at Apple stores. And you need to turn off Find My and erase the device. In order to do so, you need to disable the security feature before you proceed. But you may need to wait for an hour after trying for the first time, in case the Apple Store is an unfamiliar place.

That’s why it is recommended to turn off Stolen Device Protection at work or home when you are willing to trade in or sell the iPhone. Ensure that you do this before navigating to an Apple Store or another place. So, if you ask, should you need to turn on Stolen Device Protection? Then, you should know that turning on this security setting is a good idea.

Good Practices In public:

Although you have turned on the feature, these are the practices you should remember always:

  • Ensure that you are not giving your iPhone over to strangers to connect on social media, get contact details, etc.
  • You should not enter the passcode of your device in public places. Rather than that, you need to use Face ID or Touch ID.
  • When you are not using an iPhone, you need to put this in your bag, pocket or purse.
  • You must not connect to open public WiFi networks.
  • Ensure that you are not using any public phone charger.

What Happens If Your iPhone Is Stolen?

It is an extra layer which is added to an existing suite of tools. Stolen Device Protection security feature doesn’t allow thieves to steal sensitive information or erase your iPhone. 

Apple’s Find My permits users to  use a web browser or another device in order to locate a missing device. When you realize that your iPhone is stolen, instead of being misplaced, you need to use the Find My tool to mark the device as lost. Thereafter, you are able to use a passcode to lock your iPhone. Additionally, the tool showcases a custom message. For instance, it is possible to see a message saying where to return the phone in case it is lost.

You can also use a web browser in order to change the Apple ID password. Also, Apple lets you erase your iPhone or iPad remotely. Remember that although the warranty can’t recover theft or loss, you can get theft protection from AppleCare+ With Theft and Loss.

The Bottom Line:

When your device is stolen, you can not ensure that your sensitive information remains safe only by enabling the security feature. As soon as someone has stolen your iPhone and accessed your passcode, they are capable of making changes easily in third-party apps. Here, we have discussed How To Set Up Stolen Device Protection In iOS. For any doubts or confusion, you can ask us via comments.

Frequently Asked Questions  

  1. What Devices Does It Apply To?

It is applicable to devices like

IPhone XS and other newer models— second- and third-generation SE models.

  1. How can you stop someone from using your stolen iPhone?

With the help of Lost Mode, you are capable of locking your iPad, iPhone, iPod touch, Apple Watch or Mac. It allows you to prevent others from accessing your personal information.

  1. Why is stolen device protection not available?

In order to enable this feature, it is essential to enable the two-factor authentication for your Apple ID. Besides, your device should have a Face ID, a passcode, or a Touch ID. Also, ensure that you have enabled Find My.

read more
Do It YourselfInternetInternet Security

How to Export Passwords in Firefox? 5 Easy Steps

How to Export Passwords in Firefox

Have you saved too many passwords in Firefox? If so, then you might face issues while switching to another browser or moving between devices without syncing your accounts. Hence, you need to export the saved passwords from Firefox. While you are able to save them as a CSV file which is possible to be stored offline, you can also import them into a password manager. If you don’t need them, you are even able to delete them. In recent times, exporting passwords from Firefox has become easier. We have given here some methods to let you learn how to export passwords in Firefox.

Why Should You Export Your Firefox Passwords?

Some reasons why you are willing to export your Firefox passwords are as follows:

  • If you no longer have access to your device or browser, you have to back up the passwords.
  • You need to switch to a password manager or another browser. Then, you have to import your passwords there.
  • You need to print passwords to save them offline.
  • You may need to delete passwords from browsers for any type of security purpose.

Exporting passwords allows you to manage your online accounts without depending on the browser that you don’t want to use always. Remember that you have to be careful with the exported file. As CSV files are not encrypted, anyone can read them easily. You need to know that storing the file safely is necessary if you need to export passwords without importing them into a password manager. It is recommended that you should delete the exported file on Mac or Windows after you use this.

Where Can You Find And Edit Saved Passwords In Firefox?

Here, we are going to elaborate on the process you need to follow to view the saved passwords and edit them in Firefox:

  • Your first job is to open Firefox.
  • Then, you have to tap on the menu button, which is three vertical lines that can be found at the top right of your screen.
  • Finally, your job is to select Passwords.

How to Export Passwords in Firefox:

Step 1) Open Firefox:

Opening the browser is the first task to start the procedure of exporting your passwords from this browser. If you use a Mac, a Windows PC, or a Linux-based system, your job is to launch Firefox so that you can set the stage to access the Password Manager. It also allows you to initiate the password export process.

Open the Browser

You need to locate the icon to open the browser on your desktop, taskbar, or application menu. Then, you need to tap on this. Alternatively, you are able to find and launch this browser by using the search function on the PC. As soon as you launch Firefox, its familiar interface will greet you. The interface features an address bar, tabs, and different menu options.

Have you set the browser as the default browser? Then, you need to tap on any web link or HTML file to open Firefox automatically. In addition, you are able to customize the startup behaviour of the browser. And to do so, you need to set particular web pages in order to load upon launch. It can deliver a personalized browsing experience.

Once you open the browser, you have to make sure that you use the browser’s most recent version. It is important to keep your software updated for different security purposes. The reason is that it confirms your access to the latest features and enhancements. In order to improve stability, address security vulnerabilities, etc, the browser releases updates regularly. Therefore, it is advantageous to use the latest version.

Steps to Export

When the browser is open and starts running, you can go to the next step to export your saved passwords. You can unlock the capability of Password Manager to export your valuable login credentials.

Opening Firefox will allow you to reach one step closer towards exporting the saved passwords. It helps to set the stage for a secure process that allows you to manage your login data effectively. With the help of the browser interface, you can move to the next process of accessing the Password Manager within Firefox.

This step allows you to navigate through the features of the browser, while setting the foundation for subsequent actions and embarking on the journey in order to export saved passwords from the browser.

Step 2) Access The Password Manager:

The next step you need to perform is to access the Password Manager within the browser. The Password Manager works as a secure repository for the login credentials. With the help of this, you can see, edit, and organize the passwords that are connected to your different online accounts. Once you move to the Password Manager, you can initiate the export process. Then, you need to retrieve the valuable login data in a simple format.

Steps:

You have to follow these steps in order to access the Password Manager in the browser.

  • Your first job is to open the Menu at the top-right corner of the Firefox browser window. The menu is available as an icon with three horizontal lines. In this case, your task is to reveal a dropdown menu by clicking on the icon. The menu contains different options and features.
  • Next, you have to locate the “Logins and Passwords” option and click on it within the dropdown menu. Once you do this, it will take you to the Password Manager. Now, you are able to manage and see your login credentials that are associated with Firefox.
  • Next, your task is to move to Saved Logins. Once you access the Password Manager, you will view a list of the saved logins, like the associated website URLs, usernames, and the option that can reveal passwords. You are capable of reviewing and managing your saved passwords with this comprehensive view. It ensures that you are able to understand clearly the login credentials stored within the browser.
  • If you are in the Password Manager, you should explore some extra functionalities and features which the browser provides. The search bar can be used in order to locate specific saved logins, organize passwords into various categories, etc. Additionally, you can update the outdated credentials or remove them as necessary.

Once you access the Password Manager, you can manage the saved passwords. Now, you need to follow the next step to export your saved passwords.

Step 3) Export Saved Passwords:

It is simple to export saved passwords from the Firefox browser. This procedure can empower users to control valuable login credentials. Exporting these passwords allows you to make a backup of your vital information. So, you can easily move to another browser or a new device, while having a secure copy of your login data. This browser lets you create a file where all of your saved passwords will be available in a convenient format. Thus, it can make the export process simpler. You have to go through these steps in order to export the saved passwords from the browser.

Steps:

  • As already mentioned, you need to first head toward the Password Manager to access it. To do this, you need to open the menu and do the necessary steps we have said earlier.
  • In order to start the export process, you need to find the “Saved Logins” section within the Password Manager. The section can display a list where you can see your saved passwords, the linked website URLs and usernames. Thereafter, your job is to tap on the “Settings” icon, which you can identify through three vertical dots. It lets you reveal a dropdown menu of options.
  • Your task now is to select the “Export Logins” option from the dropdown menu. Then, you can see a dialog box where you get choices to export the saved passwords to a file. You should know that the browser is able to support the exporting of passwords in a CSV or comma-separated values format that is supported by different applications and platforms.
Export Logins
  • As soon as you select the “Export Logins” option, the browser will send a confirmation request to proceed with the export procedure. Now, you need to authenticate your identity. You can use your computer login credentials or other security measures in order to authenticate your identity. It makes sure that only an authorized user is able to export the passwords.
  • Now, your task is to choose Export Location and Name. After confirming the export, you are required to specify the exported file’s name and location. Next, your task is to choose a secure location on the PC. Then, you need to offer a descriptive name for the file so that you are able to retrieve it easily.
  • Your final job is to save this Exported File, which can be done by specifying the file name and location of the exported file. Hence, what you need to do is tap on the “Save” or “Export” button to create a file that contains your saved passwords. The browser can generate the export file that compiles your login credentials into an easy-to-access format.
Note:

If you follow the steps properly, you will be able to export these passwords from the browser. Thus, you can make sure that you have a secure backup of all saved login credentials. By following the method, you can easily maintain control over their valuable login data. It helps to facilitate seamless transitions between browsers and devices, while securing the accessibility of your online accounts.

Step 4) Choose Export Format:

Once you initiate the export process in your browser, you need to undergo a vital step which is choosing the export format for the file you have made. The browser allows to export passwords in CSV format. In this way, you can use the exported data across different platforms and applications.

The CSV format is simple and popular for its universal compatibility. This structured data format separates values within a file by using commas. When you are going to export saved passwords from the browser, you need to choose this format. It ensures that you can import the resulting file into password management tools, spreadsheet applications, etc. Also, you are able to import the file into other software that is compatible with CSV files. Because of the versatility, you can leverage your saved password in various environments. It helps to streamline the procedure to manage and use login credentials.

You can choose the CSV export format to embrace a standardized approach for storing saved passwords and organizing them. It can foster simple usage across different systems. In the CSV file, you can see columns that represent key attributes, including usernames, website URLs, and encrypted password data. These can offer a snapshot of login information in a structured format, which you can access easily.

Moreover, the CSV format can help in the seamless integration & migration of  saved passwords into password management solutions. For better security, it lets you centralize your login data.

How to Export:

Do you need to analyze data in a spreadsheet app to import a CSV file into a password manager, or have to transfer the passwords to another browser? Then, you should know that the CSV format can provide a versatile medium, allowing you to handle your exported passwords.

When you choose this export format, you will align with an adaptable standard for data interchange. It makes sure that your saved passwords can be accessed across various platforms and software.

Now, you are going ahead to perform the next and final step of saving these exported passwords. Once you perform the step, you can successfully complete the export process. It will lead to the successful acquisition of your login data’s secure backup.

Step 5) Save Exported Passwords:

Once you choose this format for the passwords you have saved in Firefox, you have to save the exported file that has valuable login information. In order to perform the step, you need to ensure that you have backed up your passwords securely, which enables you to have control of your login credentials and allows you to access your credentials seamlessly when necessary. Once you are prompted to save the exported file, you need to consider some aspects in order to optimize the security of your saved passwords.

Choose A Secure Location: In order to save your exported file, you have to select a secure location that you can access on your PC. Try to choose a designated folder or directory which should be password-protected or encrypted, as it will help to enhance the security of saved passwords. Thus, it can mitigate the risk of unauthorized access.

Use A Descriptive File Name: You need to give a descriptive name for this file. The name should reflect its contents and purpose. When you incorporate related details like export dates or linked websites, it helps to organize and identify the file amidst your digital assets.

Implement Encryption: You can encrypt the exported file, which contains saved passwords, in order to bolster its security. It is essential to use encryption mechanisms or secure storage solutions when you are willing to include an additional protection layer. It prevents potential breaches or unauthorized persons from accessing login credentials to keep it safe.

Backup The Exported File:

As soon as you save the file, you have to make a backup copy in another location. For example, you can create a copy in a cloud-based storage service or an external storage device. In order to enhance resilience, you have to establish redundant copies of these passwords. It makes sure that several avenues are available to access the vital data.

If you keep in mind these aspects which we have mentioned above, you can fortify your information’s security when you want to save these passwords. Moreover, it will help in protecting your sensitive information. Performing this proactive approach lets you control your saved passwords from this browser, while you can have a reliable backup strategy that is able to prioritize the accessibility as well as confidentiality of the login data.

As soon as you have saved the exported file securely and organized it, the method to export passwords in Firefox has been successfully completed. In this way, you are able to ensure that a resilient backup of your valuable login credentials will be available to you.

How⁣ To Transfer Your Passwords Safely And Securely:

You may face issues in making secure passwords. But keep in mind that these can be remembered easily when you follow these tips:

  • Never use‍ real words or phrases.
  • You should add symbols and capital letters.
  • Mix up numbers and words.

If you wish, you are able to use unique passwords for various accounts. Just use a password protector in order to track them. These kinds of software can store all passwords and usernames securely and allow them to be located and recalled quickly. In addition, these software let you create strong passwords whenever you want to make new accounts.

After making secure passwords, you need to transfer them safely. These are the tips you should follow:

  • You have to check that the websites you enter⁤ passwords ⁢on⁢ are encrypted.
  • You should always use password-protected programs or files.
  • Never save passwords on browsers.

Thus, you can make sure that no one is able to access your credentials. It also ensures that your accounts remain secure and safe.

How To Quickly Export Firefox Passwords With A Few Simple Clicks:

Now, exporting Firefox passwords has become very simple. So, you will not lose access to any social media credentials or confidential accounts while exporting the passwords. These are the steps you should follow:

  • Your first job is to hit the ‘Options’ button on the browser’s top right corner.
  • Then, you need to choose the ‘Security’ option. After that, you have to tap on the ⁣‘Saved Logins’ option.
  • Now, you need to hit the ‘Show Passwords’ button. Next, your task is to press Export as⁣ a ⁢CSV file.
  • As soon as you perform these steps, you can download your passwords in an encrypted CSV file.
  • You need to secure your file in a password-protected folder. Thus, you can make sure that all the personal details remain secure and protected.

How To Keep Your Password Data Secure With Firefox Export:

When it comes to talking about online safety, you should know that it’s important to secure your password data. The Firefox⁢ Export feature allows you to store your login information and save them. And there will not be any risk of  your credentials getting stolen or exposed. These are the major benefits of using this feature to keep passwords secure:

  • It makes sure that your data remains secure and safe in one place.
  • You can set up your system of password protection and customize this.
  • It allows you to sign into different accounts with your stored credentials in order to save time.
  • You are able to transfer passwords onto various devices easily.

In order to enhance the data security, you are able to set up a Master Password. Once you have set a⁤ Master Password,⁣ you are capable of shielding all Firefox Export data ‍from unwanted access.

How To Remove Exported Passwords From Firefox:

You should remove your passwords from the browser only when you are sure that you have exported them from the browser. So, you have to follow these steps in order to remove all passwords in the Firefox password vault.

  • Your first task is to open a new Firefox window.
  • Then, you have to select Passwords after tapping on the menu icon.
  • Next, you need to tap on the menu icon in the top-right corner of the password menu of the browser.
  • Then, you need to select Remove All Logins from the drop-down menu.
  • Now, you should follow the extra on-screen instructions in order to complete the method.

Firefox Export Passwords To New Computer:

  • You first need to connect your USB drive or external disk to the new computer.
  • Then, you need to open the browser Firefox.
  • After that, you have to tap on the menu icon.
  • Now, your job is to select Logins and Passwords.
  • You should now tap on the menu icon in the Firefox Lockwise window.
  • Your next task is to select Import from a File.
  • Once you choose the CSV file you have, you need to tap on
  • Finally, you can add or update the passwords and logins in Firefox Lockwise.

Firefox Export Saved Logins To Google Chrome:

  • Your first task is to close Firefox.
  • Then, you have to open the Chrome browser. Now, you need to tap on the three-dot menu icon.
  • Next, your job is to select Settings.
  • After that, you have to tap on Import bookmarks and settings.
  • Now, your job is to choose Mozilla Firefox from the drop-down menu.
  • Then, you need to uncheck all the other available items. But you need to keep your Saved passwords.
  • At last, you need to tap on Import.

The Bottom Line:

In this article, we have discussed how to export passwords in Firefox. Besides, we have covered how to save these exported passwords and how to remove them from the browser. For further queries or confusion, you can ask us via comments.

Frequently Asked Questions

What is⁣ Firefox ‌Password Exporting?

Firefox ‌Password Exporting enables you to save passwords from the browser. Thus, you are able to access them whenever you need.

How do you export your Firefox passwords?

If you are willing to export passwords, your job is to open the browser. Then, you need to select Options at‍ the top right corner. You need to head toward the Security tab. Now, you should select the “Saved Logins” button. Finally, you are able to save passwords to your computer as a file.

What ⁢are the benefits of exporting Firefox passwords?

Exporting passwords helps to keep passwords safe and secure. Moreover, it helps to remember them and you do not need to enter the passwords whenever you sign into a website.⁤

read more
Do It YourselfInternetInternet SecurityTechnology News

Auto Delete Old Files on Windows 10 and 11

Auto Delete Old Files on Windows 10 and 11

There are several people for whom a cluttered desktop & downloads folder is a way of life — no matter how hard you are trying, they will end up disorganized. Do you wanna perform a bit of digital spring-cleaning? You will be glad to know that several ways exist through which you are capable of keeping your Windows 10 PC decluttered. While you are able to get rid of Windows 10 bloatware, you are also capable of sorting the right click menu. In addition, decluttering the search results is possible, along with cleaning up your desktop. Do you want a more passive approach? Then, this article is for you where you will get to know how to auto delete old files on Windows 10 And 11

Pros And Cons Of Auto-Deleting Files:

Like every technology, auto-deleting files also comes with its benefits and drawbacks. Here are some pros and cons that should be considered:

Pros:

  • The most obvious benefit that you can get by setting up an auto-deletion function is that there is no need to manually delete files. So, it helps to save a lot of time as well as your efforts.
  • It prevents your PC from being cluttered with unnecessary files. Thus, it helps you improve system performance.
  • When you delete files automatically, it will help you to decrease the risk level of accidentally leaving sensitive information on your PC.

Cons:

  • Unintentional removal of files is probably a big fear which a person can encounter.
  • You might not have much control over the type of files that you need to auto-delete. As a result, this process can remove the files that you are willing to keep.
  • After the files are deleted, it is hard to retrieve the files.
  • It is challenging to set up auto-deletion rules. And remember, improper configuration may cause issues like unintentional file deletions.

How To Auto Delete Old Files On Windows 10 And 11:

These are the ways through which you can auto delete old files on Windows 10 & 11.

  1. Using Storage Sense:

The easiest process that you can try, if you are a beginner or less tech-savvy user, is to use the Storage Sense feature on Windows computers. This procedure is simple and very easy. You are capable of managing most temporary or downloaded files which have been living under the hood for ages inside the PC.

It is the process through which you can configure Storage Sense:

For Windows 11:

  • If you are a Windows 11 user, you need to navigate to Settings by hitting the Windows Key + I. Then, you should tap on System and Storage.
  • After that, your job is to enable the Storage Sense toggle.
  • Then, your task is to tap on this to configure Storage Sense. Next, your task is to choose the cleanup duration for the Recycle Bin, Storage Sense, & Downloads Folder.
  • You can set the following settings:

Run Storage Sense: Every week

Delete files in recycle bin: Thirty days

Delete files in Downloads folder: Sixty days

Thus, it can delete old files automatically on your computer depending on the timeline which you have set.

Whether you are willing to run the Storage Sense manually, you have to hit the Run Storage Sense Now button. It helps to clear out all the older or temporary files from the Windows PC.

For Windows 10:

  • As a Windows user, you need to press Windows Key + I to launch the Settings app. Then, your task is to go to the System page.
  • Thereafter, you need to move to the Storage section. Now, you have to enable the Storage Sense feature.
  • Next, your task is to tap on the Configure Storage Sense to make adjustments, or you can tap on the Run It Now link.
  • Then, configuring settings is possible as you want.

Similar to Windows 11, whether you are willing to manually run Storage Sense, your task should be to hit the Clean Now button.

  1. Deleted Old Files Or Folders With The Command Prompt:

The Command Prompt is capable of working with simple text-based commands, letting you perform various admin functions & fix different troubleshooting problems on Windows.

Let’s check the below section in order to fix the storage problems through the ForFiles command on Windows:

  • Your first task is to move to the Start menu search bar. Then, you need to type in ‘cmd’. Now, you have to run the CMD as an administrator.
  • In order to delete files which you have not modified in thirty days, you need to type in the following command. After typing the command, you should press Enter:

ForFiles /p “C:\path\to\folder”/s /d -30 /c “cmd /c del /q @file”

  • Hence, “C:\path\to\folder” and /d -30 refer to the folder path from where you are willing to delete files and the specific time when you wish to delete your file. You need to replace these with the settings that are suitable for you.
  • Once you hit the commands, you will see your files are removed.
ForFiles command breakdown:
  • /p — used to indicate the pathname to start searching.
  • /s — it is used for instructing ForFiles to search inside subdirectories.
  • /d — it is used to specify the last modified date for a file.
  • /c — it helps to instruct the ForFiles tool to execute the command. Remember that this one has to be wrapped in double quotes. Hence, “cmd /c del @file” is the default.
  • /q — It lets you delete folders without requiring confirmation.

However, in order to learn more about these switches, your job is to use the ForFiles /? Command.

These are some of the variables that you can use in the command string:
  • @file – it can return the file’s name.
  • @fname – is capable of returning a file name without extension.
  • @ext – can return only the file’s extension.
  • @path – is capable of returning the file’s full path.
  • @relpath – can return the file’s relative path.
  • @isdir – is capable of returning “TRUE” when you see a directory file type, and “FALSE” for files.
  • @fsize – is able to return the file size in bytes.
  • @fdate – is capable of returning the file’s last modified date.
  • @ftime – is able to return the file’s last modified time.
  1. Use Task Scheduler On Windows:

You should know that Task Scheduler is basically a simple Windows tool allowing you to automate your repetitive Windows tasks. Once you set up the task, the app will be able to handle the activity which you have said it to do. Regarding auto-deleting your files or folders, you can use the ForFiles command, which makes the task of deleting your older files or folders a lot easier.

The process you need to follow to automate the deletion is:
  • Your first task is to navigate to the Start menu search bar. Then, you need to choose the best match after typing in ‘task scheduler’.
  • Now, you need to right-click on the Task Scheduler Library. Then, you should choose the option New Folder.
  • You can enter any name and then tap on OK.
  • Next, your task is to right-click on the folder that was created recently. Then, you should choose the Create Task option.
  • Once you see the Name box, you have to put your name for the task.
  • Then, go to the Security options section in the General tab, where you have to choose the Run whether the user is logged on or not option.
  • Ensure that you do not select the Do not store password checkbox.
  • After tapping on the Triggers tab, your job is to choose the New button.
  • Then, you need to use the Begin The Task Setting to choose On A Schedule Option.
  • Now, your job is to set up the timing of every activity you wish to run under the Settings section. Then, you have to tap on OK.
  • Once you go to the Actions tab, your job is to hit the New button. Then, you need to choose the Start a program option from the Actions drop-down menu.
  • Once you see the Program/script box, you have to type in the following command:
ForFiles

Just like this, you have to type in this command in the Add arguments box:

/p “C:\path\to\folder”/s /d -30 /c “cmd /c del /q @file”

  • Hence, you have to tweak the “C:\path\to\folder” to the folder’s path where the files exist. Then, you have to replace “/d -30” with the actual number you want to choose. Therefore, your command will be like this:

/p “%userprofile%\Users\[Your Username]\Downloads” /s /d -30 /c “cmd /c del /q @file”

  • After that, you have to tap on OK. At last, you need to check these checkboxes from the Settings tab. Now, you have to tap on OK.
  • Now, you need to allow the task to be run on demand.
  • Then, you have to run it as soon as possible, once a scheduled start is missed.
  • However, you need to restart all of them if the task fails.
  1. Delete Files Older Than X Days with File Explorer:

This process will let you know how you can delete files older than X days using File Explorer. These are the steps which you need to follow.

Step 1: First, you need to open File Explorer by pressing the Win + E keys.

Step 2: Then, you need to head toward the folder where your files exist. For instance, you can go to the “Downloads” folder.

Step 3: Next, your job is to tap on the Date Modified Dropdowns. After that, your task is to choose a date range according to your requirements. You can see all files in the date range.

Step 4: Now, your task is to select the files which you want to delete. Then, you have to hit the Delete button on the top bar.

  1. Delete Files Older Than X Days With PowerShell:

Do you wish to delete multiple files from different folders & clean up by deleting older than specific days? If this is the case, you obviously want to use PowerShell to delete files which are older than X days. You need to follow these steps to delete files with it:

Step 1: Your first task is to left-click on the Windows main menu button. After that, your job is to look for Windows PowerShell. Then, you need to right-click the result. Now, you should choose Run as administrator.

Step 2: It opens the Windows PowerShell window. Then, you have to type in Get-ChildItem –Path “C:\path\to\folder” -Recurse | Where-Object {($_.LastWriteTime -lt (Get-Date).AddDays(-X))} |

Remove-Item to delete files which have not been modified in the last few days. Then, you need to tap on Enter. You have to also change the path location: “C:\path\to\folder” with the location of the folder you want to delete. Then, your job is to change -X in order to choose files with the date that is modified last in the above command.

Finally, you need to tap on OK after finalising the changes. And the task does not take too much time. Therefore, you can delete your files automatically within the specified time. If you are willing to change your decision, then delete the new folder made by you simply to reverse the setting.

  1. Using Microsoft PC Manager:

A new tool for Windows 10 and 11 was introduced by Microsoft in 2022, and it is known as Microsoft PC Manager. With the help of the easy-to-use tool, you are able to clean temporary files & manage memory usage. The app includes an option in order to delete temporary files automatically. It helps you to keep the computer free from unnecessary clutter. Follow the below section to know how to do so:

  • Your first task is to download the Microsoft PC Manager app if it’s not downloaded already. Then, you need to open the application.
  • Now, your job is to tap on the Gear/Cog icon. Then, you have to choose the Settings option.
  • Finally, you need to enable the toggle that you can see beside the “PC Manager will automatically boost your PC”.

Because of some bug, the PC Manager could not auto-delete the files. Whenever it happens, you need to clear out the data manually. In order to do so, your job is to tap on the Boost button. Then, you can see the temporary files are deleted instantly from your computer with memory usage.

  1. Delete Files Older Than N Days Using Script:

VBScripts help to delete files that are older than N number of days on a particular folder path. And the VBScripts are available to the Spiceworks forum users. We have given here a simple script:

On Error Resume Next

Set oFileSys = WScript.CreateObject(“Scripting.FileSystemObject”)

sRoot = “C:\Path To Old Files”                                    ‘Path root to look for files

today = Date

nMaxFileAge = 3                                                         ‘Files older than this (in days) will be deleted

DeleteFiles(sRoot)

Function DeleteFiles(ByVal sFolder)

Set oFolder = oFileSys.GetFolder(sFolder)

Set aFiles = oFolder.Files

Set aSubFolders = oFolder.SubFolders

For Each file in aFiles

dFileCreated = FormatDateTime(file.DateCreated, “2”)

If DateDiff(“d”, dFileCreated, today) > nMaxFileAge Then

file.Delete(True)

End If

Next

For Each folder in aSubFolders

DeleteFiles(folder.Path)

Next

End Function

Hence, you get to know from the script that it takes into consideration the “Date Created” property of items rather than “Date Last Modified”. Whether you wish to delete files which have not been modified in the last N days, your task is to change this line in the script:

dFileCreated = FormatDateTime(file.DateCreated, “2”)

to

dFileCreated = FormatDateTime(file.DateLastModified, “2”)

It helps to clear files older than 3 days. Your job in this case is to modify the folder path. Then, you need to max file age parameters in the script as you need. After that, you need to save this file with a .vbs extension & thereafter, your task is to run it. Remember that the script works recursively on the specified folder & sub-folders.

How To Create A Batch File:

You may find creating a batch file too technical or a bit difficult. But there is nothing to worry about as you don’t need to know its meaning.

Hence, your first task will be opening Notepad. Then, you need to copy the following text line and paste this:

forfiles -p “C:\Test” -s -m *.* /D -5 /C “cmd /c del @path”

You will not understand the line, but after going through the explanation, you can know what it indicates. Basically, it asks Windows to delete the files in the C:\Test folder as well as the sub-folders which are older than 5 days.

Test:

Before getting into more details about the command, remember that you have to save the file first. Then, you need to perform a test run. So, first, you have to generate a folder at the root of the C drive on the PC and the folder name is Test. After that, your job is to tap on File – Save. Now, as a batch file, you need to save the file. In order to do so, your job is to type in a name, which is followed by .bat. Next, you need to change the Save as type dropdown to All Files.

Save:

Saving the file is possible in any location on the hard drive you prefer. You have to generate a few dummy files in the Test folder. After that, your job is to double click on the Delete.bat file so that it can run. But still, you will not see anything deleted because the command includes /D -5. The term refers to files which are 5 days or older. When you need to delete any file, regardless of when it was created, you have to change the -5 to -0. Otherwise, your task is removing the /D -5 part altogether. Once you run this, you will see all files deleted.

You have to change the directory to something other than C:\Test to customise the command. It is the first thing which you need to do. It is as easy as copying the path from Windows Explorer for the directory you are willing. Then, you need to paste this into the command in Notepad.

Parameters:

Then, you will see the -s parameter, which can be viewed after the directory path. It means that the command must look into all subfolders. If you are unwilling to delete files from subfolders, you have to remove the -s parameter.

After that, you have to go to -m followed by *.* It indicates that the command has to evaluate every type of file. Whether you are willing to delete a particular file type in a folder, such as JPG images or PDF files, your task is to change *.* to *.pdf or *.jpeg. It can remove only those files.

The /D -X part lets you know how old the files should be to qualify for deletion. You are capable of keeping this with a value greater than 1. Besides, you can set the value to 0, or remove this altogether. And it is everything you should know about the command.

Run:

When you run this command, these are some things which you should note first. You should know that once you delete files, these will be deleted permanently rather than going to the Recycle Bin. Therefore, you need to be aware when you use this. Secondly, the command deletes files only instead of folders.

As it is a batch file, you were able to add the command’s many versions in the same file. For instance, you can make a batch file which will delete all DOCX files that are older than 180 days, PDF files that are older than 60 days & TXT files regardless of how old these are.

Now, you need to create your batch file and save it. Then, you should start scheduling to run on a re-occurring basis.

The Bottom Line:

Always remember that it is seldom useful to keep unnecessary files on your computer. While these consume memory space, these can also clog the file organisation. In addition, they are able to hamper the performance of your computer. You need to set up auto-delete instructions using any process that you prefer. It allows your computer to get rid of the additional baggage.

Before you want to auto-remove files or folders from the PC, remember that this process is a part of cleaning up your Windows. You should know that there are several other crucial hacks like terminating pointless background methods, removing unused apps, & tweaking settings to those which are relevant most to your situation. Therefore, you have to ensure that you are following the best principles to run your Windows as smoothly as you can.

Frequently Asked Questions

How do you delete files older than x days Linux?

Whether you are willing to delete files that are older than X days in Linux, you need to use the command “find /path/* -mtime +X -exec rm -rf {} \;.”. Using the command allows you to find the files. Then, you are able to delete the required file quickly.

Can you recover automatically deleted files on Windows 11?

Deleted files can be recovered automatically on Windows 11. However, if you are willing to recover deleted files on Windows 11, you can take assistance from a reliable third-party data recovery tool.

  • First, you have to launch the recovery software. Then, you need to scan the computer.
  • After that, your job is to preview the deleted files on Windows 11.
  • At last, your task is to recover the files which you want.

How do you remove 30 days old files in UNIX?

First, you have to know the command. After that, it is possible to remove thirty days old files in UNIX. The command which you need to type in is that: find/path/to/the/directory/ -type f -name ‘*’ -mtime +30 -exec rm {} \. After that, you will be able to remove the unwanted files.

read more
Internet SecurityInternet

Zero-Click Exploit

Zero-Click Exploit

You might have heard about the zero-day attacks before. These cyberattacks don’t require user intervention as a trigger. When the code hits your device, the attack will be executed automatically. You should know that these are nasty attacks. Therefore, everyone must be aware of this. These attacks use sophisticated tactics and can cause devastating consequences where the victim does not even know what happened in the background. People use these terms, ‘zero-click attacks’ and ‘zero-click exploits’ interchangeably. We call them interaction-less or fully remote attacks also. This article will let you know about zero-click attacks, how these attacks work, how to protect yourself, etc.

What is Zero-Click Exploit Malware?

It is a type of attack that takes advantage of software vulnerabilities without user interaction. The exploit may install malware Or perform malicious interaction on the device of the user by exploiting the vulnerability.

Traditionally, spying software works  by convincing people first so that they tap on a compromised link or file to install itself on mobile, tablet, or PC. But in this case, the victim doesn’t need to click on the link, as the software will be installed on the device without the need of clicking on the link. Therefore, it can be said that zero-click malware or no-click malware are more harmful.

These attacks include low interactions indicating lesser traces of any malicious activity. In addition, vulnerabilities that cybercriminals exploit for zero-click attacks are quite rare. The basic version of zero-click attack leaves hardly any traces due to which detecting them is hard. The same features that make software more protected and secured, can make these attacks harder to identify. While these attacks have been done around for years, the use of mobiles has increased the issue more. Let’s know how it works.

How does a Zero-Click Attack Work?

This hacking process exploits flaws in your device. It uses a data verification loophole for working its way into the system. In most cases, the software uses data verification procedures to keep cyber breaches away. Sophisticated hackers are able to exploit these vulnerabilities for the execution of cyber-attacks.

The process of working a hypothetical zero-click attack is as follows:

  • Bad actors try to detect vulnerability within a mail or messaging application.
  • They send a meticulously crafted message to the specific device to exploit the vulnerability. Attackers generally use specially formed data. For instance, they use a pixel or a hidden text message, allowing them to enter the compromising code onto the device. It may be a video conferencing session, voicemail, an authentication request, or a phone call. Any of the above may act as a vector for exploiting vulnerability in any app which can process data & evaluate it. With malware, spyware, trojans, etc., attackers can infect the targeted device remotely using the vulnerability.
  • As soon as hackers infect the device, they access the device’s contents and gain complete control over this. Attackers are able to send messages on behalf of users by impersonating them.
  • When the victim understands that someone has hacked them, it is too late because the attack has been done. Users can not find any trace of the attacker’s compromising message.
  • It is hard to pin down the specifics of this type of attack.

Pegasus Spyware and Other Popular Zero-Click Exploits:

While these attacks have become popular recently, they have been present for a long time. So, now they have built a wide range of attacking surfaces. These are a few famous zero-click hacks in recent times:

  • Pegasus Spyware: Researchers at CitizenLab found a zero-click exploit in Apple’s iPhone in September. This malware enabled hackers to spy on their victims. This spyware was invented by the Israeli company NSO. With the help of this, cyberattackers install the Pegasus malware in the target’s iPhone via a PDF file. They created the file for the execution purpose of malicious code automatically.
  • WhatsApp Flaw: In 2019, WhatsApp Messenger served as an entrance for cyber attackers. They try to install spyware into different victim’s devices. The vulnerability was identified as the “buffer flow vulnerability” in VoIP. The standard form of the term is Voice over Internet protocol. When attackers call the target’s smartphone ( iOS or Android) via a WhatsApp call, it becomes activated.
  • Apple Mail App Flaws: ZecOps, a cyber security organization, found zero-click attacks within Apple’s Mail App in April. The company later provided a write-up to inform people that cyber attackers send crafted emails to Mail users and make users’ devices vulnerable.

Examples of zero-click malware:

You should know that zero-click vulnerabilities can affect different devices – no matter whether it’s Apple or Android. These are the high-profile instances of zero-click exploits:

  • Apple zero-click, forced entry, 2021: A Bahraini human rights activist found their iPhones hacked in 2021 by strong spyware sold to nation-states. Later researchers at Citizen Lab, an internet watchdog based at the University of Toronto, discovered the attack. The smartphone of the activist, the iPhone 12 Pro, was analysed, and the researchers found proof of a zero-click attack. The attack has taken advantage of a previously unknown security vulnerability in Apple’s iMessage.
  • WhatsApp breach, 2019: A missed call triggered the infamous breach and exploited a flaw in WhatsApp’s source code framework. The attacker uses a zero-day exploit to load spyware in the data that both devices exchange due to the missed call. After loading, the spyware has enabled itself as a background resource.
  • Jeff Bezos, 2018: Mohammed bin Salman, Saudi Arabia’s crown prince, sent a WhatsApp message to Amazon CEO Jeff Bezos in 2018. The message contains a video that promotes Saudi Arabia’s telecom market. According to the reports, the video file included a piece of code. Therefore, the sender could extract information from Bezos’s iPhone for months.
  • Project Raven, 2016: It is the UAE’s offensive cyber operations unit. Emirati security officials and former US intelligence operators work there as contractors. According to the reports, a tool named karma was used for taking advantage of a flaw in iMessage. The tool used crafted text messages to attack the iPhones of diplomats, foreign leaders, activists, etc. It is intended to obtain images, emails, text messages, & location information.

Types of Zero Click Exploits:

The smartphone is the main target of harmful attacks. Different communications apps like SMS, phone, messaging, & social media apps are used by these devices. It can offer a broad range of attacking surfaces for hackers who are finding an exploitable vulnerability.

There are a few groups which are popular for identifying zero-click exploits. The NSO Group has detected and produced exploits for many zero-click vulnerabilities in iPhones & Android devices. The vulnerabilities are exploited for delivering the Pegasus spyware that is sold to governments to use in different fields like law enforcement, intelligence collection, and tracking journalists, activists, etc.

Although the NSO Group is a famous purveyor of spyware exploiting vulnerabilities, there are a few other groups that have the same capability. Other cyber threat actors can identify as well as weaponize the vulnerabilities.

How to Protect Yourself from Zero-Click Exploits:

Evading detection by the user is the whole purpose of these exploits. Due to the absence of user interaction, the target does not get a chance to detect the threat. But it never indicates that protecting against such attacks is impossible. Rather than giving a response to an attack in progress, mitigating this can need proactive, preventative actions, such as:

Update Apps & Devices: These exploits take benefits of unpatched vulnerabilities in device apps & OSs. Try to update your apps and devices to decrease vulnerability to these attacks.

Install Anti-Spyware & Anti-Malware Solutions: The exploits can deploy spyware & other malware to devices. With the help of anti-spyware and anti-malware solutions, you are able to identify & remediate these infections. It helps to mitigate the effect of a successful zero-click exploit.

Avoid Unsafe Applications: Exploitable vulnerabilities might be inside the apps that you download from third-party app stores or other sites. Remember that you should install apps only from reliable app stores to reduce the risk level.

Conclusion:

Undoubtedly you can say that the zero-click attacks are scary. State actors use zero-click vulnerabilities to go after high-profile targets. However, it is always better to have an eye on the suspicious activity on the devices.

Frequently Asked Questions

  1. Is zero-day exploit a virus?

Zero-day malware is called a zero-day virus. It is an old unknown PC virus for which particular antivirus software signatures are still unavailable.

  1. Which zero-day exploit is famous?

Stuxnet was a very popular instance of a zero-day attack.

  1. Is Pegasus Zero-click?

Zero-click attacks help spyware such as Pegasus to gain control over a device without  user interaction.

read more
Internet SecurityTechnology News

Rainbow Table Explained

Rainbow Table Explained

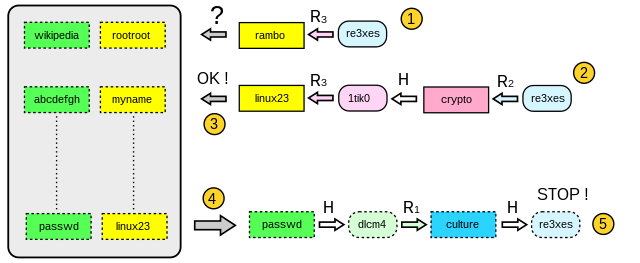
Usually, PC systems need passwords that store passwords as a hash value of the user’s password. The system hashes the password while a PC user enters a password and compares it to the stored hash. Once the hashes match, you will get access. You can use a rainbow table of reversed hashes to crack password hashes. These generally use precomputed hashes to recover the pre-hashed password.

What is A Rainbow Table?

A rainbow table is a list containing all plaintext permutations of encrypted passwords specific to a particular hash algorithm. Password cracking software often uses these for network security attacks.

About Rainbow Table:

It partitions a function. A set of values is a function domain, whereas a set of keys is a codomain. These keys are derived from those values into chains so that every chain is a changing sequence of values and keys, followed by a final value.

In the chain, every item comes from an earlier item. Therefore, you can reproduce the chain from the first value algorithmically. A key derivation function generates a key from a preceding value, while a reduction function creates a value from a primary key. Every chain’s first & last value is precalculated and stored. It helps to make the chain a row in a virtual table. Hence, you can find every even-numbered field with a value. In addition, every odd-numbered field has the corresponding key. You can use it to find a secret value or password given its associated key.

You can assume an instance of a space-time tradeoff where you need less processing. However, a brute-force attack requires more processing. But it consumes more space than a brute-force attack uses to compute a key on each iteration. Therefore, using a key derivation employing a salt can make it infeasible to recover a secret value from a key.

Common uses:

  • Almost all Unix, Linux, and BSD variations use hashes with salts. But multiple applications use hash only with no salt. In this case, they usually use MD5.
  • The Microsoft Windows NT/2000 family uses the LAN Manager and NT LAN Manager hashing method. In this regard, you must know that it depends on MD4. Besides, it is unsalted, making its famous generated table.
  • As of 2020, salting has become more common. In addition, GPU-based brute force attacks have become more practical. Therefore, we see them decreasing usage. However, you can get them available for eight and nine-character NTLM passwords.

How Does the Rainbow Table Attack work?

It performs quick and effective cryptanalysis. This attack is not a brute-force attack that computes the hash function of every available string and calculates the hash value. After that, it compares it with the one on the PC. However, the rainbow attack removes the need by calculating hashes of the large set of available strings. Instead, you need to follow two significant steps:

Creating a Rainbow Table:

First, you need to take the hash of a string. Ensure you use the MD5 hash function on the first eight characters. After that, you can decrease it to make a new string reduced again, repeatedly. For instance, you can make a table of the most common password, 12345678.

Your first task is to take the string to pass it through the md5 hash function.

hashMD5(12345678) = 25d55ad283aa400af464c76d713c07ad

It can decrease the hash only by using the first eight characters. After that, you should rehash it.

hashMD5(25d55ad2) = 5c41c6b3958e798662d8853ece970f70

One chain begins from the first plain text and ends at the last hash. You must repeat it until you have sufficient hashes in the output chain. Once you get sufficient chains, you should store them on a table.

Cracking the Password:

First, you should begin using the hashed text. Hence, you need to check if it exists in the database. If so, you should head toward the start of the chain. After that, begin hashing until it matches with one. Once you obtain the match, the procedure ceases, and the authentication is cracked.

Advantages and Disadvantages of the Rainbow Table Attack:

Advantages:

  • You can perform the hash function efficiently, unlike brute-forcing. Moreover, as you can find all values calculated already, it is possible to simplify an easy search-and-compare operation.
  • You don’t need to know the exact password. Once the hash is matched, it won’t depend on the string if it is not the password itself. It will be authenticated.

Disadvantages:

  • You need a vast storage amount to store them.
  • However, as all values are calculated, you can perform an easy search-and-compare operation.

Defense Against Attacks:

You can easily prevent the attacks using salt techniques. It is random data passed into the hash function with plain text.

Therefore, you can confirm that each password has a unique generated hash. You should know that it follows the principle of asking that more than one text can have a similar hash value, which is prevented.

Key stretching is another technique that helps to prevent pre-computation attacks. It allows the salt, password, and intermediate hash values to run through the hash function many times. Hence, it aims to boost the required computation time to hash every password.

You can follow key strengthening used to extend the key using a random salt. But it removes the salt, not like in key stretching. It forces legitimate users and hackers to perform a brute-force search for the salt value. As a result, you will not get any point in bypassing salting.

Why Are They Called Rainbow Tables?

The name might seem like an odd selection for a robust tool. However, while mapping out it and using different colors to illustrate the other reduction functions, you can see it making a rainbow-like appearance.

We experienced it in black-and-white on  Oechslin’s original research paper. But he selected different colors to represent different reduction functions in his research at a 2003 conference.

Rainbow Tables:

These exchange the single reduction function R with a sequence of the corresponding reduction functions R1 through Rk. Thus, these help to get rid of collisions with ordinary hash chains. Besides, these must offer similar value on a similar iteration. Otherwise, the two chains will not collide and merge. In addition, the final values are the same in the chain. With the help of a final postprocessing pass, it is possible to sort the chains. Thus, it can help you to get rid of any “duplicate” chains. These offer similar final values to other chains. After that, you can make new chains to fill out.

Hence, you should know that the chains aren’t free of collision. Therefore, these can overlap briefly. But these won’t merge. So, as a result, it can help you to decrease the overall number of collisions.

You can take the help of sequences of reduction functions to change the lookup. In this case, you need to create k different chains as the key of interest is available at any location in the chain. Hence, the first chain finds the key in the last key position. Then, it applies Rk. After that, the following chain thinks the hash value is in the second-to-last hash position. Then, it applies Rk−1, K, and Rk. It will continue until the last chain applies all reduction functions, alternating with K. Thus, it can create a false alarm. The wrong guess of the position of the hash value might evaluate a chain.

Algorithm:

These need to follow more chains. But these come with less number of tables to make up for it. The usual hash chain tables don’t get enough growth beyond a specific size. However, these can be inefficient for merging chains. That is why these balance several ones where every lookup must search through each. These can perform in a way that is k times larger. It enables them to perform a factor of k fewer lookups.

These use a refined algorithm with a different reduction function for every link in a chain. It prevents chains from merging during a key collision in two or more chains.

These chains won’t merge if the collision doesn’t occur at a similar position in every chain. It boosts the chance of a proper crack for given table size. But it occurs at the value of squaring the number of steps needed per lookup. For example, the lookup routine might require iterating via the first reduction function index.

Conclusion:

A rainbow table is always specific to the key function for which function you can generate. For instance, MD5 can crack only MD5 hashes. Philippe Oechslin was the developer of the theory of this technique. Later, the implementation occurs in the Windows password cracker Ophcrack. After a while, scientists invented a more robust RainbowCrack program. It can make and used for different character sets and hashing algorithms, like LM hash, MD5, and SHA-1.

Frequently Asked Questions:

  • What is its purpose?

These mean reversed hashes tables that can crack password hashes.

  • How do hackers use these?

When hackers access a list of password hashes, they crack passwords quickly using it.

  • Does salting prevent these?

Salt can stop its use of it. But it cannot make this harder to attack a single password hash.

read more
AppsInternetInternet Security

What is Gstatic & What is Gstatic.com Used for?

What is Gstatic & What is Gstatic.com Used for?

If you are surfing the web daily, you can face gstatic.com appearing on display. Multiple people don’t know what it is and think of it as a virus or malware. In this article, we have covered all details about it.

What is Gstatic?

Gstatic is a service that Google uses to hold static content and decrease bandwidth usage. Google LLC uses this http://Gstatic.com reliable domain to boost network speed for users.

What is gstatic.com?, How does Google use it?

gstatic.com is a web domain that Google uses to access its driver where Google hosts images, javascript, CSS, and other contents. It helps the content load more quickly from the content delivery network or CDN.

The domain helps to boost network performance, decrease bandwidth usage. Besides, it allows you to load Gmail, Google Maps, and other Google services. You can store different static data such as JS libraries, stylesheets, etc. The domain can verify the connectivity to the web, especially for Chrome browser and Android devices.

It comes with a few Subdomains:

fonts.gstatic.com – It sends requests to the Google Fonts API, and these consist of resource-specific domains like fonts.googleapis.com or fonts.gstatic.com

maps.gstatic.com – The domain allows you to embed Google Maps images on the web page, and you don’t need JavaScript or any dynamic page loading.

csi.gstatic.com – The domain helps to improve the performance of other sites.

These are a few other examples of subdomains

accounts.gstatic.com

connectivity.gstatic.com

csi.gstatic.com

fonts.gstatic.com

metric.gstatic.com

mail.gstatic.com

maps.gstatic.com

ssl.gstatic.com

Browser hijackers and other cybercriminals use a counterfeit version of the domain to install unnecessary applications and adware. The programs do not disclose details about apps bundled with them. We advise you to install third-party software only from trustworthy sources. Running a scan can also help you check if there is any virus.

Adware-type software or browser hijackers offer unwanted pop-ups installed on the devices without the user’s consent. For example, the adware can offer coupons, banners, pop-ups, and other intrusive advertisements.

You may find the ads disturbing as these can redirect you to untrustworthy sites. Besides, these can run scripts that can download PUAs or potentially unwanted applications and install them. It can cause harm and create issues like high-risk infections.

The browser hijacker software can change browser settings and options like search engine, new tab URL, and homepage. As a result, people can encounter redirects to untrustworthy websites. Besides, it can store IP addresses, keystrokes, search queries, geo-locations, URLs of visited websites, etc., including personal or sensitive details. The software can leak information to third parties, and they misuse the details to make revenue. Thus, you can experience different privacy safety issues.

Is it a Virus?

It is a legitimate Google service used to decrease bandwidth usage and enhance network performance. The service doesn’t have any relation to harmful activities. Therefore, if you find any unnecessary pop-ups appearing, you can scan them for viruses and malware.

What are Gstatic Images?

These indicate the images that you can find on https://encrypted-tbn0.gstatic.com/ representing the cached version of all the images stored on Google’s servers. They boost the delivery of image results.

Can you remove it?

Many people think that it is malware, but it isn’t. You can remove the service by following the procedure given below in the article.

www.gstatic.com/generate_204 Error?

You can see the URL: http://www.gstatic.com/generate_204 opening up automatically in a new tab. The page is blank with “Untitled” as its title.

If you face a misconfigured network and unstable connection, it can trigger the problem. It is because the browser thinks that it can sign in to the Captive portal. Here, the new WiFi users should enter the sign-in details for security purposes.

What is Connectivity.gstatic.com?

It is a subdomain of gstatic.com used by Chrome and Android devices. The function of the domain is to check if you have internet access to your connected network. If not, the browser can load the captive portal login web page or enable you to access the internet.

Should you Block Connectivity.gstatic.com?

You should not block the subdomain. It may not create significant problems, but the subdomain helps check internet access. Therefore, we advise you not to mess with it.

csi.gstatic.com Keeps Loading:

While opening a website on the Chrome browser, you can see a message Waiting for csi.gstatic.com available in the bottom left corner. The Page displayed doesn’t load, and you see the csi.gtsatic.com URL continuously. If there exists any problem, you can solve it by following the processes.

  1. Allow and Delete Cookies for the Page:

If something gets blocked, you can allow the cookies by tapping on the little lock next to the URL. If you are willing, try to delete cookies for that specific domain. After that, your task is to refresh the page and check if it loads.

  1. Change DNS Settings on the device:

Try to change Domain Name System (DNS) settings to fix the problem.

Uninstall from Windows:

If you’re willing to eliminate the potentially unwanted programs from Windows OSs, you should follow the steps.

For Windows 11:

First, tap on the Start icon and choose the Apps and Features option.

A window will open where you need to look for the app you are willing to uninstall. As soon as you find the app, tap on the three vertical dots. Now, choose the Uninstall option.

For Windows 10/8 :

  • When the windows search box appears, you need to enter the Control Panel. After that, tap on “Enter” or the search result.
  • Choose to Uninstall a program available below Programs.
  • Look for the entry of the suspicious program available in the list.
  • Tap on the app and then choose Uninstall.
  • When the option User Account Control appears, tap on Yes.
  • Finally, you should wait until the uninstallation method is not finished and tap on OK.

Windows 7/XP user:

  • Your job is to tap on the Windows Start and then go to the Control Panel available on the right pane. People who use Windows XP need to tap on Add/Remove Programs.
  • When you open the Control Panel, you should choose Programs and Uninstall a program afterward.
  • Choose the unwanted app by tapping on it once.
  • Tap on the Uninstall/Change option available at the top.
  • Choose the Yes option available in the confirmation prompt.
  • Hit the OK button as soon as the removal process is completed.

Delete from macOS:

If you are willing to delete it from Mac, you should go through the steps.

Remove Items from the Applications Folder:

  • Go to the menu bar, and then you should choose Go > Applications.
  • Open the Applications folder and find all related entries.
  • Tap on the app and then drag to the option Trash. If you want, right-click and select the option Move to Trash.

If you want to delete an unwanted app, ensure that you should access the Application Support, LaunchAgents, and LaunchDaemons folders.

  • After that, your task is to delete relevant files.
  • Choose the option Go and then Go to Folder.
  • Tap on /Library/Application Support and hit the option Go. Next, you may tap Enter option.
  • While opening the Application Support folder, you should find dubious entries and remove them afterward.
  • You should enter /Library/LaunchAgents and /Library/LaunchDaemons folders similarly and terminate all .plist files.

Remove from Microsoft Edge:

Delete Unwanted Extensions from MS Edge:

  • Choose Menu, i.e., three horizontal dots available at the top-right of the browser window. After that, you should choose the Extensions option.
  • Select the extension from the list and then hit the Gear icon.
  • At last, you should tap on Uninstall at the bottom.

Clear Cookies and Other Browser Data:

  • Tap the Menu, i.e., three horizontal dots at the top-right of the browser window. Next, you should choose Privacy & security.
  • Select the option Choose what to clear below the Clear browsing data.
  • Apart from the passwords, you can choose everything. After that, tap on the option Clear.

Restore New Tab and Homepage Settings:

  • Your job is to hit the menu icon and select Settings after that.
  • Next, your task is to look for the On startup section.
  • Finally, tap on Disable if there is any suspicious domain.

Reset MS Edge:

  • If something doesn’t work, you should tap on Ctrl + Shift + Esc to open the Task Manager.
  • Hit the More details arrow available at the bottom of the window.
  • After that, choose the Details tab.
  • Scroll the Page down and find each entry with the Microsoft Edge name. Tap on every item and choose the option End Task to stop MS Edge from running.

Take the help of an advanced Edge reset method if you cannot fix the issue following the procedure. Ensure that you have backed up your information before proceeding.

  • Your first task is to look for the folder available on the PC: C:\\Users\\%username%\\AppData\\Local\\Packages\\Microsoft.MicrosoftEdge_8wekyb3d8bbwe.
  • Tap on Ctrl + A available on the keyboard to choose all folders.
  • Hit the option, and after that, you should choose Delete.
  • Next, tap on the Start button and choose Windows PowerShell (Admin).
  • As soon as the new window opens, your job is to copy the command and paste it. After pasting the command, you need to tap Enter. The command is as follows—

Get-AppXPackage -AllUsers -Name Microsoft.MicrosoftEdge | Foreach {Add-AppxPackage -DisableDevelopmentMode -Register “$($_.InstallLocation)\\AppXManifest.xml” -Verbose

Instructions for Chromium-Based Edge:

Delete extensions from MS Edge (Chromium):

  • Navigate to the Edge and open it. After that, your job is to tap on select Settings and Extensions, respectively.
  • Tap on Remove to delete unwanted extensions.

Clear Cache and Site Data:

  • Tap on the Menu option and head towards the Settings.
  • Choose the Privacy and services option.
  • After that, your task is to select Choose what to clear option available below Clear browsing data.
  • Choose All times available below the Time range.
  • Finally, your task is to choose the option Clear now.

Reset Chromium-based MS Edge:

  • Your first job is to hit Menu, and after that, choose Settings.
  • Next, select Reset settings available on the left side of the display.
  • Now, you have to choose the Restore settings to their default values.
  • Finally, tap on Reset for confirmation.

Remove from Mozilla Firefox (FF):

Try to reset the browser by following the steps manually.

Remove Dangerous Extensions:

  • First, your task is to head towards the Mozilla Firefox browser and open it. Then, your job is to tap on the Menu, three horizontal lines available at the window’s top-right.
  • Next, choose Add-ons.
  • Finally, you should choose the unwanted plugin and then tap on Remove.

Reset the Homepage:

  • Tap on the three horizontal lines you can see at the top right corner for opening the Menu.
  • Next, your task is to select Options.
  • If you are willing, you can put the preferred site under Home options. Then, you can open it whenever you open Mozilla Firefox.

Clear Cookies and Site Data:

  • Tap on the Menu and select Options.
  • Head towards the Privacy & Security section.
  • After that, your job is to scroll the page down to find Cookies and Site Data.
  • Tap on the Clear Data.
  • Finally, your job is to choose the Cookies, Site Data, and Cached Web Content. After that, you need to hit Clear.

Reset Mozilla Firefox:

If you can’t solve the issue by resetting the browser, you must follow the steps.

  • Head towards the Mozilla browser and tap on Menu.
  • Move to the Help and select Troubleshooting Information.
  • Tap Refresh Firefox available below the Give Firefox a tune-up section.
  • As soon as you can see the pop-up on the screen, tap on the Refresh Firefox to confirm the action.

Remove from Google Chrome:

Delete Malicious Extensions from Google Chrome:

  • Your first task is to move to Google Chrome and open it. Tap on the Menu option, three vertical dots at the top-right corner. After that, choose More Tools and Extensions, respectively.
  • You can see all the installed extensions in the newly opened window.
  • Finally, tap on Remove to uninstall the suspicious plugins related to the unwanted program.

Clear Cache and Web Data from Chrome:

  • You have to tap on the “Menu” option and choose Settings.
  • Choose the option Clear browsing data available below the Privacy and security.
  • Next, you should choose Browsing history, cookies, and Cached images and files.
  • Finally, tap on the Clear data.

Change Your Homepage:

  • Your job is to tap on the menu option and then select Settings.
  • Next, find a suspicious site if there is any in the On startup section.
  • Next, tap on the option “Open” a specific set of pages. Now, hit three dots to find the Remove option.

Reset Google Chrome:

Try to reset Google Chrome to eliminate the unnecessary components when the above steps are not helpful.

  • You should first tap on Menu and choose Settings.
  • Scroll the Page of Settings down and tap Advanced.
  • You should scroll down to find the Reset and clean up section.
  • Tap on the Restore settings to the actual defaults.
  • Finally, click on the Reset settings for confirmation.

How to Perform a System Scan?

If you are willing to check if the PC is safe from viruses, you need to run a full system scan. Running a scan will help your device isolate and eradicate malware from the PC.

  • Your first job is to tap on “Windows” + “I” to open Settings.
  • After that, your task is to tap on the “Update & Security” and choose “Windows Security” from the left pane.
  • Now, you should choose the “Virus and Threat Protection” option. Then, hit the “Scan Options” button.
  • Tap on the “Full Scan” option and hit the “Scan Now” button.
  • After tapping on the button, the defender can scan the PC to ensure that your device is safe from viruses.

The Bottom Line:

Gstatic is something you can find in your browsing history or anywhere else. I hope after reading this article; now you know what it is.

Frequently Asked Questions:

  • What exactly is this gstatic Page?

It resembles a Google static code page to create an HTTP 204 No Content response.

  • How do you turn it off?

Look for the app you are willing to uninstall in the opened window. After finding the app, you should tap on the three vertical dots and choose Uninstall. Then, if necessary, you can perform a scan on the pc to check for malware infections or remaining unnecessary components.

  • Is it a tracker?

As per Whotracks.me, the service tracks around 39.6% of internet traffic, its tracking share is increasing each month. But there is nothing to take tension as it delivers content only, and the service will not track personal activity.

read more
AppsDo It YourselfInternet SecurityTechnology News

How to Ping a Phone?

How to Ping a Phone?

As a mobile user, you may want to find the location of someone’s mobile like your kid, any employee, etc. Besides, you may need to check if your mobile is active or getting network connectivity. You can ping a phone in this case. Have you faced such a situation? You will be glad to hear that many ways help you hence. The process is known as ‘pinging a phone.’ In this article, you will learn how to ping a phone.

What does it mean to Ping a Mobile Phone?

Pinging a device indicates knowing the device’s location that you want to check. Almost all major operating systems are compatible with this network utility, and Android, iOS, and other operating systems support this feature.

Technically, ping means a signal to the mobile querying about its network location. Then, the mobile will respond to the request with the required details. This technology takes the help of the device’s GPS location.

Use-cases for Pinging a Phone:

Its primary purpose is to find the location of the mobile. However, there are a few reasons why you may want to find the location of a mobile.

  • It enables you to find the location of a phone you have lost or stolen.
  • Using the technology, you can watch your kid’s or employee’s location.
  • You can keep people with a criminal record.
  • Spy apps are used to perform the operations. You should know that spying on someone is illegal without their will.

How does pinging a phone technology work?

Two methods are there to locate a cell phone location by the cellular network provider— Pinging and Triangulation. The first is a digital method, whereas the second is an analog method to find a device location.

To “ping” indicates sending a signal to a specific mobile phone and getting a response with the requested data. While pinging a new digital mobile, it will determine the latitude and longitude through GPS, and then, it will send the coordinates back through the SMS system.

Why ping a mobile?

People use modern technology to find the location of a stolen or lost Android or iPhone device. Likewise, using the technology, you can track the live locations of criminal people.

Besides, the android spy app companies use the technology to keep track of users’ devices. So guardians who are willing to keep track of their kids’ location can use different spy apps.

However, without the person’s permission, spying on them or tracking a device’s location is illegal. So it would be best if you let the person know, like your kid, about using the technology before installing any spy apps.

How to Ping a Phone?

How to Ping a Phone?Multiple mobiles are there supporting the ping functionality. But mobiles released currently don’t come with the feature enabled. Therefore, if you are willing to ping the devices, you will require specialized apps on the mobile. PingD, Google Find My Phone, etc., are a few examples helping to return the ping request. Therefore, you should ensure that you have the apps installed and configured on the system before you proceed. Besides, remember that you cannot ping a mobile that is turned off. However, having a firewall installed on the system does not allow other devices to ping the mobile. Besides, if the AP Isolation feature is turned on the router, other devices may not work.
Ping from a Phone:

  • It would be best to launch the App Store or Play Store first. Then, look for Ping.
  • After that, you need to ping any app that you want. Of course, as soon as you install the app, it would be best to launch it.
  • After that, your job is to put the IP of the mobile. For example, you can enter 192.168.8.101 if it is the IP address. Next, tap on the Ping or Start option.

Use command prompt:

The process is applicable with Android mobiles only. Your first task is to tap on the ‘Windows’ key plus the ‘R’ option for opening the ‘Run’ box. Next, write ‘cmd’ in lowercase letters for bringing up the command prompt. Next, you should write ‘ipconfig,’ and tap on the ‘Enter’ option after that. It offers you the machine’s IP address if it is not available.

When you go to the following line of the command prompt, you must write ‘ping’ there. After that, you should complete the IP address of the mobile to get a ping to the mobile automatically. If it is successful, both the ping and a minimum of 2-3 lines of ‘Reply from’ the address appears. Every line represents a data packet that was sent.

It is a speedy process giving the actual data packets sent to the phone, not the technical ping only. Whether you face a problem, you should try to close the PC or mobile and reboot your wireless router. The issue may be an IP address error. Hence, the process helps send a ping only, and it won’t get any details about the user’s physical location.

GPS tracking software:

It is the quickest way to find a stolen android or iPhone mobile. With the help of GPS tracking software, you can track the location of your family and loved ones. Multiple GPS tracking software is available in free and paid versions. In addition, we have given a few GPS tracking software that helps you ping the device’s location.

  1. GOOGLE MAPS:

It is one of the effective GPS tracking apps for android and iPhone devices that help to find the device location. You can use the application for free for both android and iPhone devices. It allows you to adjust the sharing options. With the help of the latest technology, you can track the lost device’s location.

  1. LIFE 360:

This GPS tracking software lets you ping a phone to find its location. It has plenty of excellent features that help to find the lost device. Besides, it helps to track the location of your family members. Apart from this, many location tracking software is available on iPhone and Android OSs.

With the help of GPS tracking apps, you can find the live location of any device. But it is not possible if GPS is disabled on the device or you have installed fake GPS on the mobile.

Default phone mechanisms:

Take the help of the default mechanism of your mobile phone if the GPS location is disabled. It will help you to ping your mobile to find out the device’s location. Generally, android devices have a default feature called “Find My Device,” whereas iPhone devices have an inbuilt feature called Find My iPhone to track the device location.

The steps you should follow to use Find My Device are as follows:-

  • Your first task is to visit the site android.com/find.
  • Then, you should log in to your Google Account via Gmail details.
  • After that, while using the map, the live location of the device you want to find out will appear.
  • If you are willing, play a ringtone, delete the data, or lock the lost device remotely.

Spy Apps:

You can use a spy app to ping a mobile to know where it is. These apps are equipped with excellent and advanced features to monitor the lost mobile or that you want to track.

These enable you to use android and iPhone devices. The apps help track any person’s live location, read conversations, monitor social media chats, check browser history, record screens, listen to live phone calls & surrounding sounds, etc.

You can find multiple spy apps available in the market, allowing you to track both Android and iPhone devices.

Follow the guide to know how to ping a mobile using spy Apps.

  • Your first job is to make a new account from an Android or iPhone device.
  • After that, your task is to choose the mobile you are willing to monitor and check your call history.
  • Now, you should choose the plan as per the requirements.
  • Next, you must install the application on the device you want.
  • As soon as you complete installing, you can experience Wi-Fi or GPS data in real-time.

Ping from computer:

Taking help from the PC, you can also find out the device you have lost. Then, you should undergo the steps given here to ping mobile using a PC.

  • First, your task is to move to the “Settings” on your android phone and open it after

that.

  • After that, your task is to click on the “About Phone” option.
  • Now, hit the option “Status,” and you should get the IP address.
  • After that, your job is to power on the computer and look for the Windows Command Prompt.
  • Next, you should open the CMD or command prompt as “Run as Administrator.”
  • Write “ping” followed by the IP address of the android device, and next, you should tap on the “Enter” option.

How to Ping a Phone in macOS System:

You can use the macOS system to ping the mobile. However, if you are willing to ping a mobile from macOS, you must follow the steps.

  • Your first job is to go to the Finder and open it on the Mac, followed by Applications. If not, you should tap on the Command and A key to get the list of apps available.
  • Tap two times on Utilities and after that on the Terminal app.
  • While opening the terminal app, you need to write ping followed by the IP address of the mobile. For example, suppose you can ping 192.168.2.1.
  • You can see the results similarly to the Windows system.

How to Ping a Phone from ChromeOS systems:

Use the ChromeOS system if you are willing for this purpose. This one is a Google-developed OS available on the PlayStore in Chrome OS. However, it is beneficial if you use the default command prompt app.

  • If you are willing to open the command prompt application on ChromeOS, you should tap on the link ctrl, alt, and T keys to open it up.
  • Write ping followed by the IP address of the device. Use 192.168.2.1 for pinging.
  • Tap on “Enter” to start connection tests and the results after the test.
  • Thus, you can ping a mobile from a system running Android or iOS.

Tracing the phone number details:

By tracing the details of a mobile number, you can find out the location of a sim number or a device. In addition, multiple apps can bring universal caller ID services to your mobile, enabling you to track the mobile number.

You can take the help of the famous mobile number tracking apps like True caller, Showcaller, CallApp. These allow you to check the sim card name, registered place, etc. It is beneficial in finding fraud caller, unknown caller location details, etc.

Take help from the phone’s carrier:

The last method is to take help from your mobile carrier by contacting them. As soon as you contact your mobile phone carrier company, they will help you to find out the mobile you have lost. They trace the live location using the triangulation process and find out the device.

How Can you prevent your location from being tracked?

A few people are unwilling to have their phone’s location traced. These are the ways to prevent the location from being tracked.

Power Off the GPS Location: You should disable the live location of your phone. Thus, you can vanish from live tracing software’s reach.

Power On The Airplane Mode: You can prevent your location from being tracked by enabling the Airplane mood. It does not allow the device to send signals to the closest GPS towers.

Power Off Your Phone Completely: You can power off the mobile and take out the battery. Thus, you can prevent all the software or tracking device from tracking the location.

Power Off Location Services In mobile Settings: Your first job is to move to the phone’s location settings and then disable them.

How to ping mobile location for free with a phone company?

You should know that all iPhone and Android devices come with a default trigger, and it enables you to return all data regarding location and GPS to the actual cell service provider.

An option is available under the “Location Services” tab in the settings section. The data will remain protected with the service provider until you use the service data given by your mobile provider.

While switching to another phone provider, they will have the authorization to track location and maintain its history.

Mobile companies have different phone towers around the area covered. Therefore, when you move, your mobile connects to every tower.

The companies can triangulate your position depending on the tower you join. It is vital to know that 911 operators and service station operators can access location software, enabling them to expedite operations and respond in an emergency. Therefore, these are legal processes using which companies can ping the mobile, and thus, they will know your location.

How can you ping your mobile, which has been switched off?

It is not possible to ping a switched-off phone. As soon as you power off the mobile, you cannot track your device. The reason is that the signals don’t interact more with nearby GPS towers. Thus, it stops letting other devices know where it is. In this case, you can know the last active location of the mobile.

However, a few rates cases always exist. For example, you can detect signals from any switched-off mobile in war zones using NASA technologies. However, the details of these operations remain unknown. As per a report, NASA helped previously to find out the location of people. Usually, there is no way to track a closed mobile.

How to ping a cell phone tower in ping a mobile?

If you are willing to trace the original location of the last cell tower giving the signal to the kid’s phone, you need to ping the mobile. Using a wireless carrier, you can do the job. However, it is not legal to ping a mobile phone not registered to you if you don’t approve it.

Phase 1:

You should first contact the wireless carrier’s customer service department. After that, you should go through the prompts to speak to a representative.

Phase 2:

Let the representative know about your intention to ping the phone or the mobile registered in your account.

Phase 3:

You need to verify the wireless account while asked. In this case, you need to give the representative the mobile you are willing to ping.

Phase 4:

Wait till the representative is not pinging your mobile. Then, it may give you instructions to enroll in a mobile pinging service of your wireless carrier, enabling you to ping the mobile without assistance.

Phase 5:

You should note down the pinged location as soon as it appears.

How to find a lost iPhone:

Use Find My:

Using the Find My app, you can track the location of the Apple products, and it helps to find out the mobile on the map. While using Find My, you can easily know where the mobile is, and you don’t need to ping it. However, if you know that your iPhone is in your home but do not know where it is, the pinging will help you.

Launch the Find My there if an Apple device is attached to a similar Apple ID like iPhone. Otherwise, if you are willing, sign in to icloud.com and then select “Find iPhone.” If you want, select the iPhone from the list and then hit the “Play Sound” option to ping. Firstly, your device will start vibrating. After a while, it starts playing a high-pitched sound. The sound is playing continuously till you will not find your iPhone. Remember that you can stop the sound using the Find My device.

Use An Apple Watch:

Pinging becomes easier while iPhone and Apple Watch have a connection between them. It is very simple, like swiping up on the Apple Watch to the Glances mode. Choose the “ping” button available under other options such as airplane mode, do not disturb, and silent mode. It lets your mobile emit a high-pitched sound.

In addition, you can give instructions to your mobile to blink the LED by tapping the “ping” button and holding it. You may use the feature to find the mobile in a dark room.

Use Siri:

Take the help of Siri if you have any other iOS 12+ device attached to the account. It may be another mobile, iPad, PC, or Apple watch. If you are willing to use Siri, ensure that you have turned on Find My and Siri. Call Siri, and you will get a reply from her. As soon as she replies, you should say, “Siri, find my iPhone.”

Whether many devices are connected to the account, you must specify your mobile. Then, Siri will ask if you are willing to play a sound on the mobile to find out.

You should say “Yes.” Next, you will get an option to see a visual map of the location of the mobile.

From the Cloud:

If you don’t have many Apple devices, there might not exist a simple way to access Siri or the Find My app. If necessary, use a device of another person or your non-Apple device to sign in to iCloud, and it will help you to ping your missing iPhone.

If you are willing to do this, go to this www.icloud.com/find site and log in using your Apple ID and password. After that, your task is to choose the mobile you are willing to find from the list of devices. Then, you should tap on the “play sound” to ping the iPhone.

Whether you have enabled the two-factor authentication and want to log in to the Apple account from an unrecognized device, you should use a 6-digit verification code to bypass the two-factor authentication.

Conclusion:

If you have mistakenly lost your Android or iPhone, these hacks will help you find your mobile phone successfully. We hope that you will know now how to ping a phone.

Frequently Asked Questions:

  • Can you Ping mobile for location?

You cannot ping a mobile number directly without access to the carrier’s system, indicating that it has limitations to carriers and is within range.

  • Is it illegal to ping a cell phone?

A few federal laws are there applicable to cell phone pings. According to the regulations, you can make one thing clear tracing the mobile of someone without their permission is against the law. You can do this only in a criminal investigation or emergency 911 call.

  • Can a private investigator ping the cell phone?

As per federal law, private investigators are not allowed to monitor mobile conversations without the permission of at least one person based on the state.

read more
Do It YourselfInternetInternet SecurityTechnology News

Printer Driver is Unavailable Error on Windows — Fixing

Printer Driver is Unavailable Error on Windows — Fixing

Generally, the Printer has excellent usage. Your Printer may run for a long year, but it doesn’t mean that it will not malfunction. It can also stop giving responses completely. We have given here a few basic printer problems, and this blog post will assist you in fixing the printer driver is unavailable issue related to Printer.

Sometimes, you can experience a “Printer Driver is unavailable” error while printing documents. For HP printers, it is very common. However, other brand drivers can face trouble also. For example, Epson printers face an “Epson printer driver is unavailable error” that occurs frequently.

When this error message appears in front of the display, it indicates that the Printer’s software is not installed correctly on the PC. Besides, it also happens that your device drivers are facing troubles. However, we are fortunate that there are methods to fix the issue.

What does ” Printer Driver is Unavailable” on Printer indicate?

The error indicates that your Printer’s driver has a specific problem that doesn’t allow your Printer to work with the PC correctly. It can be available as a status on your Windows driver software.

The issue typically occurs while the printer driver is not corrupted or up-to-date. Besides, it can happen if your system needs new Windows updates. Corrupt and incompatible printer drivers are the basic reasons for the issue.

What is a Printer Driver?

A printer driver is a small program that is available on the PC. The function of the driver is to enable communication between the Printer and itself.

Printer Driver Working:

It has two primary functions. The first one is that it works as a bridge between the Printer and the PC. It helps the PC to realize the hardware specifications and printer details.

The second function is that the driver helps translate the print job data to signals that your Printer understands. Each Printer comes with its driver. The driver is written to fit its profile on a specific OS. If the Printer cannot configure correctly or installed a wrong device driver, your PC could not detect the Printer.

However, a few printer models are there capable of using generic drivers. These come preloaded with Windows 10 and enable you to print. In this case, you are not required to install extra drivers from the manufacturer. But it can sometimes not allow you to use your Printer to its full potential due to the absence of additional printer-specific functions and settings.

Why is your Printer unable to print with Windows 10?

Plenty of reasons can be there due to which your Printer behaves like unresponsive. Hence, it is vital to check out the common causes. For example, you should check if any paper is in the tray, wires are attached to the Printer, toner cartridges are not exhausted, and your Printer is hooked up to your Wi-Fi. Check the warning lights on your device or the error messages you see on your Windows 10 computer.

Besides, whether you have updated your OS from Windows 7 or 8 to Windows 10 recently and find your device unable to print, then it may be the upgrade process due to which your printer driver has been damaged. You may have a printer driver also that doesn’t support your new Windows version.

Microsoft indicated that there would be no backward compatibility preloaded into the operating system for a few specific software and apps. The same thing applies to a few specific printer drivers. Multiple printer manufacturers are unable to update the drivers in a timely fashion.

The issue can occur due to an incompatible driver or corrupt file. However, you can fix the problem by applying a systematic approach. In this case, you are only required to check for any Windows updates. After that, you need to install the recent driver for your Printer.

How to Fix Printer Driver is Unavailable Error?

The error message prevents you from printing though you change printer ink cartridges. It doesn’t enable you to use other functions such as Scan and Copy. Whether you face trouble, try to follow these processes to fix it.

But before proceeding, it is important to know about the requirements. These help to troubleshoot the methods very easily. Make sure that you will use the second requirement only when the first requirement won’t work.

First Requirement – Change UAC Settings:

UAC or User Account Control is a setting that lets you know when your windows (10, 8, or 7) make any system changes. The changes are mainly related to the user or admin rights. You should configure the UAC settings so that it will not prevent you from installing essential components and drivers for the Printer.

Perform these steps here:

  • First, your job is to ensure that you are signed in as the Administrator on the PC.
  • Then, your task is to move to the Control Panel and then User Accounts. After that, you should go to the option, “Change User Account Control Settings.”
  • You can see that there are three levels, including two levels above Never Notify and a level below Always Notify. Hence, you need to set the slider to the third level.
  • A box is available on the right side that lets you know the summary of the setting. It will say, “Notify me only when apps try to make changes to my computer (default)” at the top. You can also see this message “Recommended if you use familiar apps and visit familiar websites” at the bottom part of the box.
  • Tap on the OK.
  • Then, you have to tap Yes when a User Account Control Settings window is available. It asks permission for the application to make changes on the machine.

Second Requirement – Complete Admin Account Verification:

If the first one is not working, then the reason is that windows have added a verification step. In this process, the identity is verified as the Administrator and stops illegal access to your account. Besides, it provides control to the admin user on all the changes made on the computer.

Steps:

  • First, your task is to ensure that you have signed in as the computer’s Administrator.
  • After that, you are required to head towards the Control Panel, User Accounts, and Make Changes to my Account in PC settings, respectively.
  • Then, your job is to tap on the Verify that is available under the Your Info heading Windows. It asks you, “how would you like to get this code.” Now, you need to select the Email Address and tap on Next.
  • Microsoft will send a verification code to your email address. You need to copy & paste the code on your required entry and tap on Next.
  • After verifying your account, as soon as the installation of the printer driver starts, the verification step won’t be available.

Here, we have given some basic troubleshooting methods that you have to apply to resolve the issue.

Ways to Resolve Printer Driver Unavailable Issue

  • You need to check if your Printer is connected to a power source and PC through Wi-Fi or a cable is used.
  • Make sure that it is powered on and not in sleep/hibernation mode.
  • Whether you send a task through email, ensure that you have specified the proper email address.
  • Wi-Fi printers are tricky due to which you have to connect your machine to a similar Wi-Fi network. It is because the Printer is going to begin a task.
  • Check if the wires are attached correctly to the PC.
  • Try to use a different wire if the recent one is damaged.
  • Whether you have a USB-enabled printer, attach it to another one if your recent USB port is malfunctioning.
  • Make sure that the printer ink cartridges must not remain empty.

Way 1) Reinstall Printer’s Drivers:

Sometimes, the driver can lose important files or become corrupted. If something like this happens to you, you must uninstall every related software. Then, you have to install your driver back on the PC.

  • In this case, your first task is to head towards the Control Panel, then Hardware and Sound, Device and Printers, and Device Manager, respectively.
  • Tap on the option Print queues to see the drop-down list. Now, you need to look for the printer model on the list. As soon as you find this, tap on its icon. Then, your job is to select the Uninstall device option. Next, tap on the Uninstall option when your Windows ask you to confirm the action.
  • Now, you are required to move to the Control Panel of your PC, and then you have to tap on Devices and Printers. Hence, you need to select the Printer and then tap on Remove device available at the Window’s top right corner.
  • Finally, you have to reinstall the driver. Ensure that you have added each essential component in the installation.

Restart Automatically:

  • In this case, tap on the Start Scan first to detect the outdated or incompatible drivers.
  • You can take Smart Driver Care’s help as it helps scan the Windows for outdated drivers.
  • As soon as the scanning process completes, you can see the outdated drivers.
  • Tap on the Update button that is available to the printer driver. Whether you use the Pro version, then you need to tap on Update All for downloading automatically and installing all outdated drivers.
  • Now, restart the OS.
  • Finally, you have to check your OS to see if the problem remains.

Way 2) Update the Windows Operating System:

If your system is outdated, it can be a reason for the issue. If it happens to you, you have to install all available Windows updates. Thus, you are capable of fixing the issue. To update the windows operating system, perform these steps.

  • You should first hit the Search Bar button next to the Windows Start Menu button. Then, you are required to tap on the “Update” word.
  • Then, the Search Bar appears with a list of possible options regarding the query. Find the Windows Update option next. After finding this, you should tap on the Check for Updates button.
  • Now, windows start checking tor the available updates. Then, you need to install these automatically.
  • When the method ends, you have to restart the computer.
  • Finally, you are required to print any page to check the issue.

Way 3) Exclusive for Plug-and-Play Printers:

Do you have a plug-and-play printer? If you have this type of Printer, then the work will be a lot simpler.

To deal with the issue, you should first unplug the Printer from the PC. It indicates that you need to unplug all cords and wires connected between these. Then, you need to connect everything again and perform the steps given by the Setup Wizard.

When you see the Wizard not appearing, your task is to navigate to the Start and then Settings.

  • After that, tap on Devices.
  • Then, you should choose to Add a printer or scanner.
  • Wait for a while now till your system is not identifying the Printer. You are required to follow the instructions.
  • Now, you can see the windows identifying all devices attached to the computer. As soon as it identifies the Printer, you should finish the instructions given on display.

Way 4) Manually Update Your Printer Drivers:

If you face any trouble after carrying out a Windows update, update the printer drivers. Navigate to the printer manufacturer’s website and check if your device is compatible with Windows 10. You can get the Driver downloads option in the manufacturer’s Support section.

When you find your device supported, you have to download the recent stable version. You need to tap two times on the installer files to add the new driver as soon as you download. Sometimes, your device can only be compatible with the manual installation of drivers. Perform the steps to do this.

  • Head towards the Control Panel first and then open it.
  • Choose the Small Icons view option available on the top right of the dialog. Next, you need to tap on the Device Manager.
  • When you go to the Device Manager window, look for the printer you are willing to install. Sometimes, you can find your Printer missing. Besides, it can have corrupt or outdated drivers, due to which you can see a yellow exclamation mark beside the name.
  • Tap on the printer name, and then you need to select the Update Driver Software option from the pop-up menu.
  • Now a new window will appear with two options. Hence, you should select the option that is marked “Search automatically for updated driver software.”
  • You need to follow the steps available in the Wizard. It helps to install the recent drivers for your Printer if these are not available. If these have been downloaded already from the manufacturer’s support site, you have to choose “Browse my computer for driver software” instead.

Way 5) Run the Windows Update Tool:

Having an outdated operating system can be a reason for the issue. It is why you are required to install all the windows updates instantly as fast as you can. Thus, you can print again and get the overall stability and security of the PC. We have given here the process of running the Windows Update utility.

  • You should first hit the Start button that is available at the bottom-right corner of the display.
  • Then, your task is to tap on the Settings icon.
  • Now, you should select the Update and Security option.
  • Windows will find updates after that. If there is any, then you have to download and install it automatically.
  • As soon as the update method is finished, you need to reboot the PC.
  • When you reboot the PC, you should check if the error message is still available or not.

Way 6) Check for Damaged System Files:

Sometimes, corrupted or damaged system files can generate multiple issues. If you are willing to fix the error, then you need to use the Reimage to perform a full Windows scan and repair.

  • First, your task is to download the Reimage and install it.
  • Then, your job is to open the Reimage. After opening this, you need to tap Yes to run a free scan.
  • With the help of Reimage, you can scan the PC thoroughly. However, it can take some minutes.
  • As soon as you do this, a detailed report of all the troubles will be available on your computer. If you want to resolve these automatically, then you need to tap on START REPAIR. But to use this, you should buy the full version. Besides, it also comes with a 60-day money-back guarantee. Therefore, if you want, you can refund any time if Reimage is unable to fix the problem.
  • Now, you need to check your driver’s status as it will be normal now.

Way 7) Uninstall the Printer Driver:

Especially, two significant solutions are there that you can follow to fix the issue. The first one is to uninstall your Printer with all related software. Then, install this in your operating system. And the second one is that go through all the available drivers and then choose the correct one. It helps to uninstall them, and then you should try to connect it. Thus, the default drivers can be installed.

Steps:

  • First, your task is to tap on Windows + R buttons. Then, write “control” in the dialogue box and hit Enter. As soon as you enter the control panel, ensure that you have chosen the option View by Large icons. After that, you need to tap on the Devices and Printers.
  • You can now see all the names available in the list.
  • Tap on the name that is creating the issue. Then, you have to choose the “Remove device” option.
  • Now, you must hit Windows + R again, and after that, your task is to write “devmgmt.msc”. Your task is to move to the “Print queues” category and then tap on the Printer. After that, your task is to choose the “Uninstall device” option. Sometimes, the option may not be available in the Printer after removing it from the control panel. Therefore, there is nothing to take tension if you won’t find this.
  • Write “appwiz.cpl” in your dialogue box after typing Windows + R button. After that, your task is to hit Enter. All the apps are available in the list.
  • You should now tap on the printer applications and then choose “Uninstall.”
Further Steps:
  • When you complete performing the steps given above, you need to unplug the device from your PC. You should do this while the device is connected via a USB connection. You should unplug it from your router if it uses wireless. Then, your task is to close the PC, Printer, and router. After that, you are required to plug the power supply out.
  • You should wait for ten minutes. After waiting, you need to connect all of these and start all modules. You should then plug the device into your PC with the help of a USB cable initially. Now, you should wait till the detection process is not finished, and then you have to install your essential drivers.
  • You should then move to the control panel and tap on the device. After that, your job is to choose “Set as default printer.” You need to print a test page to check if the issue remains.

Via Device Manager:

  • First, you are required to hit the Start button. Then, your job is to move to the Device Manager section.
  • Hit the arrow button that is beside Print queues to extend this group.
  • If your Printer is not available in the list, then you need to open the View menu. Then, your task is to choose Show hidden devices.
  • Tap on the Printer and then choose Uninstall device.
  • Now, your task is to tap on Uninstall for confirmation.
  • As soon as you uninstall the device, you need to go to the Action menu and open it. Then, choose Scan for hardware changes.
  • Now, your task is to reboot the computer. Windows will install the missing device automatically.
  • At last, you should try using the Printer.

Way 8) Start Windows in Safe Mode:

You can try to boot your windows in Safe Mode as it is an ideal way to disable any non-critical drivers, services, or processes. These can affect the PC and cause errors.

The process of doing this is as follows:
  • Head towards the Start menu first and open it after that. Then, your job is to hit the power button.
  • Hold the Shift button down and then tap on Restart.
  • Now, you can find your Windows booting in Recovery startup mode with a blue screen.
  • Then, you should choose the Troubleshoot area.
  • After that, you must navigate to the Advanced options and then Startup Settings.
  • Tap on the Restart.
  • You should then tap F4 to turn on the Safe Mode.
  • As soon as your Windows boots, use your Printer.

Way 9) Install Generic Printer Driver:

Your PC may not detect the Printer or get stuck as an Unknown device. Hence, your task is to install default generic printer drivers manually. Perform the steps to do so.

  • Your first task is to tap the Windows key and hold this. Then, you need to tap X.
  • Next, you should choose the “Device Manager” option.
  • As soon as you open the Device Manager, you need to find the Printer. If you cannot find this, you should check if the “Unknown Devices” option is available in the category.
  • Tap on the device and tap on the “Update Driver” option.
  • Then, your task is to tap the “Browse my computer for drivers” option.
  • You should choose “Let me pick from the list of available drivers…..” and then select “Generic Software Device.”
  • Next, your job is to tap on the “Next” Option, and then you should restart the PC.

You should know that installing the Generic driver might not allow you to use some functionality. But it makes your device usable, at least.

Way 10) Reinstall Printer:

If you cannot solve the ‘Printer driver is unavailable’ error message, you should reinstall the Printer. The effective way that you can choose is to solve irregularities. If you are willing to do this, then perform the steps.

  • You should switch off the printer device and unplug it after that.
  • Then, you must write Add Or Remove Programs by going to the search field.
  • Next, you can choose the Printer that you are willing to uninstall.
  • Wait for a while till the uninstallation procedure is not completed.
  • You should now reboot the operating system and then connect it again. Now, you can turn on your Printer.
  • You can take the help of the installation disc or USB in this case.

Way 11) Roll back the Printer Driver:

Have you installed a driver mistakenly which does not support your Printer and operating system? It may be a reason why you are facing the error message. Hence, the easiest way to do this is to roll back your driver to an earlier version. These are the steps that you are required to perform to do this:

  • Your first task should be to tap on the Win key + R buttons. Then, you need to write devmgmt.msc. After that, you have to tap on the Enter to open Device Manager.
  • Then, your job is to expand the category of the Print queues.
  • Tap on the printing device, and then your task is to move to the Properties.
  • Now, go to the Driver tab.
  • You should now tap on the Roll Back Driver and then go through the instructions.
  • If you see the button in grey color, it indicates that no earlier version is saved on the computer. As a result, you are unable to perform the process.
  • Finally, your task is to reboot the Windows PC and then check your Printer.

Way 12) Set the Default Printer:

Have you connected many printers and scanners with your PC? If yes, your OS can take a hard time detecting your default printer. Therefore, the device will not function properly and show the error message. However, you can resolve this by setting the default printer.

  • First, your job is to tap Win key + R and then write Control Panel. Next, you need to hit Enter to open this app.
  • Then, you need to go to the Devices and Printers.
  • Now, you need to identify your printer name in the category of Printers.
  • Tap on this and then choose Set as the default printer.
  • Tap OK for confirmation.
  • Finally, check your Printer to see if it works.

Conclusion:

If you don’t want to face Printer driver-related issues such as printer driver is unavailable, or driver unavailable on the Printer, or Printer says a driver is unavailable error messages, then you should perform specific things. You need to keep the hard disk constantly optimized and install a driver from an actual source. Make sure that you haven’t installed any software from unknown sources. Try to use reliable driver updater software and keep the drivers updated. Wish our guide will help you to fix the error message ‘printer driver is unavailable’. Try all the methods one by one to resolve the error.

Frequently Asked Questions: 

How do you fix Printer Driver Is Unavailable Error?

You can solve the error by installing or updating the printer driver. Besides, you can also update the Windows Operating System to fix the issue.

How do you make your Printer Driver available?

The issue is usually seen when your driver becomes corrupted or outdated. In this case, updating your windows or the printer driver (manually or automatically) can help you.

What is the Driver Is Unavailable Error For The Printer?

It happens while the PC and printer driver is outdated or not compatible. Your Printer can experience multiple problems like paper getting stuck, unclear, blotched print, etc. The printer driver unavailable error is one of the examples of technical issues hence.


read more
AppsDo It YourselfGadgetsInternetInternet SecuritySoftwareTechnology News

How to Fix err_address_unreachable Error in Your Browser

How to Fix err_address_unreachable Error in Your Browser

Most of the people across the world prefer to use Google Chrome as a browser. However, many users have already encountered the message ERR_ADDRESS_UNREACHABLE on Chrome. If you have already faced the problem, the reasons can be router issues, proxy settings, wrong website access environment, server problems, etc. Due to these issues, you may be unable to access a few sites on your PC.

What Does The err_address_unreachable Error Mean?

This err_address_unreachable error message is common on the Chrome browser while using a Windows PC. It usually happens for the Domain Name System (DNS) when it carries an error. This is the reason due to which you are unable to load web pages using the host.

What causes the error “ERR_ADDRESS_UNREACHABLE” in the Chrome browser?

We have given here the reasons for which you can face the issue while trying to access any site on the browser.

Router Issues:

The router that you are using can create problems in submitting requests to the designated ports.

Proxy Settings:

Whether you use a proxy network to access websites, it might not handle your requests properly. In this case, you have to disable the proxy server or try to enable it as per the situation.

Wrong Website:

This message can appear while you are trying to access a private address in a public network.

Server issues: Whether you are a website owner, you should know whether your users can access your site or not. The error can appear due to some other reason related to your site.

DNS Cache Problem:

The chrome browser stores caches of different sites. Hence, the DNS cache can be a reason for the err_address_unreachable issue.

Antivirus Issue:

If you use antivirus to check websites, you can find the site spam or harmful. The installed antivirus may block the chrome browser and not allow it to reach the website.

Slow Internet Connectivity:

While you are using any network, the internet connection can be low, due to which you may not load a website. Hence, the browser displays the err_connection_timed_out message. Sometimes, it can display the message Err_network_changed where the address is unreachable.

When you are trying the fixes, ensure that you have a proper internet connection. However, whether you are willing to access a private address, you should be in the network.

err_address_unreachable’ Error on Chrome:

When you see the error, you cannot access the websites you prefer for some reason on the Google Chrome browser. The ‘This site can’t be reached’ message comes with the ‘err_address_unreachable’ error code. The message says that you are unable to get access to the webpage. So, it is essential to run Network Diagnostic to identify the real reason for the error. Ensure that you are refreshing the webpage on the chrome browser, then check if it works.

Sometimes, you can face the problem due to temporary glitches in the networking equipment and Windows. Hence, you are required to try to reboot both your router and PC. Then, you should check whether restarting the device helps to get rid of the issue or not. Generally, router and router settings-related issues are the reasons for the error. If you’re willing to solve the error, restarting or resetting the router can help you. If the proxy server settings are turned on on the Windows computer, you can also see the error. However, problems with the website server itself are also one of the causes of the issue.

Similar Types of NET::ERR_ADDRESS_UNREACHABLE Error problem:

  • Err_address_unreachable ubuntu
  • Err_address_unreachable opera
  • Net::err_address_unreachable
  • Err_address_unreachable mac 2018
  • This site can’t be reached
  • Err_address_unreachable mac 2020
  • Err_address_unreachable wordpress
  • How to fix err_address_unreachable chromebook
  • Err_address_unreachable reddit
  • Jio fiber err_address_unreachable

How to Fix err_address_unreachable the Error on Your Browser:

First, ensure that no problem will be there at the server-side. If there is no problem with the server, then the issue is at your side. Before proceeding with the fixing methods, you have to ensure that you have proper network connectivity. When you see the network connection is fine, then check these solutions given below.

Restart Your Router:

In most cases, when you restart the router, you can solve the issue immediately. Multiple cases are there where the router goes into an error state. If you face the situation, restart the router to get rid of the error message.

First, your job is to close the power supply of the router. After that, your task is to wait for around 2-5 minutes.

When the time has gone, turn it back on. Wait for a while, and then try to attach the PC again.

After that, try to access the website and then check if you are still facing the error.

Are you unable to fix the problem? Are you facing it till now? Then, reset the router. In this case, one thing you have to ensure is that you must know the details of the ISP of the router. If you don’t know, then you should know it first before resetting the router.

Hence, your job is to first find the small hole behind the router device with the reset tag.

Use a little pin after that, and then try to tap the hole continuously for 4-5 seconds.

Now, you can connect the router after a reset. Use an Ethernet wire if necessary and then head towards the router address. You can find the router’s address on the backside of it in most cases.

Next, you are required to put the details that you get from your ISP to access the network. Finally, check if the issue remains.

Disable Proxy Server:

A proxy server is the same as a VPN, and therefore you can use it with ease while connecting to a public network. When you use a proxy server outside of the organization or office, it can cause connection problems. In this case, you have to turn off the Proxy settings.

If you want to disable the proxy server, your job is to tap the Windows key + R button available on the keyboard to open the RUN dialog box.

When you are in the RUN dialog box, you must write inetcpl.cpl. Then, you should tap the Enter key or OK for opening the Internet Properties window.

Tap the Connections tab when the Properties window is opened.

Then, navigate to the LAN settings tab below the Local Area Network (LAN) settings.

Ensure that you have unchecked the “Use a proxy server for your LAN” option.

Then, you are required to mark the “Automatically detect settings” option.

After that, your task is to tap the OK to make changes. Then, get out of the LAN settings.

Finally, your task is to tap the OK button to get out of the Internet Properties window.

Clear Google Chrome DNS Cache:

Domain Name Server is the full form of DNS. The function of the server is to store the IP addresses of those domains you have visited. This browser helps to increase the speed of your internet browsing. To do this, you have to keep all the DNS data of the sites. You can face the issue due to this error. The reason is that Chrome may use the cache data for accessing the page that has moved to a different IP address.

It is better to delete the DNS cache memory to fix the issue. If you are willing to remove the DNS cache of the browser, then you need to copy the address and paste it into the address/URL bar. Next, your task is to tap the Enter button after pasting this address chrome://net-internals/#dns.

A page appears in front of the display after that. You need to tap the Clear host cache button.

Now, you have to remove the Host data DNS from the PC.

At last, your job is to relaunch the browser. Then, move to the troubled website again. Deleting the cache helps you to reset the device.

Disable your Antivirus App:

If you use any Antivirus software or third-party antivirus programs, it can create issues like ERR_ADDRESS_UNREACHABLE. Whether you want to solve the problem, you have to disable the antivirus program temporarily. Then, you can check if the issue remains.

If you find the antivirus software not causing the issue, you must enable the antivirus software again to keep the PC protected.

For Windows Defender:

Tap the Start button or Windows logo key first to get available at the lower left.

Then, you can see the settings icon. Tap on that for opening the section of Windows Settings.

When you are in the Windows settings section, you need to tap the Update and Security option.

Next, your task is to tap the Windows security available at the left pane.

Navigate to the protection areas section and tap on the Virus and Threat protection. After that, you will see a window appearing on display.

When the new window appears, you must tap the Manage settings option from Virus and Threat Protection settings.

Then, your job is to toggle the Real-time protection off.

Finally, reboot the PC.

For AVG:

First, tap two times on the AVG icon on the system tray.

Hit the option Temporarily disable AVG protection.

Then, choose the timing for how long you want it to be disabled. Select if you are willing to turn off its Firewall too. Tap the OK option if you are ready to disable the antivirus program.

For McAfee:

First, your task is to tap on the McAfee icon two times. The icon is available on the system tray.

Tap the Exit option after that.

Next, you can see a dialog box appearing saying that McAfee protection will be turned off. Hence, you have to tap the Yes option for turning off the antivirus program.

For Avast:

Hence, you need to tap on the Avast icon twice, which is available on the computer system tray.

After that, your job is to tap the Avast shields control option.

Now, you have to find the options for turning off the program. The options are as follows— for 10 minutes, an hour until the computer is restarted, or permanently. The option permanently indicates that it remains disabled until you turn this on again. After that, you have to select an option suitable for you. Use the option for turning off the program.

Launch the browser again and then check whether the issue remains or not

Reset TCP/IP:

We know TCP/IP as an internet protocol component useful for connecting with a network. When this gets corrupted, you can face a problem due to which you may not be capable of loading a webpage. Hence, resetting the TCP/IP of the PC can help you to solve the problem. If you cannot fix the error, you may want to reset TCP/IP with Command Prompt.

You should always be careful as your device may be affected if any wrong operation occurs while using Command Prompt. An improper operation can lead to data loss.

Step 1: First, your task is to navigate the Run window and open it. After that, you need to write cmd and then tap the Shift + Ctrl + Enter buttons for running Command Prompt as administrator.

Step 2: Hence, your job is to enter the following commands. Tap on the Enter after each.

  • ipconfig /release
  • ipconfig /all
  • netsh Winsock reset
  • netsh int ip set dns
  • ipconfig /flushdns
  • ipconfig /renew

Now, get out of the Command Prompt and then helps to reboot your PC. After restarting the computer, you have to launch the browser.

Clear Browsing Data:

Sometimes, the data you are using can be corrupted. In this case, what you should do is clear the browsing data.

We have given here the method for clearing the browsing data from the Chrome browser.

Hence, first, your task is to launch the browser.

After that, you are required to tap the vertical three dots. This menu is available at the top right corner of the browser display.

Next, move to the options list and then select the Settings option.

After that, head towards the Privacy and security section while you are in the settings.

When you enter the section, your job is to move to the Clear browsing data.

Now, go to the Advanced tab.

You should make changes to the Time range to All time. After that, you should check these items.

Browsing history,

cookies, and other site data,

site settings, and

hosted app data.

Tap on the Clear data button at the bottom of the display. Now, you should wait for a while till the data is cleared.

If you don’t clear data from the chrome browser, you should know that the more you clear data, the quicker the process will complete.

Check Address:

You can encounter the error if you try to access a private address while connecting to a public network. There are network addresses like ‘192.168.1.8’ etc. that you can access only in private networks.

You need to ensure that the address you are willing to access is not bound because of networks. If it happens, then you can confirm that you have connected to the correct network. Next, you should try to reaccess the network.

Try these solutions we have given below:

You can access the site in another network using a different ISP.

Besides, if necessary, then use another browser to access the site. If you find the other browser working correctly,

then the issue is with your browser. Hence, you are required to reset the browser or try to reinstall that.

You can check the address in the incognito tab. In this way, you can make sure that if the browser add-ons are the ones who are responsible for the issue.

If you are willing, you can try to access the site on another device but on the same network. Repeat the same process while you are connected to a different network. Thus, you can diagnose the issue to check if the culprit is your device or the network.

Whether each solution fails, you need to contact your ISP.

Change to Google DNS server on DNS Settings:

In most cases, whenever you find DNS (Domain Name System) related problems, you can fix them by changing DNS servers with the help of a Google Public DNS server. Hence, your task is to change the settings on Internet Protocol Version 4 (TCP/IPv4) for your preferable DNS server and Alternate DNS server. Now, check whether you are capable of solving the problem or not.

To get rid of the issue, first tap the Windows key + I buttons together that are available on the keyboard. By pressing the buttons, you can open the Windows settings section easily.

After going inside Windows Settings, your job is to tap the option Network & Internet.

Tap the option Change Adapter that is available below Advanced network settings of network status. Hence, you can see a new window appearing.

Then, your task is to tap on the network that is available in the Network Connections window. After that, you should tap the Properties option from the drop-down menu.

You can see the Networking tab option available below the Wi-Fi Properties. Hence, you have to tap on the option.

Now, you are required to scroll the page down and then tap two times on the Internet Protocol Version 4 (TCP/IPv4) for opening the section.

Tap the “Use the following DNS server addresses” option now.

Input 8.8.8.8 as a Preferred DNS server.

Input 8.8.4.4 as Alternate DNS server

Hit the OK option for making changes.

Next, your job is to relaunch the browser and check whether the message alert is still available in the Chrome Browser or not.

Reset Network Settings:

If you encounter problems with the network settings, you may experience this error message where the address can’t be reached. Besides,  if you are willing to get rid of the issue, try resetting the network settings by going to the command prompt.

If you want to do this, your first job should be to write ‘Command Prompt at the search bar on the lower left.

Next, you are required to tap the option command prompt result. After tapping, a drop-down menu will appear. From there, you have to choose the Run as Administrator option and tap on that.

When you are at the Command prompt window, you should try to write these commands. Then, you should tap the Enter option after each command.

You have to write the command ipconfig/release and then hit the Enter option.

Now, write ipconfig/all and tap Enter.

Write ipconfig/flushdns and hit the Enter key again.

Next, you need to type the command ipconfig/renew and then tap the Enter key.

Write this command now netsh int ip set dns, and after writing the command, you should hit the Enter key.

You have to write the command netsh Winsock reset and now hit the Enter key.

Write the ipconfig/renew command and then tap the Enter key again.

Finally, your job is to restart the PC.

As soon as the PC finishes the rebooting process, you should check whether the ERR_ADDRESS_UNREACHABLE error message is available or not.

Forget Wi-Fi Network and Reconnect:

Hence, you can try to delete the current Wi-Fi network and then connect it again. If you are willing to get rid of the error, you should follow the steps.

First, a drop-down menu appears to see the Network Preferences option at the bottom part of the menu.

Tap on the Wi-Fi option, which is available on the left side, and then tap on the Advanced option available at the bottom right of the pop-up window.

Now, you are required to choose the Wi-Fi network that you prefer to “forget” and then tap the minus sign. After that, your job is to hit the OK option.

Finally, you should type the username and password to reconnect the Wi-Fi network.

Turn on and Turn Off the Airplane Mode:

If you are willing to restart the device’s Wi-Fi and mobile-data components, you need to enable and disable the airplane mode. Try to restart the components as it can solve the error.

Remove Chrome Extensions:

Your PC can display the err_address_unreachable error for the chrome extensions you use. It is another strong reason for experiencing the error message. Using the Incognito mode of Chrome can help you in this case. When you use this mode, your browsing history or extensions are not stored because of the private browsing settings.

You should try to open the page in incognito to check the extensions if these cause the issue. If you can open the webpage with ease in the incognito tab, then ensure that this one is an extension error.

In this case, you must head towards the chrome://extensions to uncheck every extension manually. Then, you have to run the webpage to check which one is the culprit.

Update Google Chrome:

We primarily use Google Chrome as our regular browser to update automatically. However, if necessary, you can update it manually.

First, your task is to tap the three vertically aligned dots that you can see on the browser’s upper-right corner.

After that, your job is to tap the Settings and then Tap the About Chrome option. Make sure that you are updated. Otherwise, it asks you to update.

You should know that other browsers come with similar layouts and update procedures.

Use a Different Web Browser:

While you are using Google Chrome, you can experience plenty of err_address_unreachable error messages.

The reason is that the chrome browser may use its IPv6 DNS settings, due to which you can face the DNS resolving issue. Therefore, you are unable to get access to the websites. A few people experienced in the dns probe identified no internet problem due to this.

It would be best to try to access a similar webpage using a different web browser. For example, you can use Mozilla Firefox or Microsoft Edge. You may be capable of using the page on another browser but face the issue on Google Chrome merely. If it is the reason, then try this method.

Website is Down, Moved or not Exist:

Have you found your ISP not the culprit? Has it not blocked the webpage that you are using? Then, one thing that you can ensure is that your webpage server may be down. You can wait for a day until it comes alive again. Whether the web page won’t come, it either moves to another new address or doesn’t exist.

Use ‘PC Repair Tool’:

If the windows PC is causing the error, then the best way you can follow is to take the help of a ‘PC Repair Tool’ for solving the error. The additional benefits you can get from the software are that it can solve BSOD errors, EXE errors, DLL errors, programs/applicators issues, malware or viruses problems, and other system issues.

What will you do if no method will work for err_address_unreachable Chrome Windows 10?

If you have been experiencing the issue till now, then ensure that you are not the one who is causing the problem. Your device also works well.

How to Fix err_address_unreachable Error on Mobile?

Not only on a computer, but you can also face the issue on your mobile while surfing the web on a chrome browser. Hence, you are required to check the internet connectivity first. If it is fine, then you are required to restart the device.

You should check whether the mobile data or the Wi-Fi is working accurately or not. If the network is working fine, then the issue is on the server side. However, if your server is not responding to your device and responding to another one, follow the steps.

First, your task should be to enable the flight mode. Then, you have to wait for sixty seconds and then disable it.

Next, you should disconnect the Wi-Fi and then connect this again if you see the error.

Now, try to reboot the android mobile.

You can try to remove the browsing data and cache of the chrome browser

If you want, you can uninstall the browser and then try to install this.

Conclusion:

ERR_ADDRESS_UNREACHABLE is a type of error that is available in chrome browsers mostly. When it appears, it indicates that the browser you are using cannot get an answer from the site. It is actually on the IP address linked to your preferred domain name.

However, you should know that you can face the error on the other end of the connection. It indicates that your website may be down or moved. You can also see the error message while your network service provider or network administrator blocks the website.

Frequently Asked Questions:

  • Why are you unable to find the address of all websites?

There are a few websites that are unreachable due to server-related problems. For example, the server may be down or under maintenance. If you want to access an unreachable webpage, wait until the server becomes active. However, when you find the server responding to another device, then the issue is at your end.

  • How can you solve err_address_unreachable on mac?

Hence, you are required to diagnose your Chrome browser and mac book. You can reboot the system and modem, check the network connection, clear the Chrome cache, browsing history, etc.

  • What is Err_timed_out?

While trying to open any website on Google Chrome, it may take too much time to load. But if it fails to load the page, you can see the Err_timed_out error appearing.


read more
Do It YourselfAppsInternetInternet SecurityTechnology News

How to Fix ERR_SSL_VERSION_INTERFERENCE Error

How to Fix ERR_SSL_VERSION_INTERFERENCE Error

When it comes to online, you can find plenty of online fraudsters trying to crack a password code, steal information like personal, payment related, etc. In this case, it is good to install an SSL certificate to offer protection against online fraudsters. If you know the method of troubleshooting the problem, you can easily access a website or page. Here, we have discussed the process of fixing the ERR_SSL_VERSION_INTERFERENCE issue in Google Chrome.

What is mean by the ERR_SSL_VERSION_INTERFERENCE in Google Chrome?

ERR_SSL_VERSION_INTERFERENCE is a type of error that you can face while browsing a site with the help of Chrome or Firefox browsers. When your browser fails to load the visiting page with SSL protocol this type of error may happen. stands for ‘Secure Sockets Layer.’ It uses TCP sockets to transmit information. We are using the browser Google Chrome that enables us to communicate with secured sites such as YouTube, Google, Facebook, etc.

While you see the problem, it means that your system is facing errors in determining the SSL version. It may also happen that your device has an SSL version conflict. Generally, you are capable of fixing the problem efficiently.

The error generally happens while the network server uses TLS1.3. You can fix the error in a few ways. According to some guides, you should disable TLS1.3 entirely in your browser. However, it is not preferable because TLS1.3 provides more security features than TLS1.2 and lower TLS versions.

A mismatch in the TLS1.3 version that is compatible with the browser and the web server may be a reason for the problem. You should know that the TLS1.3 is still developing now. Therefore, if your browser is compatible with the latest TLS1.3 only, but you have the older version of this, then it can cause errors. However, what you should try the first time is to update the browser. It is always recommended to have an updated browser. The reason is that the recent version of the browser must come with the newest security features.

When you find the error caused due to web browsers, the error may happen for the update of your browser.

Why Do You See This ERR_SSL_VERSION_INTERFERENCE Error?

Multiple reasons are there due to which the error happens in Google Chrome. We have given a few here.

  • The site you want to use is not compatible with a mutually agreeable TLS protocol version. TLS 1.3 is supported merely by the server or the client. No other party is capable of supporting this.
  • You are unable to use TLS 1.3 with the earlier versions of the protocol.
  • A few sites are there that are not comfortable with 1.2. If you use any recent browsers, then it won’t create a problem.
  • The SSL you have maybe expired, or it might not be installed properly.
  • Your system may have an improper date and time.
  • Hardware acceleration can cause an error.
  • Google Chrome may be outdated, or the antivirus you are using may not be up-to-date.
  • Having corrupted browser cache data can cause the issue also.

How to Fix the ERR_SSL_VERSION_INTERFERENCE Issue in the Google Chrome (for Owner):

We have given here the process of solving the error in Google Chrome.

Check Your Server Configuration:

If the browser is updated, it may happen that the webserver has been using an old TLS version. Hence, you should check the server configuration.

Look at the SSL:

  • You should check the SSL with the help of an SSL checker tool. Use the tool to check whether you have installed SSL correctly or not. If you find this not appropriately installed, then you should reinstall it.
  • You should see also if the SSL has validity. If you are willing to check the validity of the SSL, you should navigate to the address bar. Then, you are required to hit the padlock icon.
  • Now, you will see a box popping up. Then, you should select the option Valid available in the box below the Certificate tab. Tap on the option.
  • You can see the expiration date available in the list alongside the Certificate icon. Whether the SSL is no longer for use, it needs to be renewed. If you want, you can use a new SSL.

Disable TLS 1.3:

Whether the browser you are using is running in TLS 1.2, then you can face the error. Then, you should check the server’s configuration and enable the configuration to support TLS 1.2.

  • If you are willing to disable TLS 1.3, you should first open the Chrome browser.
  • Navigate to the address bar after that, and then you should write chrome://flags/. Tap on the Enter button at a time.
  • Now, you can view the flags options.
  • Move to the flag search box after that, and then you should write TLS to look for5 the TLS 1.3 option.
  • You are required to select the Disable option from the dropdown menu.
  • After that, you should tap on the Relaunch option to start the browser again.
  • You need to check the site displaying the ERR_SSL_VERSION_INTERFERENCE error.

How to Fix ERR_SSL_VERSION_INTERFERENCE Error (for Visitors):

Check Time and Date :

  • If you are willing to check the time and date in Windows, you should first tap on the Start key.
  • Then, you should tap on the Settings option.
  • Now, go to the Start menu and then tap the Settings option.
  • When you open the menu, you need to look for the option. As soon as you find this, tap on it.
  • After that, you should turn on the Set time and Set time zone automatically.
  • Next, you are required to begin the chrome browser again. Then, you should navigate to the site showing the ERR_SSL_VERSION_INTERFERENCE error.

Disable Antivirus Software:

When you disable your antivirus software, you should try to update it first to the recent version. In case you are facing the problem still now, disable the antivirus software.

  • If you are willing to uninstall your antivirus software, then move to the taskbar.
  • Then, you should look for the hidden trays. After that, you need to tap on the option.
  • Now, you have to find the security software icon. Then, you should tap on this and select the Exit option.
  • Next, your job is to tap both CTRL + SHIFT _ ESC buttons. As soon as you press these, it will take you to open the Task Manager.
  • After that, you should look for the tasks that are linked to the antivirus engine. Then, you should close these.
  • Now, your task is to tap on the Start option and then write ‘Control Panel.’
  • You should then move to the Programs option. After that, your job is to navigate to the option Uninstall a program.
  • Next, select the antivirus you prefer. Then, you should tap on the option and choose the Uninstall/Change option.
  • Finally, the on-screen instructions are seen. You should follow those instructions.

Erase Browsing Data:

Check out these steps for removing the browsing data on chrome.

  • First, your task is to launch the Google Chrome app.
  • Then, you need to tap on Ctrl+H that are available on the keyboard. As soon as you press these, it will open the browsing history along with other stored information.
  • Navigate to the left-pane menu after that. Then, your job is to tap on Clear Browsing Data.
  • You can see here a new window popping up. Ensure that the Advanced Tab is opened.
  • Then, you are required to choose all the boxes.
  • Next, your job is to tap the Clear Data option.
  • Finally, your task is to relaunch the browser. And then, check if the error remains.

Disable Hardware Acceleration:

If you are willing to Disable Hardware Acceleration, you should follow the steps below.

Follow these steps:

  • Go to the browser Google Chrome and open it.
  • Tap on the ‘Menu’ option. Next, your task is to the Settings option. Hit the ‘Advanced’ option now.
  • Here, you should find out the category System.
  • After that, you have to turn off the option Use hardware acceleration.
  • At last, your job is to disable the hardware acceleration.

Flush DNS Cache:

Whether there exists any corrupt local DNS cache, you may not be capable of reaching servers quickly.  That’s why it is always better to flush the DNS cache.

  • First, your task is to tap both Windows Key+S buttons on the keyboard.
  • Then, you should write “Command Prompt” in the prompt box.
  • After that, go to the results and then tap on the Command Prompt option. You should now choose as Administrator from the results.
  • When you find the cmd up, you are required to run this command following command:

ipconfig /flushdns

  • After the completion of the method, a message appears in front of you:

Windows IP Configuration. Successfully flushed the DNS Resolver Cache.

Disable and Eliminate Browser Extensions:

The browser extension you are using can cause the ERR_SSL_VERSION_INTERFERENCE error.

  • If you are willing to eliminate these installed browser extensions, move to Google Chrome and open it.
  • Then, your job is to go to the Menu option and then select the option More.
  • Look for the More Tools option after that. Next, you should choose the extensions in the menu.
  • You are required to disable extensions individually. Delete the extension until you find the specific extension causing the problem.

Disable QUIC Protocol:

We have given here the steps of disabling the QUIC protocol.

  • First, your task is to move to Google Chrome and open it then.
  • After that, your job is to navigate to the address bar. Then, hit the enter button after typing – chrome://flags/#enable-quick.
  • You can keep this Experimental Quic Protocol default.
  • Finally, you are required to disable this and restart the browser. You should move to the site where you can face the error.

The Bottom Line:

In this above post we have shared some tips to resolve the ERR_SSL_VERSION_INTERFERENCE error. read the entire post before proceeding to resolve the issue.  It is essential to have an SSL certificate for that website you are going to use. However, you may not access websites for various SSL errors. We know SSL certificates as such ones that can offer you the most security. It is because this is capable of encrypting data. As a result, hackers are unable to decrypt. While making customer trust, you can use SSL to keep your site secured.


Frequently Asked Questions:

  •  Why do you need an SSL certificate?

It is useful to keep user data safe, verify the ownership of the site, etc. Besides, It also helps to stop attackers from creating a fake version of the site.


  • Should all websites have SSL?

The site on which you want to use your personal information should have an SSL certificate. Without SSL, the sites will become HTTP.


  • Does Google require SSL?

It is Google who is now pushing web owners to use a certificate. If Google wants to do this, it must display only the secure sites in the search results.


read more
1 2 3
Page 1 of 3