close

Internet

GadgetsInternetSoftware

Capture Card: A Detailed Overview Everything You Need to Know

Capture Card: A Detailed Overview

Best capture card can change your streaming level completely. When you want your stream to function smoothly, have the highest frame rates. As well as the best quality, a card is essential.

Alright, you have to start your creation by targeting a card or computer that can stream at the maximum resolution at the lowest price. Thereby providing you with the most worth for your deal. That sounds simple, but the cost to deal ratio will shift the right match for you and your equipment.

For this reason; this is especially important for streaming beginners.

What is a Capture Card?

A capture card is a gadget that lets you record and stream games from your video game consoles. The best card is part of the most exceptional streaming system. Even when your graphics card or processor can do the task, you can lower the pressure on your first gaming Laptop by a perfect capture device. So that you can enjoy high-quality streaming and reliable frame rates at once, even, the best capture cards will extend the gaming arsenal throughout PC platforms.

Types of Capture card

Capture Card for Xbox one

Users having Xbox one; may confuse why they require a card for PC. Especially when they already have capabilities for capturing and streaming. One of the points for having it; you will have more control over your recording capabilities. Using a game card one can record more protracted periods of Game-play.

Capture card for Xbox one is of good quality, so there’s no worry about too much storage taken up on your screen. You need to pick the right game capture card for Xbox one.

Capture card for ps4

If your wish is to enter the world of gaming. Yes, you are on the right page. Of course, you do have your PS4, trustworthy sticks, a comfortable headset, and microphones but is that sufficient?

You might think you have everything, but let me tell you something important is still missing, i.e. A capture card for ps4.

It offers you to record game-play on consoles such as ps4 and PC in the possible excellent quality. With the use of a card, you need not worry about various hurdles in capturing or transferring your gaming footage. One of the great things about getting a capture card is that there’s no time limit to care about.

Card Switch

Your Switch would need to be in a docked position to use it properly. Unless you are using it in handheld mode, the streaming process won’t be complete. Disable the HDMI cable from your TV, and instead plug it into your capture card’s input port. If you use an external capture card now is the way to connect it with a USB cable to your PC.

First, you’ll want to take a second HDMI cable, and run it on your card to your TV from the output port. Congratulations, Mr leader!

HDMI capture card

It’s simple to find the best HDMI capture card. Initially, it would help if you understood the types of systems you would like to attach to. Then you will begin to consider where you want to assign to those devices. Before that, you’re required to ask yourself if you’re an existing video producer, or just beginning. These questions will help direct you to the correct HDMI capture card itself.

Compatible devices

Almost everyone wants a recording device. With their choice of streaming software; everyone avoids learning new software. You will also prefer considering operating system support. As this is easy to deal with. We can assume that you are not using a decades-old pc or console.

Portability

  • Portability implies it is small enough to fit into your pocket. You can carry easily in your hands.
  • For durability, detachable cables are superior. On the other fixed wires are better for portability.
  • Fixed cables are also easy to use.

Do I need a capture card?

Most users mostly feel uncertain, whether or not they require a card. In case you are among them. There are a few common capture card advantages listed below. You can make the correct choice:

  • It offers high-quality video. It also provides storage streaming.
  • Keep yourself apart from the rush. For streaming, you have the choice to use custom overlays.
  • It supported streaming is of high quality and lag-free. This is what makes users feel great always.
  • Even on external storage, Users can easily create and manage video library.

What do you need to point for a card?

In search of a Great Capture card? The one as similar to easy switch-and-play solution as needed, right out of the box. Of course, you would like to play, stream, and capture as efficiently and smoothly as you can. A Capture card that can do this will be a performer. Besides that, you’ll also need the price you want.

What is a USB  card?

Hardware which we can use for translating the digital signals from the camera output into a digital format is commonly known as the USB Capture device. The one your computer could identify quickly.

USB capture cards are popular as they are portable. Also, the size is convenient. In a small duration of time, these devices keep on evolving.

Need Card for YouTube?

A High-quality card is a must for you if you love sharing game-play videos. You can expand a YouTube channel by getting all the game footage that you require to create awesome videos.

How to Choose the Best Capture Card?

Choosing the best card depends on the type of topic you wish to create. Either you record videos for later editing, or concentrate on playback? Several cards are better as compared to others. Video resolution varies from card to card too, especially for streaming.

It would help if you kept in mind some of the things when you are planning to purchase a capture card for PC. Of course, you need to spend your money on the right device. Four essential points you should consider involves:

Price is one of the significant factors of buying a card is its price. You are not required to purchase, a costly capture card if you want to store a few infrequent videos.

  1. Video Quality

Undoubtedly, your capture card should have sound quality. Also providing additional support to high-resolution pictures. Indeed, the frame rate needs to be high as well.

Users who wish to track intense games. Should look either for Full HD or 4000 resolution. This enables capture cards to give excellent feedback. Rendering videos on a powerful device is necessary. In case you wish to use capture cards with 4k resolution standard.

  1. Computing

Before purchasing your new device for live streaming, make sure to check; whether your card and hardware specifications are matching. Gaming consoles like PlayStation 4; Xbox one; etc. use HDMI transfers to support it.

With several hardware factors, such as storage capacity, speed, and memory, etc.; A Capture should be ideal. A user should buy a card from recognized sellers as this provides support and helps through tutorials, customer support, and user guides. This will allow users to deal with different practical issues.

  1. Simple to use

The best Game card provides a long list of characteristics; that help users at different levels. In case you want to utilize any feature, you will have to explore the right process. It is, therefore, essential to read the user manual properly. Or you need to take help from the technical staff. Any device that is easy to handle is the choice of every user.

read more
AppsInternet

Best WordPress Landing Page Plugin in 2020

Best WordPress Landing Page Plugin in 2020

Do you want to grow your business by generating more leads and more sales revenue?  Then a customized and responsive landing page can help you to grow your sales revenue just by crafting growth-focused landing pages with the help of best WordPress landing page plugin.

However, crafting a customized landing page with the help of web developers can quickly empty your pockets? So, how to specially design landing pages with minimal knowledge?

The best option for you is the WordPress plugins. With the help of WordPress landing page plugins, you can seamlessly and flawlessly create professional landing pages in 2020.

There are tons of WordPress landing page plugins in the modern market.  So, to help you out with the best WordPress landing page plugins, we have filtered an exclusive list that can help you out.

This exclusive list consists of the best WordPress landing page in 2020 that can help you build the optimized and attractive landing pages that add value to your site and also improve your sales.

Best WordPress Landing page plugin in 2020:

If you are striving to create a landing page that helps to increase your sales? Then this list will help you to craft a professional landing page with some of the popular WordPress plugins.

Let’s get into the list of best WordPress landing page plugins in the 2020 list.

Thrive Architect: Best WordPress Landing Page Plugin in 2020:

Thrive Architect is a popular WordPress landing page plugin in 2020. The main reason for its popularity is its attractive features.

This unique WordPress landing page plugin includes more than 270+ templates to create a professional landing page without any need for coding. You can create lovely pages and posts with its easy page builder.

Lots of users love the drag and drop functionality of thrive Architect because its easy. No need to code anymore; you can build your sales funnel in just a couple of mins with Thrive Architect.

This attractive plugin offers various elements that help you to build a professional landing page that can help you generate leads. You can see some of the features in this thrive architecture: Content Boxes, CTA buttons, Countdown timers, responsive video embeds, Google Maps, Review bars, Testimonial, and more.

Apart from these, you can use email signup forms to your landing pages and easily connect your forms to different marketing services. Thrive Architect is mostly focused on conversion so you can find mobile responsive data, contact forms, and more in this tool.

Features:

  • Drag and Drop visual editor is one of the best notable features.
  • 270+ Customizable Landing page templates are great to craft an entire landing page based on your theme.
  • You can integrate most of the popular email marketing services with the landing page.
  • Easily do A/B split testing with the Addons.
  • You can edit both posts and pages with ease.
  • Seamlessly integrate with other thrive theme products.
  • You can get regular updates on the landing page.

Best WordPress Landing Page Plugin- Elementor Pro:

Elementor Pro is another good option to choose if you are looking at the best WordPress landing page builders. This special WordPress plugin is having more than 2 million active installations and the most popular and used plugins on WordPress.

Easy to use Drag and drop page functionality has made this closer to the users. The distinct feature of this elementor pro is the user-friendly interface that’s loved by everyone. Elementor is mainly popular among the crowd because it is free to use basic features. But, when you want to use its advanced features, you have to take its premium version.


With this elementor app, you can access all the great-looking page templates and different types of content blocks. However, it has some limited amount of integration, but it has the lead data integration – Zapier Integration option.

If you have a glance at the overall performance and features elementor pro is definitely the Good Pick.

It’s one of the fastest tools for launching a landing page. The premium option of this landing page builder is a good deal for one-site owners. But if you have multiple sites, then you might switch to other tools that offer unlimited sites.

The elementor 24 premium widgets and 75 pro template help you a lot in building the dream landing you need.

Features:

  • Elementor Pro has a Drag and drop visual editor, which makes it easier to create a landing page.
  • It has 24 pro widgets and 75+ premium landing pages.
  • Elementor has a popover builder to beautiful looking popover text.
  • WooCommerce builder is another useful feature.
  • It is expandable via third-party plugins.
  • You will have extensive selection template options in Elementor pro.

WordPress Landing Page Plugin- LeadPages:

Leadpages is more than just a WordPress plugin for building your landing page. It’s more than that; its a page creation platform with loads of features that mainly focus on conversion, leads, and sales.

If you are striving to use more drive conversion and lead options, you can easily use this lead pages plugin.

Leadpages is a SaaS solution that helps you build landing pages and even full websites using its flawless drag & drop editor. With Leadpages, you can publish your pages without impacting your server resources.

Leadpages can help you manage landing pages across multiple domains with a single dashboard option. It is a great time saver for users who are having various sites. This page builder has more than 200 conversion-optimized templates. So, you can quickly use the best template that fits your need.

The best thing about leadpages is it comes with responsive templates with built-in SEO features that can be optimized.

Features:

  • Advanced Drag and drop feature helps you to build breathtaking sites.
  • It is a fully hosted solution, so it doesn’t take page load on servers.
  • You can use popups & alert bars to drive conversions.
  • Easily integrate with popular email service provides.
  • You can run A/B testing hassle-free with Leadpages.
  • It has build checkout pages that can be integrated with Stripe.
  • Has a package of a simple website builder to build a website.

Beaver Builder:

Beaver Builder is the most popular WordPress plugins in the present page builder market. With the help of a beaver builder, you can build landing pages that convert, but you can even build websites.

Create stunning landing pages that load extremely fast with just a few hours of configuration. You don’t have to be a pro to build landing pages anymore; with this tool, you can create professional websites and landing pages.

You can use front-end visual editor to craft eye-crafting Custom page layout easily with this lightweight tool.

Beaver Builder has a good selection of templates that can be used for conversion purposes. The choice is relatively limited, but you can create new templates on your own with the help of Beaver builder.

Features:

  • It has a great drag and drop visual editor that helps you create stunning landing pages or websites.
  • You can get well-crafted stock templates, but you will only have a limited selection.
  • Quickly integrate with popular email providers with ease.
  • Easily save, export, and reuse your full pages, rows, modules, layouts, and more for later use.
  • The user experience of this tool is superior than most of the other Drag and drop functionality editors.

The Divi Builder:

The Divi Builder is another best WordPress landing page plugin in 2020. This is a well-known WordPress template that is used by different site owners.

You can create stunning landing pages along with full websites with this website builder tool. This Divi Builder is a plugin version of the popular Divi theme.

The visual editor has plenty of optimized conversion elements that are used for capturing leads. It also has an email signup form with direct integrations from popular service providers.

If you search for different marketing style templates, then you will not get the most because it has lesser marketing style templates.

In case, if you are striving to develop a full website with the Divi builder, then you have to install the Divi theme version to avoid messing with its plugin.

Features:

  • It has a powerful drag and drop functionality.
  • You can get 100+ professional website packs with 900+ page layouts.
  • It has a built-in A/B testing tool.
  • The Divi theme version is included in it.
  • You can choose social sharing plugins and opt-in forms.
  • Divi has a lower price than other pricy landing page options.
  • It has 46 content modules to use, and it might even grow as developers are improving it day by day.
  • With Divi, you can add custom CSS for applying your custom style.

Qards:

Qards is one of the best WordPress landing page plugins in 2020, but that is lesser-known to most of the website holders. This WordPress landing page plugin has impressive features to get listed on this list of Best WordPress landing page plugins in 2020.

With Qards, you can create stunning websites without any coding and any hitches as well.

This special tool has Drag and drop functionality, and it’s fully responsive and flexible. The main reason people love to choose this qards is its flawless media support as it allows Youtube inline and background videos.

Its also having advanced support so that you can add Custom CSS and HTML. Although Qards don’t have a pre-built template like other templates, but it’s excellent with other features to build stunning landing pages and websites.

Features:

  • It has the easiest Drag and drop functionality without any complicated controls.
  • Qards have several pre-built blocks such as covers, footers, image grids, menus, and more.
  • You can easily integrate it with MailChimp and even has individual blocks for an email subscription.
  • Each element in Qards comes with easy customization options.

Instapage:

Instapage is a perfect landing page builder option for people who focuses mainly on converting advertising into real conversion.

Although its main feature is building landing pages, it is having a full collaboration tool for page builders and even a unique optimization engine.

Instapage WordPress landing page plugin has much to offer in terms of A/B split testing. If you are looking for leads, then Instapage is a quick option for you.

It has a package of excellent A/B testing features that work best with elements. With instapages, you can use heat maps to see where people are clicking on your dynamic text on your landing page.

This page builder is similar to the other popular landing page plugins as it has Drag and drop features and elements like videos, CTA buttons, and more.

Features:

  • Robust drag and drop functionality helps you out to create a stunning lead generation page.
  • It offers a full suite of collaboration optimization tools.
  • Instapage has over 200+ customizable templates to select from to build your page.
  • You can quickly gain access to the Bigstock image library that has more than 33 million stock images.
  • Easily collaborate with excellent tools that make your landing page more impressive.

OptimizePress:

OptimizePress is another popular option for the WordPress landing page plugin option. This landing page builder is almost similar to the instapages, and it is specially designed for marketers.

Are you looking for simple landing page builders to build your sales pages, launch funnels, blog sites, and more? Then Optimize press is the perfect option for you as it is having a lot of robust features to work with.

OptimizePress has lots of features that help you A/B test landing pages, and it even has gained access to video background and more. However, its price is more than other options as of now; it stands at $99 for one personal site.

Features:

  • Because of its Drag and drop functionality, you can build pages.
  • You can build an unlimited page on your personal site but because of its restrictions you cant build landing page to other sites.
  • It has a revolutionary Optimizer Builder page platform.
  • You can access 100+ templates to customize your landing page.
  • Quickly integrate your landing page to Zapier for leads data.
  • It has regular product updates and continuous new updates inclusion.
  • The landing page are already optimized to convert leads for many users as possible.

Conclusion:

These are the best WordPress landing page plugins in 2020 you should know about. If you are curious to check out the best landing page plugins, then you should check out this list and pick the best one you love depending on your budget. I didn’t mention the budget for most of the plugins as they are continually changing. Look for the better offer and buy the best WordPress landing page plugin you want to design your sale funnel or landing page.

read more
Do It YourselfInternet

How to Free Up RAM- Tips to Free Up Physical Memory

How to Free Up RAM- Tips to Free Up Physical Memory

You will note that your system fails to complete tasks as you use up the entire available memory on your computer. If you notice that your computer programs often crash and it takes more time to do basic tasks, you may be thinking about how to free up RAM on your device.

What is RAM?

The Random Access Memory (RAM) of your computer is located on a memory chip and is usually located on the motherboard. This is where short-term data is saved on your computer. For all current and operating programs and operations, This memory chip is the center of storage. Your computer uses the data it has stored in RAM to complete tasks while obtaining and executing other functions at the same time.

The output of your computer will slow down when you use up all the usable RAM memory since it does not have the space needed to complete its tasks. When you clear RAM space, your computer gets the ability to execute tasks. There are various ways that you can free up RAM space, depending on your device.

How to Optimizing Your RAM

Using your RAM will be simple since it supports so many features. Try these fast solutions to free up RAM space before you start deleting programs from your computer.

Restart Your Computer

Restarting your device is the first thing you can do to free up memory. All of your Random-access memory (stored data) will be scrubbed away when you restart or switch off your device, and programs will restart. This will theoretically flush out certain systems and applications that eat up the RAM storage operating behind the scenes.

Update Your Software

It is critical that the most up-to-date versions of your computer program and applications are working. It can require more memory to handle older applications and app renditions, causing the computer to slow down.

Try a Different Browser

Switching browsers is something else that you can do, as some of the browsers use more data than the others. Start using a browser like Chrome or Firefox, which are usually decent memory management browsers, if you’re not already using them.

Clear Your Cache

The next thing that you can do is to clear your cache if you ever find yourself low on RAM. Often, since it utilizes RAM for memory functions, the cache will take up a lot of space. Instead of uploading them again, the cache keeps on to data that your computer uses to reload sites it has used before. This will save you time while browsing, but if you are low on Random-access memory, it’s something you can compromise with negligible effect.

Remove Browser Extensions

The use of browser extensions has made most of your everyday work and home computer operations easier. However, they still need memory, so you may want to think about deactivating your extensions or deleting them.

How to Free Up RAM on Windows 10

If you are still having difficulty freeing your memory storage, then you probably may have many programs and software on your device without even knowing. Consider these five ways to free up RAM storage for Windows 10 devices.

1. Reduce Visual Effects and Animation

With developing technology, there are even more options for computer effects and animations. For example, for applications and artifacts that use storage for unwanted effects, you can switch off the animations. There are some consequences you can shelve before you free up more memory if you happen to be running low on RAM capacity.

To open the visual effects on your computer:

  1. Go to the File Explorer.
  2. Right-click on “This PC” on the left-side column and choose “Properties.”
  3. On the left, press “Advanced system settings.”
  4. Choose the tab labeled “Advanced.”
  5. Under the Performance group, select settings.
  6. Change to “Adjust for best performance.”

This setting would disable all your computer’s animation functions. This will provide more room for you but will drastically restrict the aesthetic of your device. However, you can also modify the visual effects your computer can execute in the same tab to your tastes.

2. Keep Track Memory and Clean Up Processes

You can track the use of your computer RAM so that your capacity is not exhausted until you actually need it. You should navigate to the task manager to verify the processes in order to monitor the computer’s memory. This is where you can see which systems are running and what kind of storage they occupy.

To go to your computer memory:

  1. Open the Task Manager by pressing Ctrl+Alt+Del keys.
  2. Click the tab labeled ‘Processes.’
  3. To see how much storage they are taking up, press the ‘Memory‘ tab.

You will also see which of the applications on your computer takes up the most space and time. You can uninstall programs you don’t use, or if you find anything suspicious, that takes up your memory.

3. Control Running of Background Apps

Your applications that are scheduled to run automatically in the background are the next objects that could take up RAM. You could have used your device for years before realizing that these applications are eating up your RAM capacity. This will drain your memory, battery, and data capacity easily.

To stop the applications from running in the background:

  1. Go to your computer settings.
  2. Click on the category for ‘Privacy.’
  3. Scroll down to “Background Apps” on the left side panel.
  4. Switch off any apps that you are not using.

Applications are also automatically set to run in the device’s background. This makes it easier for them to view notifications and automatically update their apps. You will conserve RAM capacity by shutting this feature off for apps you don’t need.

4. Disable Startup ProgRAMs You Don’t Need

If you have been using your device for at least a couple of years, so you are likely to have downloaded a reasonable amount of applications that you have either missed or are no longer using. You would want to navigate to the startup tab to remove any you no longer need after the processes tab tells you which programs use the most space.

To disable startup programs:

  1. From the Task Manager, click the “Startup” tab.
  2. To organize the services from high to low use, click “Startup impact.”
  3. To uninstall any programs that you don’t use, right-click.

Startup programs are those that activate after booting up your computer. Without your permission, each one takes up a little bit of RAM in the background when these programs launch. All of the software and programs can add up after a while. Be sure to disable or uninstall the ones that aren’t required.

5. Always Clear Page File When Shutting Down

After you restart your computer, your page files will not be removed or reset because they are saved on the hard drive, unlike RAM. So it doesn’t get cleared with the others at shutdown as RAM gets stored on-page data.

Deleting page files will remove any RAM it has stored and help keep your computer running smoothly on your hard drive. This can be changed to clear automatically, much like the RAM, when your computer shuts down.

Open the Registry Editor to do this.

  1. Type “Registry Editor” into the search bar of the start menu.
  2. To open the Registry Editor to make changes to your computer, click YES.
  3. Scroll to the left and chose “HKEY LOCAL MACHINE.”
  4. Scroll down to pick “SYSTEM.”
  5. Choose “CurrentControlSet.”
  6. Find and choose ‘Order.’
  7. Scroll down to choose “Session Manager.”
  8. Look for “Memory Management” and select it.
  9. Choose “ClearPageFileAtShutdown.”
  10. Under the value data, enter the number ‘1’ and hit OK.

How to Free Up RAM on Mac

There are also useful applications for tracking and clearing up RAM capacity on your device for Mac users.

1. Free up Disk Space

If you learn that your Random-access memory is fully loaded, but you still need storage, you can use free space called virtual memory on your Mac drive. This extra storage can be found on the hard drives of Mac computers so that you can continue running applications. The feature is always on, so you would need to make sure that you have driver space available to swap in order to use virtual memory.

2. Check CPU Usage

To check your CPU health and utilization, you can also use the Activity Monitor application. The CPU is your Central Processing Unit, which carries out commands from the data stored as RAM in the computer program.

Just choose the ‘CPU’ tab next to the memory tab to manage your CPU. This is where you can see if the computing capacity of any app is greater than that of others.

3. Fix the Finder (Close Finder Windows Too)

The data each window shows are stored as RAM when you open a new window in the Finder. Instead of new finder windows, changing the finder settings will render the files open in tabs.

To open your Finder Preferences:

  1. On the top left of your screen, select “Finder.”
  2. Right-click from the drop-down options on ‘Preferences.’
  3. Check Open tabs for folders instead of new windows.

There is another way to clear the RAM storage; by combining your Finder windows. To do this, click the “Window” drop-down instead of the Finder. You’ll pick “Merge All Windows” from there to put all of your Finder windows in one place. This will declutter your desktop as well as conserve your storage.

4. Clean-Up ProgRAMs and Applications

You will want to keep your device clean and tidy if you are trying to retain a consistently safe amount of RAM storage. As macOS sees each screen icon as an active window, a cluttered desktop can consume storage far more quickly. And if you don’t think you should organize your files, it can free up a lot of RAM by throwing everything into one general folder.

5. Check Activity Monitor

You should check the Activity Monitor to keep track of your Mac RAM use, which tells you how much storage is being used and which apps are using it. To determine the applications that take up much of your storage, use the Activity Log. Delete the ones that you are not using anymore.

To Check the Activity Monitor:

  1. Search in the spotlight search bar for ‘Activity Monitor’ (command + space).
  2. Select the “Memory” tab
  3. Delete the unwanted apps.

How to Free up RAM on Windows or Mac – Additional Ways

Being proactive about the RAM of your computer is the safest thing to do so that you don’t have to think about clearing space. Use these additional ways to free up RAM on your Windows or Mac:

Increase RAM

You can still add more RAM to your computer if you have a huge amount of information you don’t want to remove. For a desktop computer, purchasing and downloading RAM is simple to do, but it can be difficult for laptops. Make sure you invest in the right kind of RAM for your device as well as the right amount for your individual storage needs.

Install a Memory/RAM Cleaner

There are memory cleaning applications to help you clean your computer if you feel that you do not have the time or you simply can not manage to arrange your files. Most of these cleaners have exclusive features or extension elimination capabilities that allow users to handle their startup programs.

Scan for Virus and Malware

When you download certain apps, software, or extensions to your computer, there is the risk that they may have a virus or malware added. If any malware or virus enters your computer, it will steal both your details and your RAM storage.

How To Free Up Ram In Android

Use these ways to clean up the RAM of your Android device and get decent performance out of it if you have been having performance problems on your device due to applications eating up all the memory.

1. Find the apps that are using the most memory

You should check the status of your phone to see how much memory (RAM) is actually being used and which applications are most used. Remember that RAM is supposed to be used, so it isn’t bad to have only a little leftover RAM available. As this is the most powerful use of it, Android will try to keep the bulk of your free Random-access memory in use.

  1. On your phone, open the Settings app.
  2. Scroll down and tap “About phone.”
  3. Click on “Memory.” This will show some simple information about the memory use of your phone.
  4. Click the button for “Memory used by apps.” The applications that use the most RAM will be shown.

2. Remove old apps

Deleting unused applications will help increase your Android’s free space, as well as free up RAM if the apps run a lot in the background. Free disk space and free RAM can also further boost the efficiency of your Android. Apps you bought or got for free can be downloaded from the Google Play Store again at any time.

  1. On your phone, open the Settings app.
  2. Select “Apps” or “Application manager.”
  3. Go through the list of installed apps to look for apps you no longer use.
  4. To delete it, select an app and then tap Uninstall. This will uninstall the app, removing it from your device. If there is no “Uninstall” option, then the app must be preinstalled on your phone, and you cannot delete it.

3. Disable apps that you don’t use and can’t uninstall

Many Android devices come with preinstalled loads of applications that run in the background and take up resources from the system. Since without rooting your phone, you can’t uninstall these applications, you can disable them instead. You’re not going to have the storage back, but they’re also not going to work either.

  1. On your device, open the Settings app.
  2. Select “Apps” or “Application manager.”
  3. Find the app that you’d like to disable. There are also carrier applications or combined applications that you have not downloaded yourself.
  4. If available, tap ‘Uninstall updates.’ Before you are offered the opportunity to disable the program, you’ll have to do this.
  5. Tap on “Disable.” This will turn off the app and stop it from working.

How To Free Up Ram in iPhone

1. Restart your iPhone on a regular basis

Restarting the iPhone will reset the device’s memory. This will repair apps that misbehave and take up too much memory. It can boost general efficiency as well.

  1. Press and hold the Power button until the screen displays the Power slider.
  2. In order to turn your iPhone off, slide the lever with your finger.
  3. Click and hold the Power button again after about ten seconds to toggle the iPhone back on.

2. Reset the RAM on your iPhone

To clean out the Random-access memory on your iPhone, you can use a quick trick, bringing you more free RAM for applications to use.

  1. Until the Power slider shows, push and hold the Power button. First, make sure your iPhone is unlocked.
  2. When the slider shows up, press and hold the Home button for five seconds. When you’re successful, you’ll be redirected to the home screen. This will disable the RAM currently in operation.

3. Delete unused apps

You can get better results on your iPhone if you have any free storage space accessible. Deleting applications, you don’t need anymore is one of the best ways to free up space. For applications that usually run in the background, this would open up disk capacity and free up Random-access memory. You will be able to download all of your paid or free apps again from the App Store.

  1. Find an app you would like to uninstall from your home screen.
  2. Until it begins to wiggle, click, and hold the app.
  3. To delete it, press ‘X’ in the corner of the app. For any other applications that you want to uninstall, repeat. It is not possible to uninstall system apps.

Conclusion

Now is the opportunity for you to bring an end to file hoarding. Without you noticing it, all of the files on your phone and device take up RAM space. Now you know how to securely declutter these redundant files from your device and how to free up Random-access memory so that it operates more effectively.

Frequently Asked Questions

Q: What is RAM?

A: The Random Access Memory (RAM) of your computer is located on a memory chip and is usually located on the motherboard. This is where short-term data is saved on your computer.

Q: Will doubling RAM improve performance?

A: If your device has less than 4GB RAM memory, we encourage you to add more RAM since it will greatly improve your device’s performance.

Q: How do I check RAM usage on Windows?

A: You can check your PC’s RAM usage by following some simple steps. Right-click on the Windows taskbar and open the Task Manager. Click on Memory, and you’ll be able to see the memory usage.

Q: What happens when phone RAM is full?

A:  It’ll slow the phone down. Full RAM will slow your Android phone. To be exact, switching from one app to another will be like waiting for a snail to cross a path. Plus, it will slow down some apps, and the phone will freeze in some irritating situations.

Q: Is clearing cache harmful?

A: Cache files are temporary files that are created dynamically when your Android phone is used, such as when you access the internet, use applications, sync your mail, etc. You will delete the memory from the cache at any time. This will not damage your phone. It will free up your internal and external storage.

read more
InternetInternet Security

Facing slow Wi-Fi issues? Here’s how you can increase your internet speed

Facing slow Wi-Fi issues? Here’s how you can increase your internet speed

With slow Wi-Fi, it becomes very frustrating. In spite of paying the service provider for high speed connections, we experience slow Wi-Fi. Most of our devices are dependent on Wi-Fi and hence the performance is hindered due to slow Wi-Fi. With the expansion of IoT and 5G networks, the Wi-Fi access is sure to skyrocket.

Before we look at how to increase the internet speed, we need to see what is causing slow Wi-Fi.

Firstly, the location of the router is important. The router should have a central location on the premises to ensure signal is sent out in all directions. The router should not be placed close to other electronics or metal objects as this can cause slow Wi-Fi speed.

Secondly, there may be too many people using their devices. In case you have an older router, then it can cause slow Wi-Fi speeds. Each device takes up a portion of the bandwidth and activities like watching videos become impossible. Slow Wi-Fi speeds are experienced when there are too many users and high bandwidth activities like gaming and watching videos are carried out.

Experiencing slow Wi-Fi: Let us look at the ways of increasing internet speed

WikiHow shows you how you can increase the internet speed and consistency. You will get internet speed for which you pay your Internet Service Provider. You can also optimize your internet connection for speed through fixes, software update and hardware solutions.

Router:

The first thing you need to do is to check your Wi-Fi router. You need to update the router to the latest firmware. An older router needs to be replaced by a new one that can handle IoT stresses. You can also go in for routers with boosters to increase your internet speeds. Make sure that the router is located centrally on the premises. If possible avoid hanging the router on the wall and keep it in an open area.

Switch to 5GHz frequency:

In case you need to increase the Wi-Fi speed in the room where the router is, switch from 2.4GHz to 5GHz. The 5GHz works over a shorter range as compared with the 2.4GHz frequency. The 5GHz frequency helps overcome interference and gives better internet speed.

Control Bandwidth usage:

Slow Wi-Fi is experienced if there are too many users. The users may be performing high bandwidth activities like video streaming and gaming. Bandwidth usage by certain apps also need to be controlled. This can be done by tweaking the Quality of Service settings in network administration.

External Wi-Fi antennas:

For larger areas and offices, you can go in for external Wi-Fi antennas to increase internet speeds. You can also use low-cost repeaters and extenders to increase Wi-Fi coverage and internet speeds for large areas.

Decrease the distance between the device and router:

In case of a slow Wi-Fi, try to use your device as close to the router as possible. Try to use your device where the router is visible. If the signal has to even travel through a single wall or appliance, you experience a slow Wi-Fi.

Check your Wi-Fi speed often:

There will be a fluctuation of internet speed through the day. You can check your internet speed by doing the Wi-Fi speed test. By this you will be able to figure out when the Wi-Fi is slower and analyze the difference. In case of too much traffic at a particular time of the day, you can avoid such times if necessary.


read more
AppsInternet

How to Speed up Wi-Fi: 7 Steps to Boost Your Wi-Fi Speed

How to Speed up Wi-Fi: 7 Steps to Boost Your Wi-Fi Speed

Today everyone knows the importance of a good Wi-Fi connection. You need it for work, entertainment and so forth. So what happens when you’re faced with less than perfect speeds? You contemplate burning your Wi-Fi router or you learn to just deal with it? There’s only so much one can do right? Wrong. There are ways in which you can speed up your Wi-Fi connection without burning up your router. There are certain ways in which you can speed up your Wi-Fi which should be within anyone’s capability.  While most of these tips are free some may cost you a few dollars but in the end you’ll have a speedier Wi-Fi connection. So without further ado here’s how to speed up Wi-Fi.

The First step in learning How to Speed up Wi-Fi is Testing your Broadband speeds:

The first step in learning how to speed up Wi-Fi is to first gauge how much your current speed is. By knowing this you know what your Wi-Fi speed is and whether any methods you’d pick would increase that speed.

When you take a look at your Wi-Fi speeds you’ll see the upload and download speeds. This will be your reference when it comes to measuring the effectiveness of various methods. Now how do you do this? Simply visit a speed testing site to learn what your Wi-Fi speed is at. An example of a speed testing website is “Speed Test”. Just click begin to learn your upload and download speeds.

To eliminate any of the reasons why your Wi-Fi might be slow which is out of your control, you could always contact your Wi-Fi provider for any problems from their end.

The Second Step is to use a Heatmapping Tool:

The second step in the process of How to Speed up Wi-Fi is to use a heat mapping tool. Once you already know your Wi-Fi speeds then the next step is to download a heat mapping tool onto your smartphone. There are plenty of apps on the app store on both Android as well as iOS that do pretty much the same thing.

heat map

What this heat mapping tool actually doesis that it helps you check which all areas of your house you get Wi-Fi connectivity and which all areas are lacking in Wi-Fi. You can do this by walking around your house with your smartphone in your hand.

By doing this you’ll know which all areas need Wi-Fi extenders and which areas you simply need to move furniture or other household appliances around to get the best speeds.

The Third Step in the Process is to Reconfigure:

Sometimes your Wi-Fi speeds may be suboptimal because of a simple reason. To fix such a thing you can simply try reconfiguring your Wi-Fi router. Who knows it might just work. To do this you’d have to use a computer and go to the Wi-Fi router page to adjust the settings.

Once on the page you’d have to go to the configuration tab and make any adjustments. You can learn to do this form your Wi-Fi router’s handbook.  Once done, again check the speed of your router to see whether that has solved the problem.

Change you Wi-Fi Router as a solution to How to Speed up Wi-Fi:

The current standard or version of router is 802. 11ac. If your router has some other version, then it is time to get a new one. Having the latest standard is another way in which you can boost your Wi-Fi’s performance. Besides increasing your Wi-Fi’s speeds, the latest standard also offers you extended connectivity. So you can move to the furthest ends of your house and still get good Wi-Fi reception.

If you happen to be a valued customer you may just be able to get a Wi-Fi router for free. Or the alternative would be to pay a few extra dollars and buy yourself a new one.

But before you do all this, first check your Wi-Fi standard. You can do so by clicking on the Wi-Fi icon on the screen. After that just hover the cursor over the broadband you’re using. You’ll see the standard next to the radio type.

Change Channels as an Alternative to How to Speed Up Wi-Fi:

The moment you set up your Wi-Fi router it looks for the least traffic filled channel and automatically connects to that.  But once there are more people in the area and that channel get clogged up, then your speeds diminish.  Sometimes one channel might be used by a number of routers in the area while there are others that are virtually empty. So the best solution would be to make use of such channels.

To know whether you need to change your channel there are some great tools to help you do this. There are software tools such as InSSIDer and NirSoft that will analyze your Wi-Fi spectrum and give you details on it including whether you need to change channels.

Pick a Less Crowded Frequency in How to Speed up Wi-Fi:

The norm 2.4GHz is crowded. With a number of people in the area using this frequency range it becomes very crowded, slowing down Wi-Fi speeds. The latest Wi-Fi routers- 802.11ac and 802. 11n offer two Wi-Fi bandwidths. This means that they are sending out two Wi-Fi signals one at 2.4GHz and the other at 5GHz.

This offers you up an opportunity to use the less crowded one- the 5GHz frequency.  Besides doing this you could also split devices to different frequencies.

Make an Investment in Powerline adapters:

This may be the last option you look at, as it can be tad expensive. But it’s the simplest and easiest way of speeding up your Wi-Fi. But if you do decide to buy one then make sure you’re choosing one with Wi-Fi capabilities or you’ll be stuck using an ethernet port. A Wi-Fi adapter basically creates Hotspots in the house which ensures that Wi-Fi reaches all areas of your house.

read more
Internet

5 Smart Wi-Fi Range Extender to Boost Your Home Connectivity

5 Smart Wi-Fi Range Extender to Boost Your Home Connectivity

Top 5 Wi-Fi Range Extender to eliminate the dead zones in home or office

Living a life without an internet connection that also which works well enough is a thing which we simply can’t imagine. Internet is just keeping us connected with loved ones, informed with latest happening in around us, entertained with the vast amount of media to consume and even more. We are relying on the internet to get things and works done by few click on the device sat our disposal. In we can’t live without internet but we certainly can’t live with slow and bad internet connections. We need high speed without any question. Secondly the menace of the dead zones while using Wi-Fi connection is most frustrating. Wi-Fi Range Extender come to our rescue by enhancing the Wi-Fi range to all the corners of the home or office.

It works by receiving the Wi-Fi signals, amplifying it and transmitting the boosted signal within the surroundings. Here are some of the best Wi-Fi Range Extender which you can buy from the market to resolve your internet signal and connectivity issues within home or office.

TP Link AC1900 with Touch Screen, Wi-Fi Range Extender


TP Link AC1900 with Touch Screen
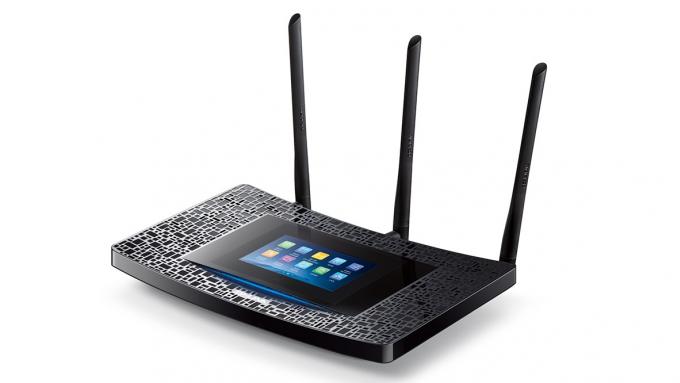
Nowadays firms are putting touch screen on almost every other gadget but nothing is as cool and interactive as having one on the Wi-Fi range extender. TP Link Wi-Fi Range extender devices are known for their incredible power and even this devices load up enough capacity to beam a range up to 10,000 sq feet. This feat is achieved by the presence of the 700wW amplifiers in the TP Link ACC 1900. It is aptly suited for large offices and homes or for those who want to use it in the outdoor.

It also features a cool touchscreen panel right on the front which makes the device excessively user friendly. This Wi-Fi range extender has cool and nifty features like support for the 4K HD streaming capabilities along with simultaneous gaming.

Xfnity xFi Wireless Wi-Fi Range Extender Pods

Gone were the days when you have to buy ugly looking Wi-Fi devices or extenders here comes the new age design. The unique pods offered by the XFinity can easily resolve the internet issues within any household or office with ease. It can easily penetrate multiple stories and can beam signals to four rooms at a time without any issues.

Xfnity xFi Wireless Wi-Fi Range Extender Pods

This Wi-Fi range extender comes with its own xFi pods which enables it to eliminate the dead spots and offer a reliable and cohesive coverage within the rooms. These pods comes together to create a mesh network which works like a charm with the xFi gateway and brings one of the best internet experience to the users.

Netgear AC 1200 Dal Range Wi-Fi Range Extender

Wi-Fi Range Extender

If you are in market looking for a powerful and robust Wi-Fi range extender then Netgear AC 1200 is right choice for you. It is a dual band Wi-Fi range extender which is designed to offer incredible power and service to the demanding users. It has 700mW high power design which enables it offers maximum Wi-Fi performance. It is aptly suited to handle your demanding chores and multiple devices ranging from the iPads, smartphones, laptops and whatever you connect it with. Apart from the home or office you are even able to get quality and reliable connection outside. It works through boosting the existing network range upto a massive 1200 Mbps and it is easily compatible with any standard Wi-Fi Router. Such a massive capability allows user to consume demanding media like live streaming or online games with ease on variety of devices.

Keewifi Kisslink – Wi-Fi Range Extender

 Wi-Fi Range Extender

We need internet fast but we don’t to wait to connect with it. Therefore Keewifi came up with the Kisslink Wi-Fi range extender which makes it easy, simple and quick to connect with the internet with enhanced performance in just few odd seconds. The plug and play mechanism of the KeewifiKisslink makes use of its proprietary KISS technology which helps in the Wi-Fi range extender in automatically connecting with the secure Wi-Fi network. This works like a charm and doesn’t even require pass, NFC or even Bluetooth technology. In other users doesn’t have type in anything or connect their device with any other prevalent technology. So you can connect with in less than 30 by simply kicking the Wi-Fi range extender in action.

Keewifi has got the pricing right and it becomes the most affordableWi-Fi range extender in the market with enhanced performance capability. When it comes to design it has a simple, modern and elegant look of the premium device in the market.

TP Link 4K Wi-Fi Range extender

If you are looking for high power, extreme performance then TP Link 4K Wi-Fi range extender is for you. It comes with three different antennas which looks awkward but does the job with perfection. All of these antennas works together in order to offer a really strong connection which can be utilized from any corner of the house without any issues. The best thing about this Wi-Fi range extender is that it does away with kind of dead zones in the home or office. Rather than placing different plugs or multiples part of the devices in order to create a mesh network you can easily get the job done with the unique antennas protruding out of this Wi-Fi range extender.

It also works with any kind of standard router or gateway and requires just few seconds to setup and start working. It is aptly suited for watching 4K content as the name suggests. It is incredibly fast with next to lag during video streaming even at the top notch 4K streaming. It allows users to do two things with their Wi-Fi connection ether they can extend the performance and range of their present connection or they can go ahead and create a new Wi-Fi access point.

All these Wi-Fi range extenders are great at eliminating the dead zones and bring the best of internet connectivity within a household or office premises.

read more
Internet

YouTube Paid Services Come to UK

YouTube Paid Services Come to UK

YouTube Paid Services make their way to Europe

Google is gradually moving into the markets and fields which wasn’t its focus in the initial phase. This include the doing away of the Nexus line up and coming up with own hardware line-up and giving a stiff competition to the establish players with the Pixel smartphones. Similarly Google has rolled out the YouTube paid services in the form of YouTube Music and YouTube Premium subscription model in the Europe in a bid to bring challenge to the established players like Tidal, Apple Music and Spotify. The best thing about the YouTube Music is that it brings a free ad supported option which isn’t available on the premium music platforms like Apple Music.

YouTube Paid Services is rebranding to cover lost ground

Google’s YouTube is already set itself as number one in the video sharing arena and the subsequent launch of the YouTube Red didn’t turn to be as good as it hope for. Therefore Google has brought the rebranded version of this YouTube Paid services with the name “YouTube Premium”. This service will allow users to stream the music through YouTube Music as well as some of the exclusive video series ordered by the YouTube. Secondly users will also get the chance to play the videos off-line by simply downloading it. It should be noted that these services had made its way in the US last month where it has received lukewarm response so far. YouTube Premium is simply based on the small but commendable library of the original content produced for the YouTube Red service in the last two years. With YouTube Paid services, Google is trying to place the YouTube Music as a favourable and best option against the market players like popular Apple Music and Spotify.

YouTube Paid services is designed to offer more

YouTube Paid Services aimed at offering the best experience to the users regardless of the device they use. YouTube Music Premium will work effortlessly both the Android and iOS phones as well as tablets. It will also work with the Google Home smart speakers but no support will be extended to the Amazon Echo devices. YouTube Music Premium plans are set to do away with the existing Google Play Music app and Google has stated that the YouTube Paid service will everything in the same place altogether. In other words users will be able to enjoy the live recording, covers, remixes and mashups at a single place.

Secondly a lot of effort has been given towards enhancing the search facility on the app in YouTube Paid services. Users will be able to find the exact song even if they end up typing muddled up lyrics of the sing in question. Users will also be able to enjoy their favourite tacks and songs even when there is no internet with the offline downloading option. However at the moment there is no desktop app for it and YouTube Paid services makes use of the location data in order to provide valuable recommendations.


read more
Internet

Google Wi- Fi Network Check Now Tests Multiple Device Connections

Google Wi- Fi Network Check Now Tests Multiple Device Connections

No More Dead Zones with Google Wi- Fi Network Checks!

Everyone needs to stay connected these days whether it’s through mobile data when you’re out or Wi- Fi when you’re at home and any problems to those connections means some really bad tempers all around. At home we depend on Wi- Fi connectivity and not only the devices like smart phones or tablets or computers, nowadays with  smart homes you would need to connect those smart TVs or smart security or washer to the  Wi- Fi too. Getting all these connected to one Wi- Fi too can be a pain if one or more devise doesn’t get the required connectivity. Remember that irritating buffering?  But now no more with Google Wi- Fi network checks.

Google Wi- Fi has already got network checks in place that measure the speed of the network as well as the quality of connection between the Google Wi- Fi and various access points in the house if you have more than one that is. Now Google is also planning to add a feature whereby the network check would now also check the quality of network going to each connected device in the household.

New Feature to Google Wi-Fi’s Network Check:

Google Wi- Fi has added another feature to it’s network check, whereby the Wi- Fi shows you how each device is performing on the network, that is if each device is getting adequate connectivity or not.

After that all you need to do is either move that device closer to the Google’s Wi- Fi or move the Google Wi- Fi closer to it. This feature just shows the bottle neck and helps you identify which devices can be rearranged in the house so as to get maximum connectivity.

You can view all the devices connectivity quality through the Google Wi- Fi app. As many as 18 devices can be connected to one Wi- Fi router and with that many devices on a network one or two or maybe even more devices will not be getting adequate network connectivity.

So with this new feature in Google’s Wi- Fi, users can know how much connectivity each device is getting.

When is this new feature on Google Wi- Fi coming?

This new feature on the Google Wi- Fi will be coming as an update to the system in the coming weeks and to all units worldwide. After the update all that the user has to do is start seeing each individual device’s connectivity through the Google Wi- Fi app.

read more
AppsInternet

Google Song Maker Lets You Easily Compose Music within Your Browser

Google Song Maker Lets You Easily Compose Music within Your Browser

Google’s Song Maker allows you to make your own Songs

Google’s launching Song Maker, where you can make your own songs and share it with the world. This project is coming out as a National Association for Music Education initiative. Google’s adding Song Maker as another tool to its Chrome Music Lab. Basically Song Maker is an easy to use sequencer that allows you draw out your own tunes in the browser itself.

It combines fun with education and allows you make songs in your very own basic music studio. There is even a feature that allows you to convert your drawing into music.

What is Song Maker?

Song Maker is a tool that makes making your own music fun and interesting. You can choose from a few instruments also to make out your tunes like the piano, synth, marimba and woodwinds. You can even get that beat down by adding drums to your musical composition.

Song Maker also comes with a section that converts your singing into notes and you can also attach a midi keyboard to your computer and play the instruments.

Song Maker also gives you the opportunity to allow the whole world to listen to your musical creations by giving you a permalink. You can also share your tunes on Twitter and Facebook and see what your friends think of your musical inclinations.

Song Maker is a simple sequencer that gives you a choice between five instruments and drums to get your groove on.

You can make your own tunes and loop it with two instruments and then share it with your friends or go in for a collaboration.

Started of as a tool to Google Chrome lab, the song maker is a fun place to kill the time and show something productive while doing so. Google launched Chrome Music Lab in 2016. As a series of web installments, Chrome music lab helps you get your jam on while playing around with music and making your own tunes as well.

Some of the installments to Chrome music Lab is Oscillators that allows you to squish a cute character, this squshing gives you an idea about frequencies and then there is Sound Waves, that shows how sound vibrations travel through air through a visual representation.

Song Maker on the other hand is a sequencer that allows you draw out your own melodies. It is divided into two portions with the top SongMaker portion being for melody and the bottom half being for rhythm. There are several musical options in each setting and you can start making your own tunes by using your finger, mouse, or any other thing depending on your device. It is as simple as that. In Google SongMaker the notes do not have to be pressed individually too you can press down on a number of them or swipe your finger across all to create whatever tune you want.

Song Maker does not require you to be a musical professional or know how to play any instruments either.

read more
InternetTechnology News

Google May Step Into Gaming With Yeti Streaming Service

Google May Step Into Gaming With Yeti Streaming Service

Will Google be making an entry into the gaming business with Yeti?

According to a report, Google is said to be developing a game streaming service, called Yeti. Google will be stepping into the video game business, where the users can play games without actually downloading them. It could work with its Chromecast device or they could be developing a console for streaming the games. Cloud Servers will be used to broadcast the games. Google has been in discussions with other game developers regarding Yeti.


Features of the Game Streaming Service – Yeti

Google is working on a subscription based game streaming service, codenamed Yeti. According to the Information website, this service could work either on Chromecast or a Google made console which is being developed for this purpose. In a way, this could enhance the success of its Chromecast platform to play games without downloading them.

This game streaming service dubbed Yeti, allows people to play games without downloading them. They can play the games while they are being streamed and there is no need of downloads or disks. This service Yeti will put Google as the front runner in the video gaming business.

This service, codenamed Yeti will be in line with the streaming services of PlayStation Now. The users will have to pay a subscription fee to access the games. The games will be broadcasted to the users via cloud servers and streamed over the internet.

Google is in talks with game developers, if games can be developed especially for Yeti. It is left to be seen whether they will do that or only make the existing streamed games available.

What is Game Streaming?

Game streaming does away with purchasing expensive video game hardware, since game processing is done in the cloud. Game streaming can be used for those with fast internet connections. The game is available on the remote server and the video is streamed to the user. Controller inputs are sent back to control the game. The communication lag is minimized if it is done properly. There is also the monthly bandwidth caps put forth by the ISPs. Local gaming can be availed in case the monthly allotment is used up.

Google will not be the first to offer game streaming. NVIDIA has GeForce Now, but it needs a Shield Android TV which is $200. The Chromecast on the other hand is only $35. According to reports, there is also work being done to develop a console where games can be streamed on Yeti. It is not clear which games Google will stream on Yeti, but the gaming enthusiasts will be hoping that the high end games will be in the offering.

It is left to be seen if Google can provide a quality gaming experience powered by Cloud to its users. Google hired Phil Harrison of Playstation and Xbox on board its project of game streaming service, Yeti. This indicates that Google is taking the games industry very seriously.

The game streaming service, codenamed Yeti will be a big move in the gaming world. If Google gets it right, this will be a big boost for them in the gaming business.

read more
1 2 3 4 5
Page 4 of 5