


Are you looking for a video enhancer? These tools allow you to improve the resolution of a video. Besides, with the help of these apps, you can change the brightness, saturation, and contrast of clips. In addition, it allows you to crop, rotate, edit, and zoom clips. Multiple apps enable you to edit 360 videos with minimal effort. We have given both open source (free) and commercial (paid) software.
What is a Video Enhancer?
A video enhancer is a tool used to improve the resolution. For example, you can perform cropping, rotation, edit, etc.
Why Should You Use a Video Enhancer?
These have plenty of features that can breathe new life into your footage. You should use them for—
- Upscaled resolution
- Better lighting
- Improved stability
- De-noising
- Brightness adjustments
- Cropping, rotating, and flipping
- Filters
- Effects and animations
How to Enhance Video Quality?
These are the essential ways through which you can improve it:
- First, your task is to use the upscale resolution.
- Then, you need to manage frame rate, codec, aspect ratio, and bitrate.
- After that, you should decrease or remove the noise.
- Now, adjust shaky videos.
- Next, you need to optimize contrast, brightness, and saturation.
- Then, your task is to rotate, crop, and flip clips.
- After that, your job is to apply those transitions, filters, and visual effects.
- Finally, you can add your favorite texts, sound, music, subtitles, and watermarks.
Top video enhancers:
1) Adobe Premiere Pro CC:
This video quality enhancer allows you to improve the quality easily. Besides, it enables you to export video formats like AVI (Audio-Video Interleaved), MXF (Material Exchange Format), etc.
Features:
- While it can reformat videos automatically, it also adjusts curve adjustments.
- In addition, it helps to extend the editing platform.
- You can mix audio with video.
- This video offers tools using which you can make and share stories.
- It supports Windows and Mac.
2) Topaz Video Enhance AI:
You can increase resolution using the tool. Besides, it enables you to upscale these. It is compatible with DVD, DSLR, Game, and HD stock footage.
Features:
- You can remake high-resolution video from low-resolution footage.
- In addition, it enables you to increase quality up to 8K.
- Besides, this software allows you to analyze multiple videos.
- You can use it for commercials, movie content, YouTube videos, etc.
3) AVCLabs Video Enhancer AI:
It is an AI-powered upscaling software that improves quality via a neural network. Besides, it can upscale videos from SD to HD (720p or 1080p), to 4K, and up to 8K in a single tap. It is an excellent super-resolution upscaling and multi-frame enhancement tool.
Features:
- AI power can enhance video quality.
- Moreover, it offers a 5-day money-back guarantee.
- In addition, it can process videos 100% automatically without fine-tuning.
- Besides, it can support automatic face refinement to enhance faces’ details.
- Its Super Resolution allows you to recover a high-resolution video from a low-resolution material. Besides, the tool can make additional pixel data to fill in the missing gaps. It uses the multi-frame convolutional neural network that helps to boost the video quality. In addition, it allows you to remove motion artifacts, stabilize video shake, remove overlay noise, etc. Classic programming can’t achieve these natural results.
4) PowerDirector:
This software allows for improving video quality. Besides, it enables you to include customized shapes and objects. Moreover, you can use the app supporting motion graphics and animated titles for Android.
Features:
- This free video enhancement software enables you to import 8K videos.
- Besides, it allows you to create a video in a 1:1 output ratio.
- In addition, the tool can offer plenty of ready-made templates.
- Moreover, this software can provide slow motion and fast motion effects.
- It allows you to correct color distortion in a clip.
- You can stabilize shaky footage.
- The tool can import and edit video shots on camera.
- It supports Windows and Mac.
- In addition, the software can give a 30-Day Money Back Guarantee.
5) Ashampoo Video Optimizer:
This robust movie editor tool can offer your shots the best. In addition, you can stabilize shaky videos and optimize colors & contrasts. Besides, you can sharpen footage by tapping on the button once.
Features:
- It enables you to improve contrast and saturation. Besides, it can make photos more vivid.
- The tool can offer a tilt-shift filter to make a selective blur. Thus, it can provide your captures with a unique look.
- It can remove fish-eye effects from videos and photos.
- You can improve the sharpness of your images to make them crisper.
- Sometimes, poor lighting and high ISO settings cause noise. This software allows you to remove it.
- It only supports Windows and offers Basic Free Version.
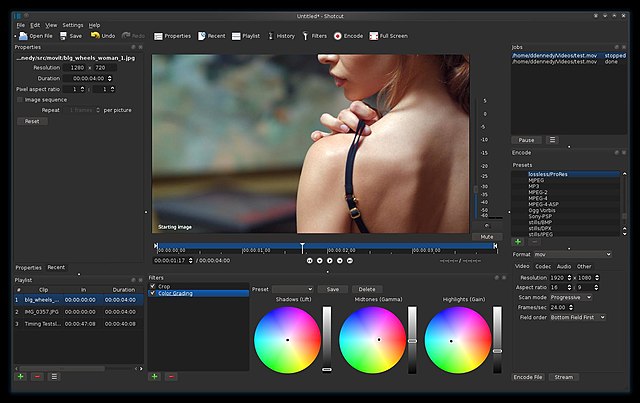
6) Pinnacle Studio:
Pinnacles Studio is a video quality improvement tool that has enhanced color grading features to improve video quality. It contains more than 2000 effects. In addition, this tool helps you to stabilize shaky videos.
Features:
- It lets you edit video in 4K and HD format and offers 360 video editing.
- The tool allows you to crop, rotate, edit, and zoom videos.
- It lets you split-screen video and edit videos captured from your camera.
- The tool only supports Windows.
- In addition, this software can offer a 30-Days Free Trial.
7) VEGAS Pro:
You can import video from cameras, tablets, and mobile devices. In addition, it can provide a nested timeline to speed up your workflow. It is a perfect tool to enhance video quality free.
Features:
- It can offer plenty of effects.
- In addition, it can remove whole sections of a video clip without any problem.
- Besides, the tool supports HDR (High Dynamic Range).
- It allows you to edit a video of 8K. Additionally, it can save your work automatically.
- It can give a drag-and-drop interface.
- This tool has an advanced version offering a lens correction plugin.
- In addition, it can create a slow-motion video.
- It supports only Windows. Besides, it can offer a 30-Days Free Trial.
8) Pikavue (Online):
With the help of the tool, you can boost the resolution and quality of the upscale video. In addition, it lets you increase the quality with no hardware limitation. You can convert any low-definition video to full HD.
Features:
- This application supports 4x the size and up to 4K UHD.
- In addition, you can compress them easily.
- It allows you to develop upscale AI.
- Moreover, it enables you to upgrade the quality online easily.
- It supports a Web-Based platform and can offer Basic Free Version for trial.
9) Final Cut Pro X:
It can dramatically accelerate graphics tasks such as rendering, real-time effects, and exporting. In addition, you can use gift cards for Apple’s digital content and subscriptions.
Features:
- It can sync up to sixty-four angles automatically with the help of different formats.
- The software comes with an intuitive, comprehensive set of tools.
- It can accelerate post-production work.
- The software allows you to add 2D and 3D titles to the 360° video. Besides, it asks you to apply blurs, glows, and 360° effects.
- This tool is optimized for the new Mac Pro.
- It can support Mac only.
- The tool offers a 90-Days Free Trial.
10) Lightworks:
With the help of this platform, it is possible to edit any digital video in multiple formats like 2K resolution, 4K resolution, and HD formats. Besides, it lets you export these for YouTube, Vimeo, etc.
How it works:
- Your first job is to tap on the “Create a New Project” link.
- Next, you should choose the video clip to import. Then, you need to use Ctrl/shift to choose many clips.
- Now, your task is to drag this to the Timeline. Hence, you can zoom the content using the plus button in the upper left corner of the display.
- A yellow bracket means parts adjacent to cuts are now separated from clips. Coop frames are available on both sides of a cut in Trimview mode. You need to tap on Preview below Viewer to see both in sequence.
- Tap on it in the Timeline and choose Speed.
- After that, put the speed percentage as you prefer and tap on Do It to save.
- Now, tap on the edited clip, sequence, or Timeline. Then, choose Export from the drop-down menu.
Features:
- It allows you to edit video timelines and trim.
- In addition, it lets you create 2D and 3D titles.
- You can share a clip with other people and assign read or write access.
- Besides, the tool can help you to customize the shortcuts.
- You can use English, German, Italian, and more languages.
- It offers an easy way to trim your video.
- It supports platforms including Linux, Windows, Mac, and OS.
- Basic Free Version is available.
11) Clip Champ:
It allows you to edit and boost the quality of any clips. Besides, the app can provide customizable video templates. In addition, you can mix and match stock footage and audio.
How it works:
- It enables you to log in or make a free Clipchamp account.
- After that, you can see the editor opening while hitting the purple Create a video button. Next, hit the Untitled video bar to Rename in the editor.
- Then, you should drag the audio files and drop them into the white pull-out tab.
- As soon as you upload your music clips, you will find them appearing under the Your media tab.
- After that, drag the audio file and drop it onto the Timeline after it is added to the media tab.
- Tap on the plus symbol on the left sidebar. You can see a pull-out tab appearing and uploading the music videos.
- Then, drag the video footage and drop it onto the Timeline.
- Choose the Text tab on the left sidebar and put a motion title.
- Finally, your job is to export the music after editing.
Features:
- It lets you compress, covert, collect, record, and make videos.
- In addition, it enables you to cut, crop, and rotate.
- You can make these using media assets from the stock library.
- It can decrease file size, convert clips into MP4, etc.
- The tool supports Windows and Mac.
- Basic Free Version is available.
-
Filmora:
It is an excellent option if you are searching for a reasonable desktop tool to increase quality. However, you must invest $60/year or purchase a lifetime license for $90.
Although there is a free version to use, it leaves a watermark on the content. Besides, you can never access the app’s vast library of effects through the store.
It can improve with stabilization, brightness, contrast, tint, and saturation controls. Besides, many overlays, motion graphics, and title templates exist.
Tips For Shooting A High-Quality Video:
These are the tips you need to follow.
Light Up Your Work Area: You must use well-lit environments. Hence, it is better to get near a window or open up all blinds while shooting indoors. However, whether you shoot outdoors, you must look for a spot in direct sunlight.
Invest in a Good Camera: Which camera you use is a significant factor in differentiating the quality. Of course, it is better to use a DSLR camera. However, you can have perfect results using a top-quality point-and-shoot camera. If possible, you should shoot them in high definition. It ensures that your music clips look perfect while uploading to the web.
Improve Audio Quality: Audio is another vital aspect to consider. First, ensure that you use a top-quality microphone to record your audio. After that, you should look for a quiet place to shoot music clips. These tips can create a top-quality video that appears excellent.
Conclusion:
You know how it is possible to improve the quality. Therefore, it is time to practice. You can create better videos by putting in a little effort.
Frequently Asked Questions:
- Can you convert low-quality video to high quality?
You can convert the low-quality clip to a high quality with their help. Besides, it is possible to use readily available sites and software for converting clips into HD.
- How does it work?
It can convert low-resolution video to HD. Then, you should check different parameters, including sharpness, bitrate and footage stability, contrast, brightness, etc., to increase the quality.
- What is the best free video enhancer?
The names include:
- Kawping.
- Clipchamp.
- Flexiclip.
- Avidemux.


 / or the so-called “Xbox Error Code” on Xbox while playing your games? Here is the solution.)