close

Gadgets

Gadgets

Motorola’s Moto G7 Lineup

Motorola’s Moto G7 Lineup

These days to get a pretty good phone you have to be ready to shell out a pretty penny. It’s simple: you want more you pay more. So how does someone beat that philosophy and get a good phone for a fraction the price of others out there? They set their sights on Moto G7. Moto’s G7 lineup  brings you more and then some for a third of the price when compared to iPhones or a top end Samsung Phone.

The most important thing is that Motorola has married amazing top end features with a small price tag. The Moto G phones that were the predecessors to the Moto G lineup was meant to give you everything but again at a lower price. With its successor you get all that and much more. To know more about Moto G7 keep on reading.

There are phones out there that have done pretty well for themselves like the Samsung Galaxy S10. But while they are still selling they had to become more luxurious as they had to compete with the Moto G series.

Then came along Moto G6 that again had everything going on for it, except the camera and stuttering menu. This time around three Moto phones are set to be launched in 2019- the Moto G7, Moto G7 Power and Moto G7 Play.

Getting into the Specifics with the Moto G7 Lineup:

The whole idea behind Moto G7 Power is that you can get 2 days of battery life with a single charge. The Moto G7 Play on the other hand is your more affordable option from the three. These phones are impressive to say the least. It’s not that they don’t have any flaws but they still can stand up to a high end phone any day.

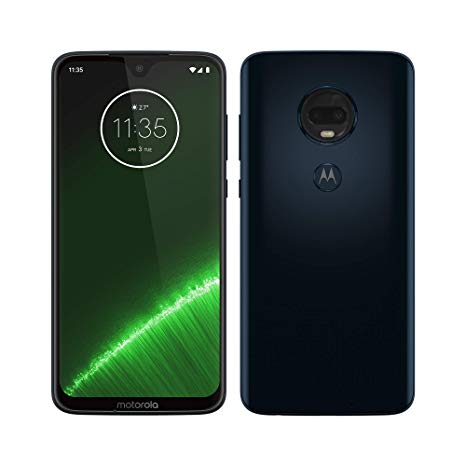
The Moto G7 which is the standard one, comes in a 6.2 inch edge to edge HD screen. It even comes with a notch up front that holds its selfie camera. Add to this a fingerprint scanner on the back and volume and power button where you normally find them and you’ve got yourself a common smartphone look.

The phone can be thought of as a sandwich between a Gorilla Glass and metal back. But apart from other 2019 phones this phone comes with a headphone jack and a micro SD card slot.

Moto

The Moto G7 and its brothers are all the same on the inside. They all run Snapdragon 632 processor and they all run on the same Android 9 pie. Besides running on the same processor these phones do have some differences from one and another.

Moto G7 Lineup Comparison:

 The Moto G7:

This Moto comes with the best screen from all three. The phone comes with 4GB of RAM and 64 GB of storage. The Moto G7 also comes with a dual camera set up on the back one of 12MPs and the other of 5MPs. It even comes with a tank of 3000 mAh of battery that will last you a little over a day. Looking singularly at performance then is phone is a cut above the rest.


The Moto G7 Power:

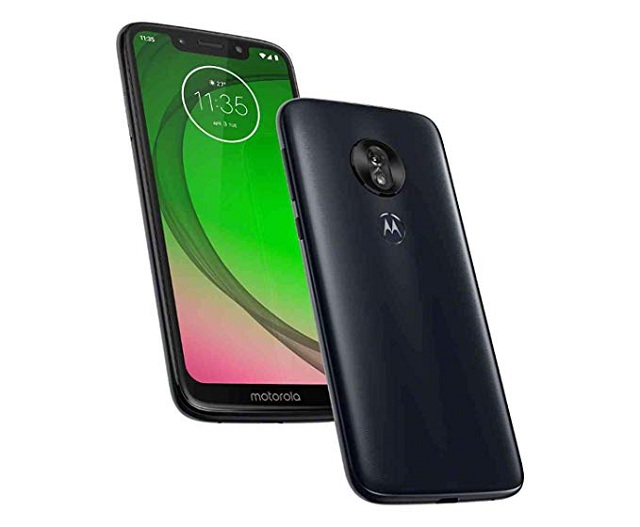
This Moto G7 is a step down from its older brother coming with only 3GB of RAM and 32 GB of internal storage. It also comes with a 6.2 inch screen as seen in the Moto G7 and a 720p display instead of HD that is in the Moto Power. The notch on this phone is larger and can sometimes give pixelated and grainy pictures.

Moto G7 Lineup

Coming to the back of the phone you have a single 12 MP camera. Its main drawing point is that it comes with a tank of 5000 mAh battery which will last you for two days or more.

The Smallest of the lot- Moto G7 Play:

This phone gives you less as compared to its older siblings. It comes with 2GB of RAM and 32GB of internal storage. Apart from this it also comes with a 5.7 inch, 720p display. It even comes with the largest notch that you’ll find on a Moto Play phone. Instead of metal at the rear it comes with hard plastic, which some find good enough. But the main source of attraction with this phone is the price which is just $200.

Moto G7 Play

Like the Initial Moto G all the phones in the same lineup come with a headphone jack and a micro SD card slot. Phone call sounds and audio is just like your average day phone. But when you listen to music you can get the most out of the experience by using headphones.

All the phones in the Moto G7 lineup are water repellent and not waterproof so you might want to keep them away from any liquids. When it comes to Bluetooth connectivity none of these models comes with the latest- Bluetooth 5.

Moto G7 and its lineup might just be the best affordable phones of 2019. They’re fast and the camera gets the job done if you don’t expect too much from it. The Moto G lineup does feel slippery to handle but in the end if you’re too uncomfortable then get a phone case. The display may be a little grainy or pixelated whichever you prefer, the phone slightly on the bulkier side of things and less file storage.

Conclusion

But if you don’t mind all these things then the Moto G7 is a really good phone for its price. Plus if you look at the Moto G7 Power it can last you for up to three days based on average usage. That’s pretty cool if you ask me. It may be a little bulkier than the rest but hey no one can argue with three days of battery life can you? These phones range from $200 to $300 and are available at Walmart, Amazon and Motorola.

read more
AppsGadgetsTechnology News

Get access to any computer via Google’s Chrome Remote Desktop service

Get access to any computer via Google’s Chrome Remote Desktop service

With Google’s free Chrome Remote Desktop service, you can get access to any computer that runs on Windows, Linux, Mac or Chrome OS. You can access any computer from any mobile device or any other desktop.

Earlier, if one had to access a computer remotely, then it would be a costly affair. It involved a complicated and costly software and technical know-how. Now, it is become so easy that you can even get access to any of the remote device’s contents and click on it just as if you were actually in front of the computer.

How to Use Chrome Remote Desktop

The greatest advantage is that Chrome Remote Desktop allows you to sign into your own personal computer or work computer from afar.

In order to access the  Remote Desktop service, you need to decide on the type of connection, follow a few easy steps and you will be remotely connected.

Steps you need to follow when accessing your own computer using the  Remote Desktop

Firstly open Chrome on the host computer. Navigate to Google’s Chrome Remote Desktop web app. Next click on the circular blue arrow icon within the box labelled ‘Set up remote access.’ After being prompted to download the Chrome Remote Desktop extension, you need to click the ‘Add to Chrome’ button and confirm your desire to proceed. On returning to the original tab, there will be a prompt to enter your computer’s name and move ahead. Click the ‘Next’ button, create a PIN composing six digits. To access the computer remotely, the PIN is needed along with being signed into your Google account for security purposes. A warning may show up in order to ensure that you want to allow the app access to start a remote connection.

How to Prepare Computers for Remote Connection:

You will gain access anytime the computer is powered on and Chrome is running. In case you require the connections to remain for a long time, then go to the computer’s power management settings to ensure it does not go into hibernation mode.

To disable the remote connections, click the Chrome Remote Desktop icon which is on the right of the browser’s address bar. Then click the trash can icon that is alongside the computer’s name to remove it from the app. You can also uninstall the app by right clicking its icon and choosing ‘Remove from Chrome.’

The next step is to connect the computer from either another desktop or mobile device. For this, you need to go to the Chrome Remote Desktop website – remotedesktop.google.com/access which is within the Chrome browser. Sign into Chrome by using the same Google account that you used on the host computer. Your computer’s name will appear and by clicking on it you can begin the connection. You will be in and you can do anything you want, just as if you were sitting in front of the computer.

For access via mobile, download the Chrome Remote Desktop app for iOS or Android devices. If you are signed into the same Google account, the app will show the computer and allow you to connect with a tap and typing your PIN.

read more
AppsDo It Yourself

How to Share Your Wi-Fi Password with a QR Code in Android 10

How to Share Your Wi-Fi Password with a QR Code in Android 10

In this modern world, we all love cool stuff which will amaze us. We like to share things on our phone to our friend’s phone and do lots of crazy things. Do you know, How to Share Your Wi-Fi Password with a QR Code in Android 10. Now, if you love to get some cool tricks on tech means you will enjoy this QR code trick in Android 10.

Android 10 is having a unique capability to share your Wi-Fi  password with a QR Code. Most of you might be amazed by what I have said. But it’s true, if you are techie means, you will know about these easily.

Now if you are running your phone on Android 10 means, you can quickly share your WI-FI network with your friends and family with a secured and handy QR code.

Most of you might be stuck with a question that how to share your Wi-Fi password with a QR code in Android 10 and some might even think that to access Wi-Fi  another person should also have Android 10 or not? If you are struggling with these types of questions, then don’t worry.

I have got you covered in this post on how to share your Wi-Fi password with a QR code in Android 10.

Let’s dive into the questions:

To access, should another person must have Android 10?

To access shared Wi-Fi other person doesn’t have to be running on Android 10 OS. So, it is one of the coolest features in Android 10.

The best thing about these features is you can even share this QR code with iPhone users as well.

Now, by listing this most of you might get excited right?

You should be because this is one of the ravishingly fastest ways to share your Wi-Fi  password.

By, using this method you can share your Wi-Fi with your friends without sharing your original Wi-Fi  passwords. There are some times we often keeping our passwords as the combination of our dear ones and we don’t want to share those with others. In that case, this Wi-Fi QR Code technique will come into place.

So, let’s find out how to share your Wi-Fi password with a QR Code in Android 10.

How to Share Your Wi-Fi Password with a QR Code in Android 10:

Follow the below steps to learn how to share the Wi-Fi  password with QR code on Android 10.

Step 1: Firstly Get the QR CODE:

The first thing you have to do for this is to get the QR Code ready. For that, you have to open your smartphone which is running Android 10. Then click on the settings app and head over to the “Network & Internet” option.

  • After that, tap on the word “Wi-Fi.”
  • Now click on the “Wi-Fi.”
  • Then select your current Wi-Fi network from the list of connections.
  • Remember this works for your current network.
  • So, tap on the “Share” Button which has an icon that looks like a QR Code.
  • Then you will be notified to Enter your PIN Code or even ask you to scan your fingerprint.
  • You have to complete that process — After that, your QR code will be revealed.

Now, you are good to start sharing QR Code.

Step 2: Share your Wi-Fi Password:

As you have generated your Wi-Fi password, now is the time to share your Wi-Fi  password with your friends. This process can be done within seconds.

All you have to do is ask your friend to scan your QR code to connect to your current Wi-Fi Network.

If your friends are using Google pixel phone or iPhone means they can simply open their camera app and the phone will automatically be connected to your network because those phones can recognize the QR code as soon as its view the Code. Just scan them they will be connected within a second.

How your friends can scan QR Code:

Most of you might get the same question as my friends asked me. That how your friends can scan the QR Code. If you are facing that question means, say the below process.

If they are using different Android phone means they will not have a built-in QR Scanner functionality and features like Google Pixel and iPhone.

So, they have to download a QR Scanner App. There are the number of third-party QR scanner apps hovering over the internet.

You can use one of them to complete the scanning process and get connected to the Wi-Fi  network.

If you want to consider our recommendation, then we recommend — Kaspersky Lads — QR code reader and scanner. It’s good it’s fast and its reliable app.

  • Now, after downloading the app install the app and open it.
  • Then just point their camera at the QR Code screen.
  • Within seconds, they can connect with your current Wi-Fi

That’s it; we hope you all enjoyed this cool trick from Android 10. It is just of the cool feature of Android 10 you can see hell lot of features in the near feature. That’s everything about how to share your Wi-Fi password with a QR code in Android 10.

read more
Gadgets

How to speed up a slow iPad?

How to speed up a slow iPad?

Do you have an old iPad which is running slow? Well, there are some tips that you can follow to increase the speed of your iPad. We know how it feels when your system is running slow. You feel irritated and disgusted at the same time. According to Apple, the platform of iOS always runs smooth, but it is not the case. Numerous times as your iOS becomes slow when it becomes older. Thus, if you are wondering about how to speed up a slow iPad, you are in the right place. Here, we are going to discuss some tips about how to speed up a slow iPad.

  1. Make some free space

To speed up a slow iPad, the first thing which you have to do is to create some space in the device. If you want your iPad to work best, you have to create some space as it applications need some space to perform to the finest. This is one of the most significant reasons behind slowing down of your iPad. Well, it is a very easy process to free the space from your device. All you have to go to the ‘settings’ and opt for the ‘general’ option and then you have to select the ‘iPad storage’ option. There you will find all your currently installed applications. If you find any app, which you are not using, tap the application and click the ‘delete app’ to free up some space. So, free up some space if you are thinking about how to speed up a slow iPad.

  1. Restart your iPad

After you are done with removing the unwanted apps from your iPad, the next thing you must do is to restart your iPad. It will refresh the memory of your device and will make it perform even better. You don’t have to follow any complications to restart your iPad. It is a very easy process. To restart it, you have to hold down the sleep/wake button for a while, and you will see the ‘slide to power off control slider’. Swipe it to switch off your iPad. Wait for some time and then restart your iPad by pressing or holding the sleep/wake button again. After switching on your iPad, you will get a clear idea about how to speed up a slow iPad.

  1. Stop the background apps and refresh

You have already freed up some memory, and your iPad is already working comparatively faster than before. But if you are using some of the older versions of iPad like iPad mini or iPad 2, then it will be best for your device if you can turn off the features, without which you can manage to do your works. So, refresh your iPad by clearing the background apps and know how to speed up a slow iPad.

  1. Update the latest version of iOS

Finally, after all these steps, if you are still worried about how to speed up the slow iPad, update your OS as soon as possible. It will make your iPad perform better.

So, stop worrying about how to speed up a slow iPad and follow the above-written tips.

read more
Do It Yourself

How to wipe your Computer clean before you Sell It

How to wipe your Computer clean before you Sell It

You’re planning to sell your old computer, so you have to delete all your old files. But wait a minute it’s not as simple as you think. You can’t simply dump all your old files into the recycle bin and say done. That’s not really How to wipe your Computer clean. It takes a little more than that but we’ve got you’ve covered.

You don’t need any Jason Bourne stuff either. When you sell your computer you need to make sure it’s back to factory settings and as good as new, well minus that it has been used. You don’t want anybody strolling through your stuff later on, now do you?

The process How to wipe your Computer clean has gotten a lot easier of late and if you have decent internet speed and a little time to spare, then wiping your computer clean is easy.

Before we start you might want to get an external hard drive to transfer all your old stuff to. Just in case you’ve deleted something you wanted Windows and Apple, macOS to be specific have got you covered. In Windows you have a built in back up facility and in Apple you have an app called the Time machine.

How to Wipe your Computer clean in Mac:

First things first get rid of your old iTunes account. Go into account authorizations once on the application and press deauthorize this computer. Next iCloud is on the list. Go into system preferences and then iCloud and press the sign out button. Just remember to press no when asked if you want a backup of your data on the computer.

Next the messages app- go on to the app and press on the word messages and then preferences. Once there press on accounts and highlight it and then press the minus button to remove them.

Open the finder window and highlight Macintosh HD and hit cmd-i. Once you’ve done all this shut down the computer and start it up again and immediately press and hold on the command and R. Do this till you see the Apple logo or a spinning Globe.

You’ll get a macOS utility page open. Once there open disk utility. Then press view and show all devices. Here you have to be careful and select Apple SSD or whatever is the top most option. It may be known by a different name.

Highlight the option and press erase. You’ll be then prompted to give a new name, format and scheme. You can name it “Macintosh HD”. Normally Disk HD will choose a format for you but if not you can choose either MacOS Extended or APFS. As for scheme you can choose “GUID Partition Map” and finally click erase.

Once you’ve got all that covered you can quit Disk Utility and in macOS Utilities choose “Reinstall macOS”. Then you just have to follow the instructions till its gets the system going.  And that’s how to wipe your computer clean before selling it.

read more
Gadgets

Apple Working on Force Sensor Gloves for Gesture Controls

Apple Working on Force Sensor Gloves for Gesture Controls

Apple to make in- roads into the future with force sensor gloves. These so called force sensing gloves could be potentially used to control devices, computers and other gadgets of the future. Apple plans on incorporating force sensing circuitry into clothes which can be used to issue commands. These force sensing gloves can issue commands by touching various surfaces in different ways. Apple plans on bringing the gloves used in the iconic movie “Minority Report” to reality in the form of its force sensor gloves.

Change in The way we Interact with computers using Force Sensor Gloves:

Today we use various gestures on mobile devices instead of the ordinary tapping on particular keys or in place of using keyboards. But all this is for now. Apple is apparently looking at the future with Force sensor gloves.

An Apple patent was published by the US patent and trademark office recently and described how gloves or any other clothing could be used in issuing commands. The circuitry incorporated devices would allow the wearer to issue commands without the need of a tactile display.

The Tech behind Force Sensor Gloves:

The fabric or gloves would contain a force sensor which would be connected to a control circuitry. This control circuitry would in turn be connected to conductive strands that fit into the fingers of the glove.

The tech in the circuitry would allow the wearer to not only issue commands by simple touch but to also issue commands based on pressure as well.

Applying the idea to Any Fabric:

While the same logic could be applied to any fabric, Apple is specifically keen on the force sensor gloves route. Hands are the easiest place to input such a technology as hands will be key when issuing commands.

The technology could also be used in kiosks, automobiles, head bands, wrist bands, furnishings and various other clothing items that can be thought of.

Apple’s patent on Force Sensor Gloves:

Apple’s patent on force sensor gloves includes multiple force sensors on a per finger basis. Meaning that each finger will be able to issue multiple commands based on the number of sensors in each finger in the glove.

Force Sensor Gloves may also contain “stiffeners” that would allow a user to issue commands without even touching surfaces in certain cases. This will be especially useful in cases of augmented reality and virtual reality.

The patent on the force sensor gloves goes on to mention force circuitry that will be connected to sensors that are woven into threads in the gloves.

Apple files a number of patents on a regular basis. While it is not indicative of a future product that will reach shelves in the near future, it does show what Apple is willing to spend considerable resources on.

It is even possible that a display could accompany such force sensors incorporated into gloves or any other wearable fabric. The fabric based force sensor could combine elements of both fabric as well non fabric technologies.

read more
AppsGadgetsTechnology News

How to Use Google Lens on iPhone and iPad in a perfect Way

How to Use Google Lens on iPhone and iPad in a perfect Way

Wondering how to use Google lens on iPhone and iPad in a perfect way? But don’t know about the Google lens. Then don’t worry, i got you covered.

Google Lens has made its initial debut at Google’s I/O 2017 event, which lets you obtain text and hyperlinks from images, and it can also identify a number of landmarks around the world.

Earlier in 2018, Google has released Google Lens feature to all non-Pixel Android devices and later it has started rolling the update to the iOS devices as well.

For people who are confused with what actually Google Lens does, here is the straight and simple answer.

“Google Lens is a comprehensive photo recognition tool built into Google Photos that can provide additional information about the pictures you are taking.”

How to use Google Lens on iPhone and iPad

Let’s get into few examples for clear understanding.

Example 1: For instance, taking a picture of Burj Kalifa will show the reviews, contact information and any additional information that found useful to the user.

Example 2: Taking a picture of an invitation will automatically be added to your calendar and marked it as an important date.

I hope with these examples you can get a clear view on the Google lens. Now, lets have a look at how to use Google lens on iPhone and iPad in a perfect way.

How to Use Google Lens on iPhone and iPad

If you are not using the Google Application on your iPhone/iPad yet, go to the App Store and download the latest version of Google app and launch it.

Make sure to Sign-in with your existing Google account or create a new account to effectively use this application.

How to use Google Lens on iPhone and iPad

Once you are done with signing in, locate the search bar and tap on the Lens icon on the right corner.

Suddenly it prompts a popup, click on the blue button that says “Turn on camera to use Lens”. Also, you need to provide permission access to utilize the Google Lens to the fullest. Tap “OK” in the permissions alert on your settings menu to allow Google to access your camera.

That’s it, just locate a picture that you want to know more information about, and click on the circle that appears on the bottom.

This feature is not limited to only the photos that you are taking currently, but also the photos that you have taken previously and stored in your device. To know more information about the photos that you have previously taken, simply tap on the picture icon located at the top right of the camera.

How to Use Google Lens on iPhone and iPad

And repeat the same permission access step that you have done for providing access to your camera. But this time it asks to grant access to the photo library. Once you are done with giving access, simply select a photo you want.

How to delete Google Lens history?

Are you striving to know about how to delete Google lens history? Then don’t worry it’s not that difficult at all. You can simply delete Google lens history by using this post. Check out the below content.

  • Simply log in to your same Google account on your PC/Desktop.
  • Go to https://myactivity.Google.com/, where you can find all the images that you have snapped using Google Lens.
  • At the top right corner of every image, you will find the “More Options” icon. Click on the icon and delete the photos.
  • Or you can directly delete all the activities you have done with Google Lens with one click.
  • At the top of the My Activity page, you will find “Today”. Similar to the process of deleting an individual photo, you will find the “More Options” icon on the right corner.
  • Click on that and you can find an option to delete all at once.

This is how you can delete Google lens history. So, just check the above process and do it in perfect way. Now, are you keen to learn more information about the Google lens then check out this guide.

More Information on Google Lens:

As you are interested to learn more about the Google lens you can check it out here in this article. Google lens has some best features which helps you to learn about the product from its history. While its visual character recognition powerhouse has been optimized to read more product labels, Google has also sharpened its machine learning and AI to recognize more animals, which suggests common pet breeds as well.

Without stopping its limitations to that, Google Lens can now also recognize a person, Wi-Fi network names for auto-connecting, and geometric shapes. And if cannot able to grab the exact information, it will offer up similar photos that match the picture that you are looking.

Curious to know what other things Google Lens can do? Or wondering how to use Google lens in iPhone and iPad perfectly? Then its Ok, here is the information you are looking for.

What can you do with Google lens?

  1. Collect contact information:

Place your Google Lens-equipped camera at any business card, and it has the ability to capture both the phone number and address present in that card. Also, It will add that info to a contact on your phone as well. That feature works with email addresses and URLs.

So, if you are keen to collect the contact information of a product then just take out your Google lens and have a glance at the product to learn more about the contact information and details about the pic or product.

  1. Books, music, movies:

If you scan a book cover or a music album cover, Google Lens will identify the title and give you reviews sourced from the web, and also adept at pulling up information about music albums, movies just by scanning their covers. If you are music freak who loves to know about the music albums and more then simply use this scan the cover with Google lens to find out more interesting aspects about those music albums and more.

  1. Details about things:

Want to know information about a landmark or building? Just take a picture of it, and Google Lens will provide you with information about the structure’s construction, architect and more. If you are walking through a museum, the Google Lens feature in Google Photos can give you information about the art pieces you see. That’s handy right?? It replaces the tour guide, as it offers even more information that one can provide. If you know what we mean(every minute detail).

  1. Scanner:

Google Lens offers more features than just collecting phone numbers and email addresses. It also scans barcodes and QR codes on products and shows up more informative results. If you strive to get more details and collect more information then you shouldn’t miss this tool.

  1. Recognize images:

Google states that Google Lens can identify the common plants and animals and shows you the necessary information when you point your camera at one of them.

Well, if you are an Android user, but still reading this article to know exactly what Google Lens does, you may be still in a disappointing side.

It’s not compatible with all Android devices and if so but not equally. For example, while it will work with the Samsung Note 9, it won’t play as nicely with the Samsung Galaxy S9. Some of the users have also noticed that the app doesn’t work on the Moto Z Play, Nokia 7 Plus, Xiaomi Mi A1, and many other phones. You’ll have to be running Android Marshmallow and above in order to access the app.

Conclusion:

By the end of this article, you might have come to the conclusion that “How to use Google lens on iPhone and IPad” is not a tough task to deal with. Speaking about the application itself, Google Lens is a handy application that lets you know about the things around you in just one snap. But the only concern with the application is with the consistency. We all know that Google is a masterpiece in making the useful technology, let’s hope Google Lens will also get better and better with the updates.

I hope you all got a clear view over how to use Google lens on iPhone and iPad in a perfect way. So, start using Google lens and enjoy its features.

read more
Gadgets

All-New MacBook Air Takes Flight

All-New MacBook Air Takes Flight

The new MacBook Air with Latest Features including the T2 Chip

The announcement of the new MacBook Air was made at the Apple’s New York event. The new MacBook Air comes with a lot of features that include a Retina display, a third-gen keyboard, an upgrade on the portable design and latest processors. The new MacBook Air has faster SSDs, T2 Security Chip, Touch ID and Thunderbolt 3. It features a Force Touch trackpad, all-day battery life and incredible stereo sound.

The new MacBook Air is available in three different variants-gold, silver and space grey. It is selling at $1,199 and can be ordered on apple.com. On Nov 7, the  MacBook Air can be purchased from Authorized Apple Resellers and Apple retail stores.

New Macbook Air Design and Sound

The new MacBook Air has a 13.3-inch Retina display with more than 4 million pixels of resolution whereby the images and text look more stunning and sharper in macOS Mojave. The  MacBook Air has a more portable design than the first MacBook Air. The wedge-shaped design is compact and portable and offers 12 hours battery life for wireless web use and 13 hours of iTunes movie playback. It is available in gold, silver or space grey. It is 0.61 inches at the thicker end and 2.75 pounds in weight.

There is an in-built FaceTime HD camera and the three microphones allow better sound quality and even an improvement on the voice recognition for Siri.

The new MacBook Air has advanced speakers and audio technology thus providing a better and immersive audio experience. Watching movies and listening to music is a treat with the speakers being 25 percent louder and the bass being doubled.

Security Features

The new MacBook Air has the Touch ID that is built into the keyboard. This becomes ideal for unlocking the MacBook Air, authenticate your ID and even ensure secure purchases on Apple Pay. In addition, the  MacBook Air has the T2 security chip to make it even more secure. The T2 has an always-on processor that enables ‘Hey Siri’ and an SSD controller with data encryption for all that is stored on the SSD.

Keyboard and Trackpadof New Macbook Air

The third-gen Apple keyboard is especially designed for a more responsive and accurate typing. There is more illumination as each individual key is backlit with low-power LEDs.

The  MacBook Air comes with a Force Touch trackpad which is 20 percent larger than the earlier MacBook Air which allows for a better user experience.

Processor of the new MacBook Air

An 8th Gen Intel Core i5 processor, Intel UHD Graphics and faster 2133 MHz system memory up to 16GB has been included in the  new MacBook Air. It ensures good performance for organizing your photos, browsing the web, viewing videos and making presentations. It also has SSDs up to 1.5TB which is 60 percent faster than the earlier gen and opening apps and files are faster and more responsive.

Thunderbolt 3

It has two Thunderbolt 3 ports for charging the notebook, transferring data via USB and Thunderbolt, output video in three formats and also connect various devices like external storage, docks for additional ports, 4K and 5K displays and eGPUs for speedier graphics.

read more
Gadgets

File Edge Review: Jetson Metro Electric Folding Bike

File Edge Review: Jetson Metro Electric Folding Bike

The Jetson Metro Electric Folding Bike as the name suggests is electric and foldable and hence good for travelling on crowded roads and gives off much less emission. We have heard of commuting on one-wheel hoverboards, electric skateboards and even the Segway. When it comes to an alternative for travelling by car, then most people would opt for an electric folding bike.

The Jetson Metro Electric Folding Bike could relieve traffic pressure and get you to your place of work without too much of a sweat. The folding bike could easily fit under your desk at your work place.

Features of the Jetson Metro Electric Folding Bike

The Jetson Metro Electric Folding Bike comes with a 250-watt motor which is positioned in the crossbar of the bike.

It has an aluminium alloy frame and weighs 38 pounds.

File Edge Review- Jetson Metro Electric Folding Bike

When the Jetson Metro Electric Folding Bike is folded, there is a magnet that holds the front and back wheels together. It is about 25 inches high, 30 inches long and 17 inches wide in the folded position. It is compact enough to fit under your work desk or even in the trunk of a car. There is nothing to hold the handlebars onto the frame and hence one has to be careful to avoid the handlebars from swinging about.

The Jetson Metro Electric Folding Bike does a range of 40 miles.

The bike comes with three levels of wattage – 150, 200 or 250 watts. Depending on the level you select, you can get the computer output without really figuring out how much torque is required for either driving up hill or at a specific speed.

The Jetson Metro Electric Folding Bike achieves a maximum speed of 16 mph.

The safety aspect is also taken care of with its rear suspension and the fat, 16-inch wheels.

The Jetson Metro Electric Folding Bike comes with a comfortable seat and big firm grip. There is a small LCD mounted on the handlebars where you can check out your battery level, speed and odometer readings. In dim light, you can turn on the integrated front light.

On the right-hand grip there is a button for sounding the horn.

The Jetson Metro Electric Folding Bike has front and rear disc brakes. There is also a guard to prevent any mishap of getting your pants stuck in the chain. It comes with just one gear.

Few drawbacks of the Jetson Metro Electric Folding Bike

At 38 pounds, the Jetson Metro Electric Folding Bike is a bit heavy to carry.

There is no scope for a front or rear rack to store your things. Storage on the Jetson Metro Electric Folding Bikes are limited to the racks that are attached to the seat post or baskets that are attached to the handlebars. The storage weight is thus limited as opposed to the storage in compartments in the rear.

The wheel forks have limited clearance making the options for fenders limited.

The Jetson Metro Electric Folding Bike is selling at $800 and is one of the more affordable options than other bikes in the market.


read more
Gadgets

What is the Best Laptop in 2018

What is the Best Laptop in 2018

Best Laptop of 2018 So Far!

Looking out for a laptop in today’s market is no easy task. There’s a lot to choose from whether it be hybrid models, touchscreens and more. Knowing what is the best for you can be very difficult but here’s our list of best laptop for 2018 to get you going. Whether you’re a gamer or a professional or you simply would like to use your laptop for something else, we have a variety of best laptop to meet your every need.Today’s laptop has to do it all. There are a lot of good laptops in the market and very few features to tell them apart. So focusing on those features and what will be good for you here’s our list of best laptops for 2018 so far!

Starting of the list with Best Laptop: Numero one Dell XPS 13—

Numero one Dell XPS 13 best laptop

Combine fast processing with a cool exterior and you have Dell XPS 13. The Dell XPS 13 features 8th generation processors along with solid state drives and up to 16 GB of RAM. As for the look of the laptop, it has a metallic finish with a white fiberglass interior.

The design looks premium and feels premium. Another feature of this sleek design is the InfinityEdge Bezel. This laptop has a bezel of only a quarter of an inch surrounding its screen. The keyboard is easy to use and the touch pad is as large as any of the competitors so there’s really nothing to complain about. Apart from all these niceties, this laptop has its web cam below rather than above the screen due to the quarter inch bezels. This laptop on the best laptop list will cost you above $1000.

Another best Laptop on the List- Macbook Pro 13 inch:

best laptop Macbook pro

So what do you get for paying Apple’s premium on a laptop- well you get MacOS of course and Apple’s great quality to go with it.

To add to this you get 7th generation core processors with not only this laptop but with all macbook pros. So if you’re wondering why to pay a premium for Apple products when there are just as best laptop out there? The answer is simple if you’re not really that taken up with Apple and its OS then their customer service will definitely make the decision of choosing a laptop for you.

Their service includes hardware others might refuse to guarantee and you can go to any Apple store to get your laptop looked at. While all this may still not appeal to you, Apple’s reputation and the quality of their goods will definitely ensure you a longer lasting laptop. So in a way it may be worth the extra price tag. This laptop will set you back around $1300.

Only the Best Laptop for this List- Samsung Chromebook Pro:

Samsung Chromebook Pro best laptop

This one is for those looking for basic functionality, this laptop on the best laptop list combines a budget buy with Google’s reliable Chrome OS.

The Samsung Chromebook Pro has 2,560 by 1,600 display and an intel core M processor to power it up and to add to that its got tons of memory to go along with it.

Google’s Chrome OS is simple and fast to understand. Before Chrome OS was used to run only web apps and extensions but it now includes everything you can find in the Google Play Store. So now you get all that is there on your phone on your laptop as well. You can get this budget friendly laptop anywhere above $600.

Another on the best budget buy laptop list- ASUS Zenbook UX33OUA:

ASUS Zenbook UX33OUA

This ultrabook is a powerful laptop that may not be a Dell XPS 13 but is still a really good buy. The base model comes with an 8th generation intel core i5 processor and 8 GB of RAM with 256 GB worth of solid state drive. This budget friendly laptop also comes with great battery life to go along with it.

This laptop will cost you $750 to get your hands on it.

A 2 in 1 Laptop for this list- Surface Pro:

Surface Pro

Not so sure about a laptop cum tablet kind of thing then the surface pro is the one to bring you over to the hybrid side. It’ got all you look out for in a laptop fast processing, its light weight, stylish and functions as a tablet as well.

You can tote this thing around without the extra weight of the keyboard too. It has windows 10 and does everything a best laptop is supposed to do. Clocking in at just 1.73 pounds and only .33 inches thick this laptop is the one for anyone. It comes in a student version too. But no matter what version you pick you get the 7th generation Kaby lake processor to go with this laptop. This laptop on the best laptop list will cost you above $800.

This one is for the gamers out there- Alienware 17 R5:

Alienware 17 R5

Alienware is known as the laptop makers for gamers and this one is no different too. Being one of the first laptops to come with a 6 core intel core i9 processor and also a Nividia GTX 1080 graphics card with 32 GB worth of RAM this laptop screams power and more.

With this amount of power you can run anything at any resolution without having any problems whatsoever. The display has 1440p with a refresh rate of 120Hz so gaming on this laptop is smooth sailing. As for design, Alienware never gets it wrong. This laptop may come in at the pricier side of things starting at $1500.

Hopefully this list of best laptop has given you clue or maybe more on what laptop to get whether it is for gaming or for a normal days work at the office or maybe simply for lying down watching YouTube videos all day. Coming in at a variety of price ranges these were our top picks for the year 2018.


read more
1 7 8 9 10 11 15
Page 9 of 15