close

Technology News

AppsDo It YourselfTechnology News

How to Create a Contact Poster On iOS 17?

How to Create a Contact Poster On iOS 17?

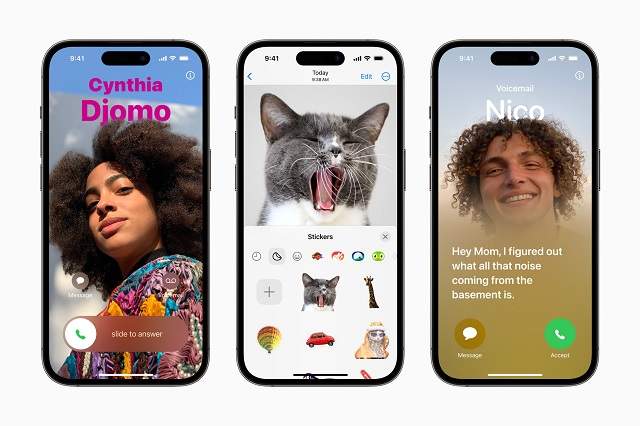
In June, Apple announced iOS 17 at WWDC. It is going to be released in the fall alongside the iPhone 15 models. Contact Posters is a feature belonging to the new software update. It is one of the communication upgrades brought by iOS 17 to the latest iPhones. If you use an iPhone 14 Pro or an older model, you can benefit from these features while updating. If you call someone who has saved your contact information in their address book, they can see your Contact Poster entirely on their screen, instead of the old small thumbnail.

As soon as you set up, your selected contact picture & the personalized poster will become visible to someone with your matching phone number or Apple ID. NameDrop, developed by Apple, is a method that can exchange contact information across Apple devices. Just like AirDrop, for sharing contacts, it uses Bluetooth technology, and every person’s contact poster will be showcased as a visual representation of their identity. Let’s learn how to create a contact Poster on iOS 17.

What is contact poster iOS 17?

Contact Poster in iOS 17 is a new feature allowing you to customize how your contact card will appear when calling someone. You can customize the call screen appearing on other users’ iPhones, including the photo, name, typeface, style, pronouns, etc., for unfamiliar users. In this way, it is possible to present yourself & express your identity.

How To Create A Contact Poster On iOS 17:

You need to enable the beta software updates to get the Developer Beta in Settings. Beta software is not stable and can drain your battery life. In addition, it can carry the risk of data loss. You can expect a public release of iOS 17 this September.

Contact Posters work with NameDrop, a way through which we can exchange our contact info with someone new quickly. It is necessary to hold the mobiles together to exchange the name, number, and email.

Set up your Contact Poster—

  • First, your job is to move to Contacts app or the Phone app’ Contacts tab where you can get to see the contact card at the top. Then, you need to click on My Card and Contact Photo & Poster.
  • Next, you need to click on Edit so that you can generate or change contact posters.
  • Three slots will be available to make a Contact Poster. Then, you need to click the + for creating a new one.
  • Users can generate a Photo poster, a Memoji poster, or a Monogram poster. Once you click on Camera, you can create a Photo poster with an image that you have taken on the spot.

Create a Photo Contact Poster:

  • This interface is almost the same as making a Lock Screen. First, choose an image from your library, preferably a vertical photo. Try to take photos with Portrait Mode because the phone easily separates you from the background while applying color effects.
  • You need to swipe left & right between different filters on the picture separating you from the background. Then, your task is to click on the color circle which can be found in the bottom right corner so that you choose an accent color.
  • Next, customize font, and color by clicking on the name at the screen’s top. Use your two fingers to zoom the image and drag it around on the screen.
  • Then, you have to click on Done. Then, a preview of the contact image will appear. Now, you should click on the Crop option to reposition the photo. Otherwise, you can click Customize Photo to choose a different one. Once you complete the steps, you need to tap on Update or click on Skip to leave this as the default.
  • Once you complete the steps, a pop-up will appear and it will ask if you are willing to have this new contact poster and image to sync across all your devices.

Create a Memoji Contact Poster:

Use the Memoji contact poster when you are unwilling to present a picture of yourself. Hence, you can select a Memoji from the list. For instance, you can choose an animal or something you made of yourself. Has your Memoji fallen out of date? Then, try to update this with the available instructions. You can choose a preset face like winking, tongue out, thumbs up, etc. Besides, it is possible to capture your face’s expression. Some Memoji come with torsos and arms.

  • First, you need to tap on Memoji.
  • Then, your task is to select and click on the Memoji you prefer.
  • If you want to create a new Memoji, you need to tap the + icon.
  • You can pose as you want and then once you are ready, you need to click on the Shutter icon.
  • If you want to try again, you need to tap the Bin icon which you can find in the bottom left corner. However, you will be able to click and choose from the presets that can be found at the bottom of the screen.
  • Then, your task is to tap on Next in the top right corner.
  • You can use the pinch gesture, if you are willing to to resize and reposition the Memoji.
  • You have to tap on Cancel if you want to try again. Otherwise, you need to tap on Choose if you are okay with the image.
  • Now, what you need to do is to choose a background color for the Memoji.
  • Then, your task is to click on Next.
  • Now, the memoiji will be assigned to the Contact Poster. You need to click on the icon in the bottom left corner, if you want to change the background color.
  • After that, you need to tap and select your preferred color.
  • If you are willing to choose a custom color, you can click on the color wheel.
  • For adjusting the vibrancy of the background color, you can use the slider at the bottom.
  • Now, your job is to click on the X icon after customizing the background.
  • Next, you need to tap the contact name at the top to customize the same.
  • Now, you need to swipe and select your preferred font.
  • After that, your task is to use the slider so that you can adjust the font weight.
  • Now, you need to change your font color. To do so, tap the color wheel and select a custom color.
  • Then, you need to click on the X after customizing the contact name.
  • If you are willing to change the Memoji, you need to tap the icon in the bottom right corner.
  • Now, you will be able to select your preferred Memoji and customize it.
  • Then, you need to tap on Done in the top right corner after you finalize the Contact Poster.
  • After checking everything, you need to click on Continue at the bottom.
  • Finally, the poster will be assigned to the contact you have selected. Now, you need to tap on Done so that you can save the changes.

Create a Monogram Contact Poster:

The monogram contact poster lets you enter only two initials and choose a color. You will have a limited font selection: the system font, a rounded version, a condensed version, and a nice serif font. If you wish to create your name’s monogram, use the fancy serif font. You can see a shimmery bevel effect changing the light when you tilt your mobile. But it will appear so subtle that the letters seem blurry. You can expect this to change before iOS 17 releases this fall.

You need to follow this procedure to create a Monogram Contact Poster.

  • First, you have to launch the Phone application on your iPhone, and then your task is to navigate to the Contacts tab.
  • After that, your task is to click on the contact card at the top.
  • Next, you have to head toward the Contact Photo & Poster section.
  • Now, you should press the Edit button.
  • Then, you need to hit the plus (+) button at the bottom.
  • After that, you have to choose between Camera, Photos, Memoji, & Monogram.
  • You can then change the style by swiping horizontally.
  • Next, you have to change the style, color & typeface by clicking on your name at the top.
  • Press the Done button located in the top right corner once you do this.
  • After that, you need to hit the Continue button.
  • You can optionally set a profile image for iMessage & other Apple services.

It is very simple to create & customize a Contact Poster. As soon as you set up this, you are able to pick whether it’s shared automatically with all contacts or only those whom you approve.

Use your Contact Poster to share your contact info:

If you find a person who is using the iOS 17 beta, just bring mobiles together to exchange contact info. Then, both can view each other’s Contact Posters. Moreover, using the same feature, you will be able to start SharePlay. Once you receive a call from a person you know, their Contact Poster will appear on a beautiful new incoming call screen.

The bottom line:

People were previously able to share iMessage profile photos. And the availability of a Contact Poster is certainly a welcome bonus that enriches iOS. The feature lets you recognize a caller by the larger photo and custom-made design. However, your contacts have to run iOS 17 or a later OS version to see your creation.

Frequently Asked Questions

  • What is a contact poster?

It is something through which Apple redefines the way you see your contacts & interact with them.

  • How do contact posters work?

You can customize how you will be represented when you call someone with the help of this new feature. Just like customizing your lock screen, changing your name’s font type, color, and full-screen image is also possible.

  • What is the poster template?

It refers to a basic template that can lay out what your finished poster will look like.

read more
AppsSocial MediaTechnology News

How to Delete a Playlist on YouTube

How to Delete a Playlist on YouTube

When you add videos to the playlist, you know things can get messy sometimes. That’s why it is essential to know how to delete a playlist on YouTube. Deleting a playlist is easy – no matter whether you are content creators or a normal run-off-the-mill YouTube viewer.

While YouTube is a famous site worldwide, it receives more than thirty million visitors daily. A lot of people spend most of their time watching YouTube videos. You can organize the videos through YouTube playlists. Besides, you may want to save a few videos for later. Playlists can help you in this case and let you organize the videos. You can use “Favorites” for all videos whereas “Music” playlist can be used for favourite songs. Let’s learn how you can delete a playlist on the app.

How to Delete a Playlist on YouTube as a Viewer:

Are you a casual YouTube viewer? Follow the process to delete the created playlists from both your phone and PC.

On the App:-

If you are using the YouTube app on an Android or iOS device, follow these steps to delete a YouTube playlist:

  • Your first job is opening the YouTube app on your mobile, whether you use Android or iOS.
  • After that, you should hit the profile icon that can be found in the YouTube app’s top right corner.
  • Then, your task is to choose Your channel.
  • After that, you need to go to Playlists.
  • Now, you can see a three-dot menu near every playlist. Click on the one beside the playlist which you are willing to delete.
  • The Delete option will be visible now, and you need to click on this. A confirmation message will appear thereafter. Then, you have to click on Delete again to delete your playlist.

Use Browser:

It is easy to delete a playlist on YouTube via the PC. You only have to follow the below-mentioned steps to do so.

  • Your first job is to open the YouTube app using a desktop or laptop browser.
  • After that, you need to find the profile icon that you can get on the top right corner of the screen. Then, you have to tap on it.
  • Now, your task is to find the Your Channel option and tap on this.
  • The Playlists section will appear then, and you have to tap on this.
  • It is now possible to see a list of all playlists you have created. Navigate to the one you are willing to delete. Now, you can see a three-dot menu where you have to tap on.
  • After tapping on the three-dot menu, two options will appear – Delete and Edit. Now, you have to tap on the Delete option.

 How to Delete YouTube Playlist as a Creator:

As a YouTuber, you may spend the most time with YouTube Studio. Therefore, learning how to delete a playlist on YouTube Studio is beneficial. You can perform the process both on your computer and phone.

On App:

  • First, you need to open the YouTube Studio app on your Android or iOS device.
  • The Content section will be available at the bottom panel. Then, you should click on it.
  • After that, your job is to click on the Playlists section.
  • Now, you will get to see the Playlists you have created. You need to click on the one you are willing to delete.
  • The edit icon is available in the topmost panel of the screen. Then, you need to click on it.
  • Now, what you need to do is choose the option: Delete playlist.
  • Then, you can see a confirmation popup window. After that, you need to tap on Ok.

Using browser:

  • First, you need to open the YouTube app on the PC browser.
  • Then, your task is to tap on the profile icon that you will get to see in the top right corner of the screen.
  • After that, your task is to navigate to YouTube Studio from the YouTube homepage.
  • Now, you have to select the option from the left window pane to visit the content section.
  • Tap on the Playlists section.
  • Next, you need to tap on the three-dot options menu near your playlist that you are willing to delete.
  • Now, the Delete Playlist button will be available. After tapping on this, a confirmation window will appear, and you need to tap on Delete again.

How can you (For Creators) delete individual videos from a YouTube Playlist?

YouTube not only allows users to delete the entire playlist, but also users can delete any specific video from their playlist. Let’s learn how to do it.

On App:

If you are a creator and willing to delete individual videos from a playlist, these are the steps that you need to follow.

  • Your first task is to open this app on your phone.
  • Then, you should hit the Profile icon at the top right corner.
  • Now, you need to choose Your Channel.
  • After that, your task is to head towards Playlists.
  • Then, you need to click on the playlist from which you are willing to delete the video.
  • Now, you have to select the three-dot menu near the video that you are willing to remove from your playlist.
  • Finally, your job is to click on the Remove from Playlist option.

Use Browser:

  • First, your job is to open this app on the computer using any browser.
  • Then, you need to hit the profile icon on the YouTube homepage.
  • Now, you have to choose YouTube Studio.
  • After that, your task is to select content on the left panel of YouTube Studio.
  • Next, you need to choose Playlists.
  • A list of playlists will appear thereafter. Then, your task is to move the mouse to the video to delete it. You can now see the Edit on YouTube option. Once you see this, you need to tap on it.
  • Recently added videos to the chosen playlist will appear on the right side of the next page.
  • Now, move the mouse over the video to remove it from the playlist so that you can see a three-dot menu. Finally, you need to tap on it.
  • When the Remove from [playlist_name] option will appear, you need to tap on this to delete it instantly.

How to Delete Individual Videos from a YouTube Playlist (For Viewers)

For mobile devices, this process is the same as that for creators. But for PCs, the process is a little bit different.

  • First, you need to choose the browser you want to open the app.
  • Then, what you need to do is choose the profile icon in the top right corner of the screen.
  • Thereafter, you have to select Your channel.
  • After that, your job is to tap on Playlists.
  • Now, you need to choose the playlist from which you are willing to remove videos manually.
  • You will see the recently added video start playing. Find the video you desire to remove from the playlist by scrolling the panel on the screen’s right side.
  • Now, your task is to move the mouse over the video to remove this from your playlist. Then, tap on the three-dot menu once it appears.
  • Finally, you should choose the Remove from [playlist_name] option.

Remove Another Creator’s Playlist from the Library:

We have discussed how to delete a playlist on YouTube. However, it is necessary to know that this app offers an option to save other creators’ playlists to your library. In addition, these can be stored in this playlist library. When you want to delete the Playlists, you need to follow these below-mentioned steps.

  • First, your task is to head towards your YouTube account and tap on the library page. Then, you will get to see a few playlists made by other accounts.
  • Now, you need to look for the playlist that you want to delete. After that, you have to tap the “view full playlist” button on that specific playlist’s bottom. Now, you can see a screen popping up. It looks similar to the previous screen but it has a difference. No drop-down menu exists to delete the playlist. The reason is that the playlist doesn’t belong to you any more. Therefore, you are unable to delete this. It is only possible to remove it from your library.
  • Your task is now to look for the symbol with the lines and the checkmark. Once you put a cursor on this, it will say “remove from library”. Finally, you have to hit the option to remove the playlist from the library.

The bottom line:

Creating playlists is one of the best features of YouTube. But sometimes, you may need to delete the Playlists, and this article is all about it. Go through the article properly to learn how to delete a playlist on YouTube. Still, if you have any questions or doubts, feel free to ask us via comments.

Frequently Asked Questions

  •  Why can’t you delete a playlist on YouTube?

If you want to delete a playlist on YouTube, you need to hit the three-dot menu from your mobile or PC. After that, your task is ro click the Delete option.

  • How do you delete a playlist from your YouTube library on your phone?

To delete a playlist from your YouTube library on your phone, first you should go to Profile. Then, you need to go to Your channel. After that click on Playlists. Then a Three-dot menu will appear and you need to click on it. Finally, tap on Delete.

  • How do you permanently delete a playlist?

When you select a playlist to delete, it will be deleted permanently. You will not be able to undo this.


read more
Technology News

The Advantages of Online Payroll – Simplifying Payroll Management

The Advantages of Online Payroll – Simplifying Payroll Management

Processing payroll can be complex, especially for businesses that continue to grow. This typically leads to more benefits, employees with different pay methods, and complicated tax filings. The good news is that there are ways to simplify payroll management. This will save time for HR teams and allow them to focus on revenue-generating tasks.

Automated Time Tracking

An excellent online payroll service will simplify tracking and recording employee time work, eliminating another opportunity for human error. This will save you hours of manual calculations and give you the peace of mind that your employees are being paid correctly and on time. The centralized data, systematic procedures, reuse of information, and automation of an online system will also save you time. This is a significant advantage for business owners who must focus on winning new customers and growing the company rather than spending precious resources on payroll tasks. Online payroll services also ensure that tax tables and compliance requirements are always up to date, as government regulations often change, resulting in fines for missed payments or late submission of returns. An online payroll system will also allow the payroll administrator and employees to access it remotely, meaning they don’t need to be at the office to perform their duties. It is an excellent solution for small businesses, especially those with mobile workers who need to keep tabs on their work from anywhere. In addition, a reputable payroll service will seamlessly integrate with your other workplace software tools, such as the time tracking program, so that you don’t have to spend extra time transferring records from one program to another.

Employee Self-Service Portal

As a business owner, you have plenty on your plate already. Managing payroll can be a time-consuming task that’s prone to error. Fortunately, online payroll services make the process much simpler and faster. A significant advantage of a web-based system is that it runs on computers, which are far more intelligent and accurate than humans. The software can easily calculate salary, benefits, and tax deductions in a fraction of the time it would take you to use a calculator. In addition, the software can instantly provide an audit trail and proof that all salaries were paid and taxes collected. Human errors are common, but a mistake that shortchanges your front-line staff could ruin morale in your workplace and lead to costly penalties. The people running online payroll services have their ears to the ground and are aware of changes in laws, regulations, and compliance requirements. That way, they can update their systems to avoid legal issues and ensure their client’s compliance. Additionally, the automated systems have validation programs that can catch mistakes before they’re saved. This reduces the chances of a miskeyed entry, which can be a big problem in the computing industry.

Single Source of Truth

As a business owner, you must know precisely what is happening in your payroll. You must ensure that no one has been shortchanged or even paid the wrong amount for their work. One disgruntled employee can damage your business’s reputation and destroy morale. With an online payroll service, there is a single source of truth for your data, making it easier to see the exact status of all salaries and payments. This is a massive advantage over traditional paper processes, which often have multiple documents and spreadsheets for different functions. The online system keeps track of the latest versions of all documents and ensures that any changes to an existing document are automatically reflected in the new version. It also prevents duplicate entries that are easy to make using a manual process. An online payroll service is an excellent tool for reducing the time you and your staff spend on administrative tasks. It also allows you to use your accounting and HR personnel for more revenue-generating duties, which helps to improve productivity. Most online services don’t require a specific accounting background to manage your payroll, which makes it possible to use your existing team and avoid hiring additional help. When selecting a reputable online payroll service, look for one with a support team available through messaging, email, or phone calls. This will allow you to quickly get any questions or concerns answered, reducing the risk of errors that could result in costly penalties.

Easy Mobile Access

In a time when organizations are shifting towards fully remote work configurations for employees, payroll processing systems must provide easy access to information and calculations to support this new reality. With online payroll systems, employees can access their salary and leave records on any device and in any location with Wi-Fi connectivity. This lets teams stay informed of employee data without sifting through paper files or manually updating spreadsheets. It also means that hours previously spent processing payroll can be invested in other revenue-generating activities. It also helps minimize the risk of costly errors that can damage morale and impact employee retention. There are a variety of cloud-based payroll software solutions to consider when searching for an online system that can simplify your payroll management. Look for one that provides world-class integration and automatic data synchronization to ensure seamless payroll processing. It should also include a digital signature capability, so all team members can quickly sign payroll runs and approve timesheets. Finally, look for a solution that will sync birthdays and payroll deadlines so that you can easily keep track of important dates and not miss any payments.

read more
Technology News

How to Open On-Screen Keyboard

How to Open On-Screen Keyboard

When you cannot use an external physical keyboard for Windows or a computer, the on-screen keyboard on Windows comes to your help. Generally, for several users, using an on-screen keyboard is the same as using a physical keyboard. However, for normal physical keyboards, there is a chance of getting broken or not responsive. We are fortunate that Windows has a visual on-screen keyboard that can be helpful when you can’t access the physical keyboard. Sometimes, you can find your devices infected with keylogger malware. In that case, malware can steal sensitive data input like login data or bank details through physical keyboard. A Windows on-screen keyboard gives you all the standard physical keys. Besides, you will be able to create visual keystrokes with & without tablet mode, with a mouse, and with selected key groups. To learn how to open on-screen keyboard, dig into the entire article.

What is an on-screen keyboard?

It is a standard input tool in Windows 7, 8, and 10. This tool allows you to navigate the system so that you can use text input without a classic keyboard. While you can use this with a touch screen, typing with a mouse or a game controller from your couch is also possible.

How to open on-screen keyboard:

Use Run Command Window:

Launching any file or program on Windows PC is the specialty of the Run command window. Therefore, you can use the tool to show the keyboard on the screen. The process to use the Run Command window is as follows:-

  • Your first task is to search for Run by going to the magnifying icon on your Taskbar. As soon as you will get to see the program, you need to click on it to launch this. Do you use a working keyboard? Then, your task is to open Run on your Windows by hitting Windows + R keys.
  • Now, you need to type ‘osk’ in the typing field and tap on Ok.
  • Based on the computer speed, you need to wait one or two seconds to open the On-Screen Keyboard.

Simply Search From the Start Menu:

Searching the tool directly from the Start Menu or the Search Icon is another process of showing the keyboard on the screen. The steps that you need to follow in this case are:

  • First, you need to head toward the Windows icon on the bottom-left corner of windows or select the Search icon near it.
  • Then, you have to type ‘osk’ or ‘keyboard’ or other related keywords on any of these tools.
  • As soon as you will get to see the On-Screen Keyboard option, launch this by clicking once.

If the start Menu is not working, you might face issues while launching other tools.

Directly Use the Keyboard Shortcut to open the on-screen keyboard. :

Use the dedicated Keyboard shortcut to launch the On-Screen Keyboard. In this case, your task is to simultaneously hit Windows + Ctrl + O keys. After that, the tool will pop up within a second.

Remember that the shortcut key is beneficial only if you use a working keyboard. Otherwise, the technique is not used when your device is not working properly or if you cannot hit the dedicated keys. Try the next methods to check if you can launch the On-Screen Keyboard.

From Windows Settings:

Windows features a section for On-Screen Keyboard in Settings. To know the process through which launching the tool is possible check below:

  • First, you need to tap on the Windows icon and then select Settings.
  • After that, you have to enter the Accessibility tab. Then, find the Interaction section by scrolling down. Now, you should select the Keyboard option.
  • Then, you need to head towards the On-screen keyboard, access keys, and Print Screen section. Next, you will get to see that the On-Screen Keyboard option is turned off. As soon as you turn on this, you can see the virtual keypad opening up on the screen.

Launch From the Installed Location:

When you navigate to the installed location, you will get an idea of where Windows stores the Keyboard file. You need to follow the steps to launch the tool from Windows File Explorer:

  • Your first job is to head toward the Desktop and double-click on This PC.
  • After that, you should go to Local Disk (C:) to open the Windows directory.
  • Now, you need to launch System 32 to scroll down.
  • At last, you need to find the osk application and double-click on it.

Alternatively, it is possible to copy & paste the location directly on the Windows File Explorer address bar to launch the On-Screen Keyboard:

C:\Windows\System32\osk.exe

From Ease of Access Center:

Opening the keyboard from the control panel is possible. Follow these steps to perform the procedure.

  • Your first job is to launch Run by hitting Windows + R keys.
  • Then, you need to type ‘control’ when you will get to see the dialogue box. Then, your task is to press enter to go to the Control Panel window.
  • After that, your task is to select Ease of Access.
  • Now, you should click on Ease of Access Center.
  • Then, you need to choose Start-On Screen Keyboard from the Quick access to the common tools.
  • Now, the tool will be opened up and you will be able to use this for different purposes.

Use the Windows Terminal:

If you work on a Windows terminal, you will be glad to know you can see a keyboard on your screen from Powershell and CMD. Follow the steps to do so:

  • Your first task is to launch Command Prompt from the Start Menu. Hit Windows + X keys to run Windows Powershell. Then, you should choose the Windows Terminal option.
  • If you use CMD or Powershell, your job is to enter the command osk and press Enter.
  • Next, you should wait for a second or so. Then, the On-Screen Keyboard will pop up on the screen.

Make a Batch File:

Creating a batch file is possible to load on-screen Keyboard on Windows. You need to follow these below-mentioned steps to show the keyboard on screen using a batch file.

  • Your first job is to open the Notepad from the Search Menu.
  • Then, you need to paste this location:

C:\windows\system32\osk.exe

  • Now, you have to open Save as the dialogue box. To do so, hit Ctrl + S keys.
  • After that, you need to choose an appropriate location so that you can open the file easily.
  • Give a name to the file but ensure that you add ‘.bat’ at the end. For instance, name it ‘osk.bat.’
  • At last, you have to hit the Save button.
  • Next, head toward the saved location and then double-click on the batch file to open up the On-Screen Keyboard.

Create a Shortcut Icon on Windows Taskbar:

When you create a shortcut icon on the Windows taskbar, you will be able to see the keyboard on the screen with just a single click. It eliminates the effort of hitting the shortcut keys for navigating a specific location to launch the On-Screen Keyboard.

The process to create a shortcut to On-Screen Keyboard manually is as follows:

  • First, your task is to tap on the screen anywhere.
  • Then, you should click on New and choose Shortcut.
  • As soon as you see the Create Shortcut window, your task is to copy & paste the following location:

C:\windows\system32\osk.exe

Otherwise, you need to tap on Browse and then your task is to select the same location.

  • Then, you need to tap on Next.
  • After that, give a name to the shortcut file & tap on Finish.
  • Now, Return to the Desktop and tap on the recently made shortcut file.
  • At last, your task is to tap on the Pin to Taskbar option.
  • Now, check if the On-Screen Keyboard shortcut is available on the Windows Taskbar. You need to launch the tool by tapping on this.
  • Alternatively, it is possible to search for the Keyboard from Search Menu. After that, tap on the tool and choose Pin to the taskbar.

Use a Third-Party Virtual Keyboard:

Those who don’t prefer an On-Screen Keyboard can download any 3rd party app from the internet. Thus, getting a customizable virtual keyboard with a few extra features is possible.

How to Open on-screen keyboard Windows 8:

To open Open on-screen keyboard Windows 8, check the below-mentioned steps:

  • You need to use your mouse to go to the bottom taskbar and then, tap on the free area.
  • After that, you have to head toward the “Toolbars” at the top of the menu you have opened.
  • Next, your task is to check the “On-screen keyboard” box.
  • Now, you will get to see the Windows on-screen keyboard icon at the taskbar’s bottom right corner. You can open this visual keyboard by tapping on it.
  • Tap on the keyboard icon again to close the keyboard. If you want to turn off the on-screen keyboard, tap the taskbar menu again. Then, you should uncheck the “On-screen keyboard” option.
  • Otherwise, you can also open the Windows on-screen keyboard by swiping inward from the screen’s right edge. Then, you need to type “on-screen keyboard” into the search bar and tap on this.

How can you activate an on-screen keyboard in Windows 7?

If you want to activate an on-screen keyboard in Windows 7, follow the steps mentioned below:

  • Your first job is to open the Start menu by tapping the Windows logo at the bottom left.
  • After that, you need to head toward the “All Programs” on the Start menu. Now, your task is to tap on it.
  • Next, you need to hit the “Accessories” and “Ease of Access” tabs.
  • Then, you should tap on “On-Screen Keyboard” to activate the visual keyboard.
  • If you want to deactivate the keyboard again, then you need to tap on the “x.”

Pin an on-screen keyboard to Windows 10 taskbar:

You can pin the on-screen keyboard to the taskbar in Windows 10 so that you can open it quickly.

  • Your first job is to type “system icons” at the Windows search bar’s bottom section & then you need to open the system icons menu.
  • You need to set the slider to “On” in the menu window. After that, you can see the on-screen keyboard pinned to the taskbar. So, it is possible to open this with just a single click.

The bottom line:

Now, we hope that you have understood how to open on-screen keyboard on Windows 10. Check the entire article to know different ways that can be followed to open the on-screen keyboard on Windows 10, Windows 7 & Windows 8. Still if you have any doubts or queries, do ask us via comments.

Frequently Asked Questions

 How do you resize the on-screen keyboard in Windows 10?

Resizing the on-screen keyboard in Windows 10 is not a simple process. In this case, you need to position the cursor at the on-screen keyboard’s corner. After that, you need to drag this to your preferred size.

How do you bring up the onscreen keyboard?

For bringing up the onscreen keyboard, your first job is to head towards Start. Then, you need to choose Settings. Next, go to the option Ease of Access. Then, click on Keyboard. After that, enable the toggle under Use the On-Screen Keyboard. You can now get to see a keyboard used to move around the screen & enter text. The keyboard will still be available on the screen until you close this.

How do you get rid of the on-screen keyboard on a Chromebook?

If you want to get rid of the on-screen keyboard on a Chromebook, first, you need to navigate to Settings and then choose Advanced, followed by Accessibility. After that, you need to select Manage accessibility features. Now, your job is to select Enable on-screen keyboard in the Keyboard and Text Input section to disable it.


read more
Technology News

The DIY Aspects Of Modern Technology That Can Make All Users An Expert

The DIY Aspects Of Modern Technology That Can Make All Users An Expert

The modern world of computing and Information Technology has developed remarkably over the last decade. It has now arguably arrived at a point in time where these advances have added an aspect, or level of do-it-yourself, to the tech that makes everyone who uses it and fully understands it to be somewhat of a tech expert. No matter your understanding or technique, the best tech now comes with an assortment of options and support services to make anyone an expert user in no time.

Open-source software

Open-source software is the one aspect of modern tech development that has definitely allowed the user to dictate or improve the software. The ability for the user to detect and spot errors and be in a position to rectify these is the main advantage that open-source software has. Furthermore, it can be used to design and produce sector-specific or even company-specific software solutions, as the user is able to make changes and improvements to the software to meet a specific business or functionary need.

Collaborative software

Software and IT systems that can be worked on or used by entire development and design teams in real time are now becoming the norm. A great example is the professional PCB design software, which allows the designers to provide input and make changes to the design of electrical components and PCBs in real time and as a collaborative team. The level of innovation and sharing of ideas in online and cloud-based design thus allows for those with the right design team and the right software to be able to produce top-quality and highly professional technology.

YouTube and How-to clips and videos

Whether it’s upgrading hardware or adding RAM to your IT system, these techniques and the skills to do this are now freely available on the internet. The understanding is that there is nothing that you will need to do in a tech environment or in relation to your IT that hasn’t been done already. The tech community also prides itself on being highly communicative and the establishment of help forums and online tech support communities that meet up to develop solutions to a myriad of problems and IT challenges. Whatever your tech problem, there will always be a solution available online.

Artificial intelligence (AI)

The ability for tech developers to use AI and machine learning based on huge amounts of data to craft solutions and produce reports on specific subjects and topics of interest is becoming the norm. In fact, it is beginning to be a common feature in higher education and high-end tech development that AI is used to provide the initial ideation and theory for tech and computer-based development.

There should no longer be any user phobias or the feeling that any tech is above or beyond your comprehension. The aspects noted herein can now make any level of user feel like an expert in their use and operation of the tech that now defines how people live and work.

read more
AppsDo It YourselfTechnology News

What is Mkv File? How to Open Files SKV File Extension?

What is Mkv File? How to Open Files SKV File Extension?

You may encounter MKV files when you download any video from the web or get any video from a person. These files especially appear when you download HD videos. It is not a popular video format like AVI or MP4. This one is often a puzzle where you have to find a process to play it. Let’s dive into this article to learn about mkv files like what is an mkv file, how to open it and so on.

What is an MKV File?

Mkv file is actually a multimedia container format instead of an audio or video compression format. With the help of this MKV container, it is possible to incorporate audio, video, and subtitles into a single file despite different encoding types being used by those elements. For instance, you can have a .mkv file which has H.264 video and MP3 or AAC for audio.

The primary purpose of the design of MKV container files was to make them future-proof. It means that these files will never be outdated. Many key features are included by the developers to make these things happen, like:

  • Fast seeking
  • Chapter, menu, and metadata support
  • Different chosen audio and video streams
  • Online streaming compatibility
  • Subtitle (hard-coded and soft-coded) support
  • Error recovery allows for the playback of corrupted files.

It is compatible with any audio and video format. Therefore, the format becomes simple to use & highly adaptive.

History:

These files are called Matroska Video files, originating in Russia in 2002. Lasse Kärkkäinen is its main developer who worked with Steve Lhomme ( Matroska’s founder) and a team of programmers for making the comprehensive multimedia container file format. The naming was done from the Russian word for Nesting Dolls, matryoshka.

Developers created the Matroska project, an open standards project. It indicates that this one is open source and free for everyone willing to use it personally. This company has several resources on their website, such as a list of playback options. The more time passed, the format got improved. Later in 2010, it became the basis for the WebM multimedia format.

How Can You Play MKV Files?

These files are not industry standard. Therefore, all media players do not support it though support has grown rapidly. There are several choices to play MKV files, which are as follows.

  1. Use VLC Media Player:

The preferable option, in this case, is using a VLC media player. You will like to use this mostly as it does not need you to install anything else, and it also comes with built-in support. Following the proper method, you can download & install the program easily. You need to start the process by visiting the official download page at videolan.org. Ensure that you are not going anywhere else, as many crapware vendors contain fake VLC download sites.

  • You need to run the file you downloaded for installing VLC. The whole process of installation needs up to two or three minutes.
  • Once you complete the installation, you can see any mkv file. Although VLC associates itself with all supported video & audio formats during the installation, it doesn’t register as a preloaded application for the file types.
  • If you want to watch an MKV file with this media player, you should first tap on the MKV file. Then, direct this to “Open With” and select “VLC Media Player.”
  • If you are willing to make VLC the default player for mkv files, tap on an mkv file, direct to “Open With,” and tap on “Choose Another App.”
  • You must choose “VLC media player” in the app selection window. Then, turn on the “Always use this app to open .mkv files” option, and hit “OK.”
  • Your task is to double-click an MKV file so that you can open this in VLC.
  • If you can not use the VLC player properly or it doesn’t suit you, use some suggestions from the Matroska website for Windows with built-in support.
  1. Use your mobile devices:

While on the move, you can get a chance to enjoy MKV videos & audio. When you are on the iOS platform, you can see the videos directly from the iPhone, iPad and iPod via the native PlayerXtreme Media Player. If you are an Android user, you should download and install the VLC’s mobile version or the Simple MP4 Video Player. Normal MP4 Player comes with a reader for other video formats.

  1. Download codecs for compatibility:

The media player can’t succeed at opening video files with an MKV extension. The reason is that it does not have the essential codecs to decide the file type. You should know that it is a viable option. So codecs let your media player decompress as well as play the MKV files.

You can turn the media player into an MKV file player, but remember that it can harm the PC. Ensure that you download codecs or other necessary software from the recommended sites. There are a few sites which hide crapware in famous software.

If you don’t know where to begin, navigate to Niite. It can offer free downloads devoid of any bloatware. When you go to Niite, you need to find a codec pack named Combined Community Codec Pack (CCCP). It can provide several codecs supporting many file formats.

If you are on the Niite landing page, your job is to choose the CCCP option. After that, tap on the “Get Your Niite” option. Then, the file starts downloading. As soon as it ends, you need to run this to install the codecs. You can select other apps from the site and install these, also. If you effect the changes, you should restart the PC. However, mkv files should mostly begin playing promptly.

  1. Converting to supported formats:

Sometimes, your MKV file reader does not detect mkv files despite downloading and installing the appropriate codecs. You can encounter an issue in your device that can lack the requisite resources to render MKV file formats. It is possible to convert MKV files to a format which hardware & software supports to solve the issue.

You can use a free video file converter to convert MKV files to other formats friendly to your device. It is possible to use the online version of some converters to save space on the device. However, ensure that it is not your first choice because video files are quite big. These take a lot of time to upload, convert and download the converted file.

You can use offline video converters when your device comes with ample storage space. But if there is no ample storage, it is possible to use external storage media, like thumb drives or external hard drives. Offline converters are cost-effective and fast enough because there is nothing to worry about bandwidth costs.

  1. Edit MKV files:

You can edit these files like other file types to apply changes you are willing to achieve. It is possible to include chapters & subtitles as well as delete them. Besides, you are capable of changing the video’s start & end points by trimming off unnecessary parts.

When you find a good video editor, your task is to start with the free versions first. There is nothing to pay for software if the free counterpart is capable of accomplishing as much. If you are willing, try MKVToolNix, a free program used for Windows, Mac & Linux. In most cases, free video editors suffer from major limitations. So you are unable to enjoy all the features.

How To Convert MKV Files?

Sometimes, any method you apply does not work. If so, try to convert the .mkv file to formats like MP4, AVI, etc. After that, play them on the preferable app.

1) Freemake Video Converter:

If you are a PC user, you may use Freemake Video Converter. This tool comes with a simple user interface. There are also many formats for output options.

It is the procedure following which you can convert MKV to MP4 or AVI with Freemake Video Converter:

  • Your first job is downloading and installing this tool in your system.
  • After that, you need to hit the +video button. Now, you should add this MKV file. It is also possible to drag and drop the file.
  • If necessary, edit the video.
  • The software comes with a default editor to cut, rotate, or join videos.
  • You can choose the output format, likely AVI or MP4.
  • While it is possible to choose from a ready preset, you can also custom-create one.
  • Tap on convert so that you can transform the MKV file into the selected mkv file format.
  • You can get a converted file in minutes and see it offline or upload it.

2) Handbrake:

Do you want to know how to open these files on Mac? If you are a Mac user, you can use Handbrake. Compared to the previous one, this one is a little complicated. However, it is not so hard to use.

Converting MKV file to MP4 or AVI is possible with Handbrake in the following way:

  • Your first task is to download Handbrake and install it on Mac.
  • Then, you should launch this.
  • After that, you must navigate to the Open Source button to add files or drag and drop the .mkv file.
  • You need to choose the output format, especially MP4, and a ready preset if you need this.
  • After that, your task is to head towards the Audio and Subtitles tabs so that you can choose the tracks to keep for future files.
  • It is possible to customize Codec, Framerate, bitrate, etc.
  • You should tap on Start to run the process of conversion.
  • After that, you will receive the converted MKV file.

3) CloudConvert:

Follow these steps to Convert MKV to MP4:

  • You need to open its website first and Signup.
  • Then, head toward Convert.
  • Choose MKV in the first box, and in the other box, you should choose MP4. Using this is possible to convert MP4 to MKV.
  • After that, head toward the Select File option. Now, choose the file that you are willing to convert.
  • It is possible to customize the Options.
  • Tap on Start Conversion.
  • Finally, your file is ready for downloading.

4) Wondershare Uniconverter:

All Media Player fans have to convert the MKV file to a format which allows to open & play this because Media Player doesn’t support MKV format. With the help of this tool, you can convert MKV File To Media Player Supported format for both Windows and Mac.

  • First, you have to launch the mkv file converter.
  • Then, hit the Add File icon on the toolbar.
  • After that, you should navigate to the folder with your MKV file.
  • Tap on Open to import the file. Otherwise, you can drag and drop the file.
  • Now, head toward the Output Format option.
  • Once you see the dropdown menu, choose a format that Media Player supports, such as WMV.
  • Hit the Start All button to begin the conversion.
  • You can receive that file in the format you have chosen. Open this thereafter in the Media Player.

It is possible to use the free trial version. However, it is not so helpful. If you want, purchase its Annual Plan for one year, one PC at $29.95. Otherwise, choose its Perpetual Plan, one PC for a lifetime. You can purchase this at $45.96. If you want a business plan, buy it at $161.91 for 2 Pcs. Remember that the cost can vary if you want more than two PCs.

Conclusion:

A few files use the same file extension though the formats are not related. They appear to be for similar-looking suffixes. For instance, files which are available in the MKA format are Matroska-related audio, without video. You can use Matroska 3D video files (MK3D) for stereoscopic video.

Frequently Asked Questions

How do you extract subtitles from MKV?

Downloading the MKVExtracGUI-2 special MKV subtitle extractor tool can extract subtitles from an MKV file. With the help of the tool, you can import an MKV file. After that, you have to choose the subtitles to extract. The program can extract the files in ASS or SRT format on the PC.

How do you burn MKV files to DVD?

Your first task is to convert the file to a supported file format with the help of Freemake Video Converter or any other program. As soon as the conversion is complete, you need to burn that new file to a DVD. You may use BurnAware Free and WinX DVD Author in this case.

Is MKV a better format than MP4?

We know mkv for converting DVDs and Blu-Ray discs to video files. Most people prefer to use MP4 to play videos on a browser. Besides, this one has less file overhead. Each one is better for some uses, whereas not so good for others.


read more
AppsDo It YourselfTechnology News

What is lockapp.exe on Windows?

What is lockapp.exe on Windows?

If you power on your Windows PC, you can encounter several hidden system services and processes. How the windows will appear on the screen depends on these processes. Besides, these determine the way of accessing your local network & connected devices, signing into Windows, etc. Your PC will not work without them. lockapp.exe is one of these unusual processes you could encounter in Windows 10. It is the reason for drawing part of the lock screen, which you view before signing in.

What is LockApp.exe on Windows?

LockApp.exe is a crucial Windows file that overlays a graphical interface over the locked screen while your PC becomes idle for a long time. Before logging in, you can view the overlay screen. When you check Task Manager, the file can be seen running in the background. This file shows a beautiful background picture with the date & time when the screen is locked. Let’s dig into this article to learn about LockApp.exe.

What Does LockApp.exe Do?

It can make a beautiful graphical user interface used to overlay over the locked screen in Windows 10. Elements offered by the graphical user interface of LockApp.exe are as follows:

  • A background image
  • Date and time
  • Quick notifications
  • Preferences set by you to show on screen
  • Controls to shut down or restart
  • Network internet access status

Remember that you can execute this only when you are signed into your system and your PC is idle for a long time. Additionally, tap on Windows + L to manually execute this to lock the screen. Remember that the file process remains suspended the rest of the time while the PC is active.

How Much System Resources Does LockApp.exe Use?

You may wonder if it uses so many resources from your system or not. Sometimes you can find it running in the background, because of which the PC can be awake for a long time. It can consume only  12 MB of memory in the idle stage of the computer when the file’s process remains active.

If it’s not active, consumption goes down significantly. It indicates that your pc needs only 48 KB of memory when you work on a computer and when no lock screen is active. So, it can be said that LockApp.exe is a lightweight application.

Where is LockApp.exe located and what is its File Size?

People using Windows 10 can find this file in the “C:\Windows\SystemApps\Microsoft.LockApp_cw5n1h2txyewy ” location.

Then, you should tap on the file to check out the properties for further details. Around 3.41 MB is the file size.

Can LockApp.exe Be A Virus?

This one is a legitimate program and safe to use. Windows users did not complain & Microsoft Corporation has signed this digitally. There exist no suspicious activities linked with LockApp.exe.

As it is an executable file, hackers are capable of imitating the file to attack the system. You can check easily if this one is a virus or not. These are the steps you should follow to check this.

  • First, your task is to tap on Ctrl + Shift + Esc keys together to launch Taskbar.
  • After that, you have to navigate to the Details tab, where you can see all running files in the list. Then, you need to find LockApp.exe.
  • Now, you have to right-click on the file to select the Open the file location option.
  • Once you see this in C:\Windows\SystemApps\Microsoft.LockApp_cw5n1h2txyewy, ensure that it is safe.

If you find the location different, it may be spyware or a virus. That’s why it is recommended to use an antivirus program and run a full system scan. With the help of Windows Defender, you can perform a full system scan. These are the steps you should follow:

  • First, your job is to tap on the Windows + R together and type “ms-settings:windowsdefender”.
  • Next, you should hit Enter.
  • After that, your task is to choose the Virus & threat protection option.
  • At last, go for “Scan options” and choose the Advanced scan option.

Common Errors Regarding LockApp.exe

Here, we are going to mention some common Errors Regarding LockApp.exe:

  • exe – Bad Image.
  • exe Application Error.
  • exe could not be found.
  • exe could not be installed.
  • exe could not be launched. Class not registered.
  • exe could not be started.
  • exe failed to initialize properly.
  • exe has encountered a problem and needs to close. We are sorry for the inconvenience.
  • exe is not a valid Win32 application.
  • exe is not running.
  • Cannot find LockApp.exe.
  • Error starting program: LockApp.exe.
  • Faulting Application Path: LockApp.exe.
  • The file LockApp.exe is missing or corrupt.
  • Windows failed to start – LockApp.exe.

If you are willing to troubleshoot the error, it becomes essential to find the source of the file. In most cases, the error occurs during startup. So users can face a runtime error when they use Microsoft® Windows® Operating System. Hence, the reason may be poor programming on behalf of Microsoft Corporation, conflicts with other software or 3rd-party plug-ins, or outdated hardware. The error also occurs when you delete them accidentally or a malware corrupts them. Therefore, you need to confirm that your antivirus is updated and scanned daily.

 Is the LockApp.exe Process Safe?

Till now, there is no complain of viruses or

other malware which fakes themselves as the LockApp.exe process. It is possible if the location of the process is C:\Windows or C:\Windows\System32 folder. Usually, malicious programs tend to imitate legitimate system processes to blend in.

So, go to the Task Manager and start checking this by following the steps.

  • Your first job is to hit the Start button, and then you need to select the Task Manager.
  • After that, you have to head toward the Details tab. Tap on the LockApp.exe process to select the Open file location.
  • Next, the File Explorer window will open. Then, check if the location of the process is: C:\Windows\SystemApps\Microsoft.LockApp_cw5n1h2txyewy.
  • If you find the process in another folder, it may happen that malware is running on your computer. We advise you to run a system scan to detect malware with the help of Windows Defender or other antivirus software.

How to fix the lock screen in Windows 10?

The lock screen is directly linked with the LockApp.exe process. Therefore, it may happen that some system files are corrupted. You can follow these two ways to fix the lock screen in Windows 10.

Install Windows updates:

Installing pending Windows updates will fix the problems by replacing old corrupted files with new ones.

  • If you are willing to update the operating system, you should head toward Start Menu -> Settings -> UpdateSecurity -> Windows Update.
  • Then, tap on Check for updates on the right. You can find your system scanning for pending updates.
  • If you find any updates, it will start downloading and installing them automatically. You should reboot the PC when asked to and see whether the lock screen has been fixed or not.

Scan for corrupted system files:

Windows 10 usually has a default tool to troubleshoot system files that may have been corrupted. With the help of the System File Checker (SFC), it can repair corrupted system files that are redundantly available on the computer.

  • If you are willing to perform the scan, you must open Windows PowerShell with administrative privileges. After that, you need to run this command: sfc /scannow
  • You should wait some time to run the command completely and scan the PC.
  • As soon as it is completed, you need to restart the PC. Finally, check if the lock screen starts behaving normally or not.

Restore computer back to the latest restore point:

You should follow these steps to start System Restore (Windows XP, Vista, 7, 8, and 10):

  • Your task is to press the Windows Start button.
  • As soon as you see the search box, your task is to type “System Restore” and hit “ENTER”.
  • Now, look for System Restore in the search results.
  • After that, your task is to enter the administrator password once prompted.
  • You should now follow steps displayed in the System Restore Wizard to select a relevant restore point.
  • Finally, your task is to restore the PC to that backup picture.

Uninstall Microsoft Office Access 2010 (or related software) and reinstall:

By following the steps or instructions of Windows XP, Vista, 7, 8, and 10, it is possible to uninstall Microsoft Office Access 2010 software and later try to reinstall this.

  • Your first job is pressing the Windows Start button.
  • Once you go to the search box, you are required to type “Uninstall” and hit “ENTER”.
  • When you see the search results, you need to look for the “Add or Remove Programs” option. Once you find this, you need to tap on it.
  • After that, you have to look for the entry for Microsoft Office Access 2010 14 and tap on the “Uninstall” option.
  • Now, your job is to uninstall this by following the prompts.
  • Once you uninstall the software completely, your task will be restarting the PC. Then, try to reinstall Microsoft Office Access 2010 software.

How to Disable lockapp.exe on Windows 10?

The process is not as important as dwm.exe and other critical processes. When you try to disable this, it will direct you in the login prompt.

  • If you are willing to disable the process, tap on a new Windows Registry entry. You need to tap on the Start menu to do this and choose Run.
  • Then, you have to type regedit in the Run dialog box. After that, you need to choose the option: OK.
  • You can use the registry editor to find the HKEY_LOCAL_MACHINE\SOFTWARE\Policies\Microsoft\Windows\Personalization key. If you can’t find it in this location, tap on the Windows key to create this. After that, you should choose New > Key. As soon as you create the key, tap on the white pane on the right. Then, you should choose the New > DWORD (32-bit) value from the list. Next, you have to name the new value NoLockScreen.
  • Tap twice the new value. After that, your task is to type 1 in the Value data box. Then, you should choose OK to save.
  • As soon as it is saved, the lock screen overlay will get disabled and LockApp.exe will not be activated. You will see the sign-in prompt when you lock your PC again or sign in —— the overlay will not appear.

How to Configure the Lock Screen?

It is possible to configure the lock screen that permits you to include certain notifications, like the number of unread emails in your inbox.

  • If your job is configuring the screen, you should use Windows Settings.
  • After that, you need to tap on the Start menu and choose Settings to begin.
  • When you open the Settings menu, choose Personalization > Lock screen. Then, your task is to change the lock screen background. Then, see “quick status” notifications like your calendar, inbox, news app, etc., to add other apps.

The bottom line:

In this article, we have covered everything that you need to know about LockApp.exe, such as what is lockapp.exe on Windows 10, how to check if the file is safe, how to disable this to save CPU & GPU usage, etc. However, if you don’t have a shortage of CPU usage, there is no need to disable it because it is a vital part of the graphical interface of Windows 10.

Frequently Asked Questions

 What is the LockApp exe process?

It is a Windows system component that displays the lock screen.

Why is LockApp exe using GPU?

It can happen if you set the Lockscreen to keep changing the wallpaper or keep the PC awake for a long time as you have not configured the monitor or PC sleep time.

Why does Lock Screen Keep consuming resources when the PC is idle?

It is essential to look into GPU Software. Then, select Windows to let it change settings instead of the driver doing that to reduce the usage. The reason is that rather than the driver, windows will decide everything.


read more
InternetSoftwareTechnology News

What is AAE File Extension?

What is AAE File Extension?

Several Apple users can see AAE files after sharing edited images from one device to such a device which is running a different OS-based device. Have you encountered this problem also? Do you want to know what is a .aae file and which step you should take? Then, check this article.

 What is an AAE file extension?

AAE file refers to the record of all edits made to a picture by a person in the iOS version of Apple Photos. People can use this to share edits from iOS to macOS. Besides, reverting the pictures to the original form is possible when necessary. These files remain stored alongside the pictures whose edits they contain.

What Does AAE Stand For?

According to some people, these originated with the Apple Aperture photo management application on Mac. For a non-destructive editing system, it used XML sidecar files. Hence, you need to know about the term which stands for “Apple Aperture Edits,” “Apple Aperture Extension,” etc. Apple introduced the files first in iOS 8 and Mac OS X 10.10 Yosemite in 2014. They announced the discontinuation of Apple Aperture & iPhotodflr, the new photos app.

More Information:

Photos app makes these files in iOS 8 and later and macOS 10.10 and later. These files save edits that are created in Photos. Therefore, original pictures of the user aren’t overwritten when edited.

If you open an edited .JPG file in the Photos app, it will indicate the linked AAE file of the JPG & apply edits it contains. Data of the AAE file is saved in the XML format. It indicates that you can open the files & see them using a text editor like Apple TextEdit or Microsoft Notepad.

Photos app makes a unique XML file with an AAE file extension every time you will edit an image. This extension contains information on the edits made to an image to allow original pictures to retain without any changes. Moreover, you will be able to undone the edits at any time.

The iPhone stores these files alongside the images. Therefore, for instance, if you share the images from an iPhone to Windows, you can see a file called “IMG_0026.AAE” and it will match another file called “IMG_0026.JPG.”

Can you delete AAE files in Windows?

While importing images edited with the help of the Photos app to Windows or the old version of mac OS, you can see AAE files accompanying the photos. If you use Windows, you will see the .aae extension hidden by default. But the names of AAE files remain the same as the JPG files whose edits they contain. Once you share images into Windows, deleting pictures’ AAE files is possible without erasing the connected pictures.

How Do You Open an AAE File in Windows?

This one is an XML formatted file, so you can open it on Windows or Android. Although it does not function in Windows, the file can still be viewed. Check this below-mentioned procedure to learn how to open an AAE file in windows 10:-

  • Your first task is to tap on the “AAE” file.
  • Now, choose “Open with” from the dropdown menu.
  • After that, your job is to select a text editor to open the file. Use Notepad or Microsoft Word in such cases.

Although users open the files in a text editor or on Windows or Android devices, applying changes to the corresponding JPEG file is impossible.

AAE File Format:

These are saved as XML files, human-readable file format, to disc. Therefore, you can open this in text editors like Apple TextEdit on macOS and Microsoft Notepad on Windows OS. You can use Notepad++ to open AAE files.

Opening an edited JPG file in the Photo app will read the change log from the respective .aae file. Next, it will apply edits to the image before showcasing this to the user.

Do you Need to Save AAE Files?

People planning to keep iPhone photos permanently on a platform that is incompatible with the Apple Photos app, such as Windows or Linux, should not save these files.

Conclusion:

Do you want to open the files later on a Mac, iPhone, or iPad? If so, then you need to keep these AAE files with the original photos in the same directory. The Photos app can read them.

Frequently Asked Questions:

Can you Delete AAE Files From iPhone?

Remember that these files are essential if you want to apply any change to the original images on your iPhone. Deleting the files allows the corresponding edited picture to return to its actual condition. As these files are not so big, they will not consume too much space. However, if you want to save space, you can convert AAE files to JPEG. Then, you should delete the AAE file.

How Do You Open an AAE File on iPhone?

These files can be analyzed automatically on Apple devices that run on the latest versions of iOS or macOS. There is no need to open the files. You can use a text editor program. The similar thing is applicable to Windows, Linux, or Android devices.

What is the AAE file?

It is a unique file type used by Apple Photos to keep track of changes you make to the images.

read more
Do It YourselfInternetSoftwareTechnology News

How to Fix File Explorer Not Responding Windows 10

How to Fix File Explorer Not Responding Windows 10

Windows Explorer is the basic way through which you can navigate into your System. With the help of Explorer, you are capable of seeing, accessing, & managing all files on your device. But sometimes, the explorer does not respond, or it gets frozen or won’t open. Therefore, you will encounter several issues when you try to use your PC. When it doesn’t respond, you will no longer be able to interact with the app’s interface. Let’s see how to fix file explorer not responding windows 10 problem.

What Is File Explorer?

File Explorer, known as Windows Explorer is a default application in Microsoft Windows operating system. The graphical user interface enables users to access & manage drives, folders and files.

What causes Windows Explorer not to respond to errors?

No specific reason exists which could be the origin of the disturbing problem. Depending on user reports, it can be said that several causes can lead to this error.

  • Ensure that your File Explorer history is cleared. The history of File Explorer can be clogged, resulting in Windows Explorer behaving incorrectly. Try to clear the history. We have mentioned later how to do this in the solution section.
  • If there is any change to display settings like the font size, the issue can appear. Have you changed the settings recently or allowed an app to change them? Then, remember that reverting is the most effective way to do so.
  • If you use an outdated Windows 10 version, it can cause you the problem. Therefore, you must update the windows. The new update always comes with new bugs, which sometimes irritates you. It can patch up multiple existing problems and security holes. Ensure that you update to the latest release of Windows 10 if you run its older version.
  • File Explorer cannot work properly when your System drive runs out of space. Hence, it is essential to create some space to make windows explorer functional.

Solutions to resolve File Explorer not responding windows 10:

Solution 1. Restart File Explorer in Task Manager:

  • Your first job is tapping Ctrl + Shift + Esc to start the Task Manager.
  • After that, you need to tap on Windows Explorer in Task Manager. Then, you should select the End task.
  • Next, your task is tapping File on the upper left corner. Now, you should select Run new task.
  • Now, you have to input explorer.exe in the box. You should tap on Enter thereafter.

Thus, windows explorer can restart. Finally, check if the file explorer is not responding Windows 10 problem has been fixed or not.

Solution 2. Manually Restart the Explorer.exe Process via Command Prompt:

 According to some people, it is possible to restart file explorer through Command Prompt commands. If you are unable to launch file explorer normally or facing the windows explorer not working issue, restarting the explorer.exe process is possible with some easy commands.

  • You should go to the Windows 10 Cortana box and input cmd in it. Then, you have to tap on the most suitable match to open the Command Prompt window.
  • Next, input taskkill /f /im explorer.exe in the CMD window. Then, you need to tap on Enter. Once you apply the command, you can end the explorer.exe process. Then, a blank screen will appear behind the Command Prompt window.
  • You should type start explorer.exe in Windows for starting the procedure again. Therefore, tap on Enter.

Now, you can see desktop icons, Taskbar, etc.

Solution 3. Run System File Checker Scan:

It is a default tool to scan for corruption in Windows system files and restore corrupted files. Sometimes, your drive’s corrupted files can be behind the problem. Several people say that performing System File Checker scans allows them to fix the problem. You should try the scan to see if the process works.

  • Enter cmd into the Cortana search box of Windows 10. Then, you need to look for the most suitable match and tap on it. Then, you should select Run as Administrator.
  • Now, your task is to input sfc /scannow and tap on Enter.
  • Once the scan completes, try to restart the PC to check if the problem has been fixed.

Solution 4. Clear File Explorer History:

⅘ th of the users encountering the problem said that clearing its history can help you to fix the issue. If you have tried the above fixes and can’t resolve the issue, you must try this.

  • Your first job is to type Control in the Cortana search box of Windows 10. Thereafter, tap on the Control Panel from the Best Match result.
  • Now, your job is to look for File Explorer Options from the interface. Then, you need to tap on it.
  • Next, tap on Clear. After that, you have to tap on OK so that you can clear File Explorer history.
  • Finally, you should again try to open file explorer.

Solution 5. Change Display Settings:

The display setting usually doesn’t have any relation with the file explorer not responding Windows 10 problem. However, it can affect your PC if not configured to the recommended sizes of text, apps, etc. In this it needs to be mentioned that the screen’s unaccepted size & text can crash the file explorer.

  • Your first task is to hit the Windows Start button and select the settings. After that, select System while the interface of Windows settings will appear.
  • If you are on the Display Panel, you should try to change the text size to 100% or reset the size to the Recommended Point.
  • Finally, you need to check to see if File Explorer is accessible.

Solution 6. Extend System Partition If It Is Full:

 You can encounter an error when the system drive doesn’t have sufficient space. Hence, using third-party software is possible to extend the partition. You can use any famous partition manager that can offer better performance than the Windows default Disk Management and using which you are capable of extending partitions, formatting partitions, resizing partitions, checking file systems, converting MBR to GPT without data loss, etc. Additionally, changing cluster size, copying the disk, and converting NTFS to FAT are possible.

Solution 7. Create a New User Account:

 You should create a new user account to deal with the problem. As soon as you create a new account and log into this, you will see the Windows 10 File Explorer working normally. People with one user account on their computers need to follow Microsoft’s instructions that let them generate another new local user account. Now, check if file explorer is working or not.

If you use a new account, it allows you to remove the currently used files in Quick Access. If you fix this issue following this process, you may try to move all data from the old account to your new account. But there exists an issue that you might have to reinstall a few applications for a new account.

Solution 8. Keep Windows 10 updated to the Latest Version:

 Ensure that your Windows is running its latest version. If not, we recommend you upgrade this to the latest version. Microsoft can resolve popular problems like file explorer not responding Windows 10 via updates.

  • Your first task is to tap on the Windows Start menu and select Settings.
  • After that, you need to select Update & Security once you get the Windows setting interface.
  • Tap on Windows Update. Next, you should hit the Check for updates button for installing the latest updates.

Solution 9. Restore Windows 10 to an Earlier Date:

 Is the System Restore feature active on your PC? If so, you have to restore Windows 10 to a previous date when it was offering smooth performance. You must follow these steps to restore your operating system to an earlier date when Windows Explorer usually works.

  • Go to the Cortana search box of Windows 10 and type create a system restore in it. Then, you are required to select the best match for opening System properties.
  • Tap on System Restore in the System Protection section. Disabling the System Restore greys out the System Restore button.
  • At last, your task is to follow the instructions on the screen. Then, you should choose a restore point for the System’s restoration to an earlier date when it works accurately.

The bottom line:

These nine solutions can help you to resolve the file explorer not responding Windows 10 issue. You need to try each method individually to check if the problem is resolved or not.

 Frequently Asked Questions

What do you do when Windows Explorer is not responding?

You can try to clear the history of file explorer to deal with the problem. Hence, your task is to open the Control Panel. After that, your task is to set the view by large icons. Now, tap on File Explorer Options from the interface. Hit the Clear button. Then, tap on OK to clear Windows Explorer history. Finally, you should try to open file explorer again.

How do you fix File Explorer problems in Windows 10?

 These are some methods that you can try to deal with the problem, and these are as follows—

  • Restart File Explorer in Task Manager
  • Manually Restart the Explorer.exe Process via Command Prompt
  • Run System File Checker Scan
  • Clear File Explorer History
  • Change Display Settings
  • Extend System Partition If It Is Full
  • Create a New User Account

What to do when File Explorer stops working?

 If it happens, you need to restart windows expo via Task Manager. Now, your task is to hit Ctrl + Shift + Esc so that you can start Task Manager. Then, you should look for File Explorer in the Task Manager and select End task. Next, you need to tap on File in the upper left corner. Then, your job is to select the option Run new task. Now, you have to type explorer.exe in the box. Restart this immediately by hitting Enter.


read more
AppsDo It YourselfInternetTechnology News

How to Fix Hot, Dead or Stuck Pixels on Your Screen

How to Fix Hot, Dead or Stuck Pixels on Your Screen

Millions of pixels comprise all display devices. The pixels are responsible for changing colors as per the projected image. But it can die or get stuck sometimes, and you will see a dark spot on your display. People wrongfully call a stuck pixel a hot pixel, also. Basically, you can see hot pixels only in digital cameras when any electrical charge leaks into the sensor wells of the camera. If it comes to talk about a dead pixel, all the sub-pixels remain permanently off. As a result, the pixel looks black. It may happen due to a broken transistor. Are you seeing a colored or white pixel? Then you can fix it. But if you are seeing a black pixel, then the chance of getting fixed is low.

How to Fix Hot, Dead or Stuck Pixels on Your Screen

Let’s see how to fix a dead pixel on your monitor or smartphone.

What are Dead or Stuck Pixels?

A Dead or stuck pixel refers to a fixed spot on display. These are pretty harmless and not permanent. Compatibility problems with software apps, technical errors, or manufacturing defects can cause the problem. Generally, a stuck pixel is green, red, or blue. On the other hand, a dead pixel is black.

How are dead/stuck pixels an issue for the users?

Sometimes stuck or dead pixels remain in a corner, and we think they won’t grab our attention, but it does. Therefore, they can irritate you and take away your focus. In addition, these can point to a more serious issue like monitor failure.

What causes dead pixels?

A manufacturing defect is the most common problem. In addition, any physical damage to the display device may damage your laptop’s one or more pixels.

Will dead pixels go away or spread?

These don’t usually spread. If these do spread, you should replace the screen. Otherwise, you can hire a specialist. You can see the portions permanently malfunctioned, resulting in these not going away with time.

How to Test New Screens for Stuck or Dead Pixels

Testing a new monitor for a bad pixel is essential, and it could be done by running your screen through a palette of basic colors. Moreover, you need to run the screen black & white in full-screen mode with the help of the EIZO Monitor Test.

  1. EIZO Monitor Test:

With the help of this online tool, you can find stuck pixels and eventually fix them. It includes a wide range of options and makes all of these available in a single test window. However, as soon as you learn a basic idea about this, you can use it easily.

If you are willing to test the screen, you should check all those boxes which you need to include in your test. It is recommended to go with the default setting, where you need to check all boxes. When you test many monitors, opening the test is possible on an extra monitor. Once you are ready, you should tap on Start test so that you can launch the full-screen test window.

Now, you can see the first test pattern. Every display has an explainer in the bottom right detailing what you need to find. After that, a menu will be available, allowing you to move from one test to the next on the left. After moving through the black & white screens and solid colors like green, blue, and red, you need to check the screen. If you want to exit, you should hit the ESC key. Otherwise, you can tap on the exit symbol in the top right corner. If you find a bad pixel, it is recommended to use UDPixel or JScreenFix to flash it.

  1. Online Monitor Test:

Performing the thorough test not only helps you to identify bad pixels but also lets you test your monitor quality. Most browsers don’t support Flash. However, you can make it a try and use it with the executable version to make this functional.

Selecting between three different modes is possible to test the screen. Once you run the executable, you can see the screen differently.

Your task is to take the mouse to the test window’s top portion. Then, you can see a menu appearing. After that, you can see an info window which you can turn off with a button in the menu’s top right corner. Now, you should tap on the Homogenuity test point. Then, you must move through the three colors and black & white.

How to Fix Dead or Stuck Pixels:

It is not possible to fix a dead pixel. However, if you want to fix a stuck pixel, you can try this process mentioned below-

  • Your first task is to detect dead or stuck pixels and to do so, you need to see your monitor in different color palettes.
  • After that, to fix that pixel, you should use a third-party tool that flashes the pixel with many colors. Using UDPixel (Windows) or LCD (online) is recommended.
  • Finally, you should try a manual process where you must use a damp cloth to rub the stuck pixel, or you can use a pointy. In this case, make sure that you are using a soft item, like the rubber/eraser at the pencil’s end.

Tools that you can use to Fix Hot, Dead or Stuck Pixels on Your Screen:

  • JScreenFix
  • Pixel Doctor Pro
  • Aurelitec PixelHealer
  • Rizonesoft Pixel Repair
  • Dead pixel
  • Filehorse Pixel Repair

What to Do If You Can’t Fix Your Stuck or Dead Pixel?

If you make all the attempts to remove the bad pixel and nothing works, you should make peace with it. An ugly pixel will not break the screen, and soon you will forget about this matter. But when the defect affects more than one pixel, you should replace your monitor. You should check the warranty. Sometimes, the marketplace from where you bought the product covers dead pixels.

The Bottom Line:

If you want to detect any stuck pixel, you can take help from a few online monitoring tests or third-party apps & tools. You can see some ways mentioned in this article, along with some effective tools that you can try. If the tools don’t work, you should follow the manual guide. But when nothing works, you may need to take your device to a hardware engineer.

Frequently Asked Questions:

Do stuck pixels go away?

No. However, these pixels are temporary. You may need to attempt a few effective ways to remove them.

Can all stuck pixels be fixed?

These pixels are seen in colors except black or white. A few methods can help you to fix the problem. But if the pixel is dead, you can’t fix this. However, if you fix a stuck pixel somehow, you should know that the fix is not guaranteed.

Can hot pixels be fixed?

You should apply pressure on the screen where you have seen the stuck pixel. Ensure that you don’t apply pressure anywhere else because it can increase the production of more stuck pixels. When you apply pressure, you should power on the PC and screen. Then, you need to remove the pressure. We hope that then you will not get to see the stuck pixel anymore.

read more
1 2 3 4 20
Page 2 of 20